Overview of the Group Events Entry Page
The Group Events Entry page provides features that enable you to simultaneously add new event data to selected member records. Additionally, you may, on occasion, find that you want to make the same change or changes to the event data in member sacrament records. Using group events entry process, you can quickly update those records simultaneously instead of editing them one at a time.
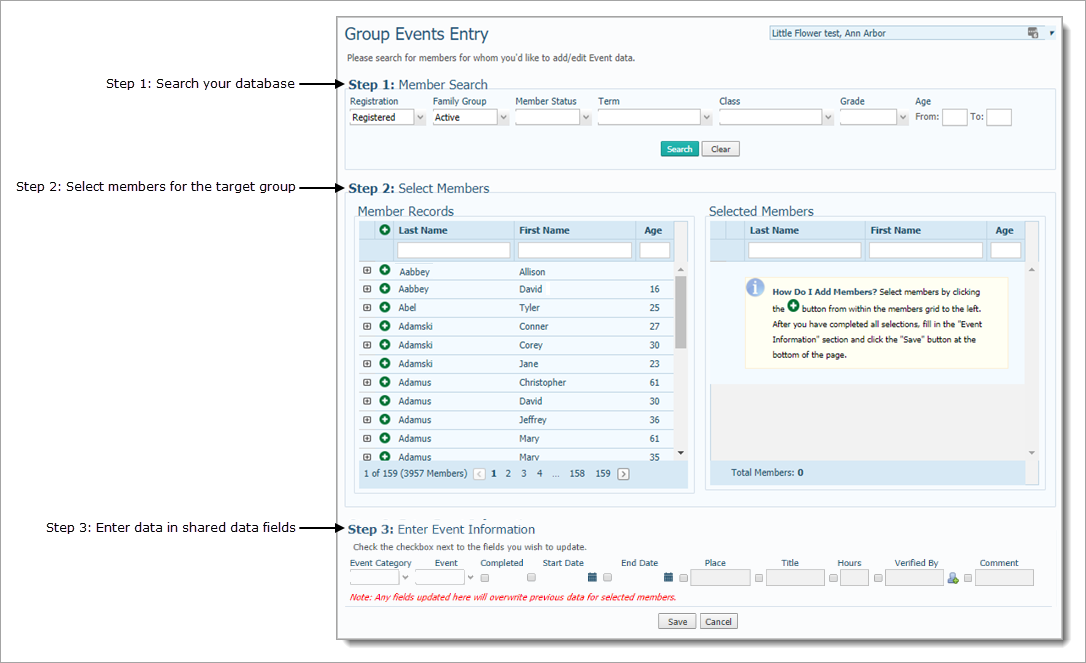
The group events entry process is easy to use. To help you enter your data into the system, the Group Events Entry page walks you through the three-step process:
Search your database
Use the filters to search your database to find the member records you want to work with. The remaining steps in the process are performed on the result set of this initial search.
Select members to include the group
Select members in the results set to identify those for whom you either want to add new event data or edit existing event data. The members you select in Step 2 comprise the target group.
Enter event data
Select the desired data fields and supply the information you want to enter. When saved, the system updates the information in all of the records in the target group.
Permission assigned to your login credentials for ParishSOFT Family Directory determine the actions users can perform on Life Events data. The following table lists the permissions that can be granted to users and their associated actions.
This Permission ... |
Enables you to... |
| View | View existing life events data. |
| Add/Edit | Add new event data to members' records. Change existing event data in members' records. |
| Delete | Remove life event data from members' records. |
Generate a Census > Life Events report. |
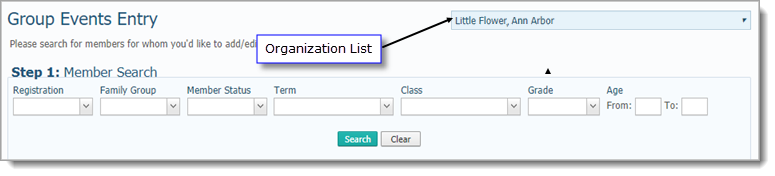
The organization associated with your ParishSOFT login credentials automatically appears in the Organization list, which is located in the upper-right corner of the Group Events Entry page.
● If you manage multiple organizations, select the organization you want to work in.
● If you want to work in all of the organizations you manage, select All Organizations.
Only the organizations for which you have access rights and permissions to view are displayed in the Organization list.
![]() If
you are returning to the Group Events Entry
page from another page in the application, be sure to check which organization
is shown in this box. The organization defaults to the one selected when
you last visited the page.
If
you are returning to the Group Events Entry
page from another page in the application, be sure to check which organization
is shown in this box. The organization defaults to the one selected when
you last visited the page.
The illustration below identifies the Search fields on the Group Events Entry page. Place your mouse pointer over a link (without clicking) to view a general description of an element. Click the link to jump to the section on this page that gives you more detailed information about the element you clicked on.
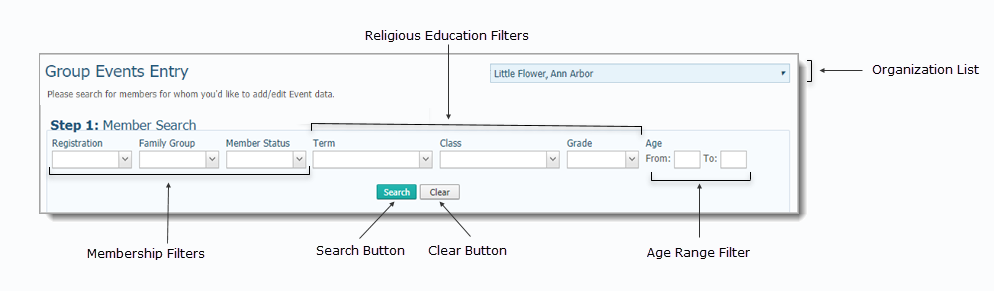
Use the filters to conduct a search of your database to find members matching your search criteria The filters are described in the following sections.
![]() If the Religious
Education search filters are not available, either you do not have the
appropriate permissions tied to your login credentials or your organization
is not licensed to use the Religious Education module.
If the Religious
Education search filters are not available, either you do not have the
appropriate permissions tied to your login credentials or your organization
is not licensed to use the Religious Education module.
![]() To speed
data entry, press the Tab
key to advance the cursor to the next filter field.
To speed
data entry, press the Tab
key to advance the cursor to the next filter field.
![]() You must
specify at least one criteria to search for.
You must
specify at least one criteria to search for.
After you enter your search criteria, click .png) .
.
The filters in this group help you find members who meet specific membership criteria.
Use this filter to limit your search to members whose registration status is set to one of the following: Registered and Unregistered. Select a registration status option from the dropdown list.
Use this filter to limit your search to members belonging to a specific family group, for example, Student or Staff. Select a family group from the dropdown list.
Use this filter limit your search to members who have a specific membership status in the organization, for example, active members only. Select a member status option from the dropdown list.
If you are searching for students in your Religious Education program and your organization is licensed to use Religious Education, you can apply the filters in the Religious Education group to help you locate members.
This dropdown list filter contains options that are defined as school terms in your Religious Education application (for example, Winter 2015). Select a term from the list to search for members who took classes in a specific term.
This dropdown list filter contains options that are defined as classes in your Religious Education application (for example, 1st Communion). Select a class from the list to search for members in a specific class.
This dropdown list filter contains options defined as grades (for example, Grade 9) in your Religious Education application. Select a grade from the list to search for members in a specific grade.
These text entry filters enable you to search for members whose age falls with a specified age range.
To specify an age range, enter a number in the From and To fields. Each field is limited to two numbers and accepts non-negative, non-decimal numbers.
 click to search for records that matches the criteria currently loaded
into the search fields.
click to search for records that matches the criteria currently loaded
into the search fields.
Based on the criteria you enter, the system locates members and displays their names in the Member Records grid (see Step 2).
![]() click
to clear the contents from the search fields so that you can enter new
values.
click
to clear the contents from the search fields so that you can enter new
values.
If your search returns any results, they are displayed in the Member Records grid, shown in the left panel of the following illustration:

In this step, you must select the members from the result set for whom you either want to add event data for or edit existing event data. When you select a member in the left panel, the system adds the names to the Selected Members list in the right panel, as illustrated below:

Both the Member Records and Selected Members grids contain useful controls for viewing and filtering the lists. The controls are described below.
If the list contains a lot of records, you can use one or more of the column headers to further narrow down the list to find the exact record you are looking for:
● Last Name: type a last name into the field to display members with the same last name.
● First Name: type a first name into the field to display members with the same first name.
● Age: type an age into the field to display members of the same age.
 Expand and Close Record Buttons
Each record in the list contains a bit of detail about
the member. Click to
expand the entry and view member details. For example:

You can use these details to verify that you are selecting the correct member.
To close the entry, click  .
.
 Add Member Button
This button appears to the left of each member listed
in the Member Records grid. If you want
to add or edit the member's record, click . The member
is added to the Selected Members list in
the right panel. The Selected Members list
shows the names of members in the group.
 Remove Member Button
After you add a member to the Selected Members
list, this button appears to the left of the member's name. If you need
to remove a member from the list, click .
The number of pages in the Member
Records grid is displayed under the grid. Select a page to go directly
to that page in the grid. Alternatively, click  to page
back or click
to page
back or click  to page forward
through the list. The total number of records in the grid is shown in
parentheses.
to page forward
through the list. The total number of records in the grid is shown in
parentheses.
Step 3 shows the fields you can update in the selected members' records. In this step, you must define the exact value in each field. When you save the records, the system updates these fields with the values you specify in the records of all members you selected in Step 2.
The illustration below identifies the data entry fields in Step 3. Place your mouse pointer over a link (without clicking) to view a general description of an element. Click the link to jump to the section on this page that gives you more detailed information about the element you clicked on.
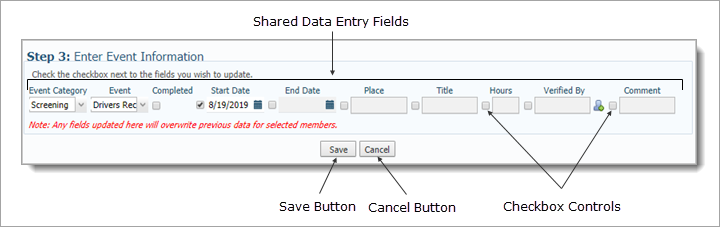
Note the small checkbox control to the left of each data entry field. By default, all checkboxes are disabled (not selected). If you want to enter data into a field, you must first select the checkbox to activate the entry field, as shown below:

The following table lists and describes the shared data fields (the fields sacrament records have in common). Enter a value into any of these fields to update all records with the value.
![]() Note that you
must select a checkbox
to activate some of the fields.
Note that you
must select a checkbox
to activate some of the fields.
Data Field |
Description |
Event Category |
Dropdown list of event categories. Select a category to view the events associated with it in the Event dropdown list. |
Event |
Dropdown list of event options. Select an event from the list. |
Completed Checkbox |
Select the checkbox to indicate that the selected event is completed. |
Start Date |
Click |
End Date |
Click |
Place |
Location of the event. For example, St. Mary's Church. |
Title |
Name or label that describes an individual’s degree level or appointment. For example, Deacon, Retired, Doctorate. |
Hours |
If you are keeping track of the hours for an activity (for example, volunteer work), enter the number of hours in this field. |
Verified By |
If the accuracy of the data being
tracked for this event must be verified or approved, click |
Comment |
Use this field to add notes pertaining to the event. |
 saves
the values entered into the data entry fields. The system updates these
fields in each selected member's record.
saves
the values entered into the data entry fields. The system updates these
fields in each selected member's record.
.png) cancels the group event entry process. No
changes will be saved to the database.
cancels the group event entry process. No
changes will be saved to the database.
How to Add an Event to Multiple Members' Records Simultaneously
 and select the
start date for the event from the calendar. Alternatively, type
the date directly into the field in mm/dd/yyyy format.
and select the
start date for the event from the calendar. Alternatively, type
the date directly into the field in mm/dd/yyyy format.