This topic shows you how to generate a query and use the results as a data source for a mail merge document.
Using Query Results as a Mail Merge Data Source
Printing a Mail Merge Document
Mail merge is a process for creating formal announcements, form letters, campaign correspondence, or any other types of documents that you want to produce for mass mailing purposes yet personalize to make more appealing to each recipient. Mail merge is great for simplifying the creation of repetitive documents, such as mailing labels and address lists.
To perform a mail merge, you need the following:
● Main Document
The main document contains fixed content. "Fixed" means that the information does not change. Fixed content can consist of text you create from within the Mail Merge application. Alternatively, you can pull text from an existing template (for example, one in your Global or My Templates folder) or copy from a text document stored on your local computer. The fixed content can even include a graphic, such as a photography or your church logo.
● Data source
Technically, the data source is your database, but it is your query results that will transfer the actual data values from columns to the merge fields in your document. For this reason, you must make sure that the query contains the columns you need to deliver to the merged document (for example, Members Title, Members Last Name, and Members.Contact Info Home Address 1).
When you run Mail Merge, the process outputs a document for each recipient using the fixed text content and substituting the data values from the columns in your query.
This section shows you how to create a mail merge document that uses a query as a data source. We will use a thank-you letter as our sample document to help you understand the process.
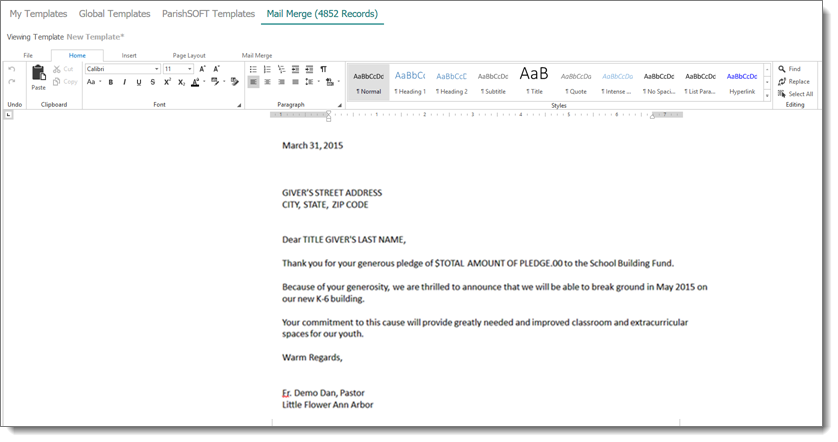
Suppose that you want to create a thank-you letter to express your appreciation to givers who gave a donation to your school building fund. An example of a thank-you letter you might create is shown in the following illustration:
![]() In the example letter in the illustration below, we inserted placeholder text (the text in all caps and highlighted in yellow). We will use the placeholders as a guide for where to insert the merge fields (query columns) into the document.
In the example letter in the illustration below, we inserted placeholder text (the text in all caps and highlighted in yellow). We will use the placeholders as a guide for where to insert the merge fields (query columns) into the document.

As the previous illustration shows, our sample letter contains both variable fields and fixed text. For illustration purposes only, the seven variable fields (for example, TITLE and TOTAL AMOUNT OF PLEDGE) in the sample letter are shown in all caps and highlighted in yellow. These are the placeholders (merge fields) that indicate where to insert information unique to each recipient.
![]() IMPORTANT
IMPORTANT
The placeholders correspond to the columns that you must have in your query. Later, when you select the merge fields to insert in your document, only the columns included in your query are available for you to select.
During the merge, the unique information in the columns will replace the placeholder fields in each recipient's copy of the letter. The fixed text, on the other hand, will remain the same for each person you send the letter to.
The mail merge process entails these steps:
The query is the data source. When setting up the query, you must select the columns and apply conditions in the query to generate the information you need to be merged into the document.
In this step, you will open a blank document and enter your fixed text and merge fields. Fixed text is custom text that is the same for each version of the document, for example, the body of a letter and closing words, such as "Sincerely" and "Warm Regards." Fixed text can also include an inserted graphic, such as your church logo or a photograph. Merge fields are placeholders that represent real information, such as the recipient's actual name and address.
The merge fields in your document correspond to columns in your query. In this step, you will replace the merge fields in the document with the columns that contain the data. During the merge, the system will extract the column's actual data and insert it into the merge field.
In this last step, you will perform the mail merge. The system merges your query results into each individual document and creates a single file. You can then preview each document before saving the file to your computer.
Detailed instructions for each step follow.
To use a query as a data source, complete the following:
OR
For the sample thank-you letter presented earlier, these seven columns must be included in the query:
 to run the query.
The results are displayed in the Query Results panel.
 to save the query.
 . From the dropdown menu, select the Mail Merge option.
The Mail Merge window opens:
In the following example, we saved the text of our thank-you letter, copied it, and then pasted it into the document text area:
Select the Mail Merge tab, located at the top of the document window.
Add the merge fields to your document. To do this, complete the following:
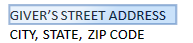
Select the text where you want to insert the first merge field (query column).
The system highlights the selected text. Using our thank-you letter example, we start by selecting the first merge field, GIVER'S STREET ADDRESS, as shown below:
Click  .
.
The Fields menu is displayed. The menu lists the columns included in your query. Using the thank-you letter example, you see the seven columns contained in the query:

Select the column that you want to replace the selected text.
The system replaces the selected text with the column you selected.
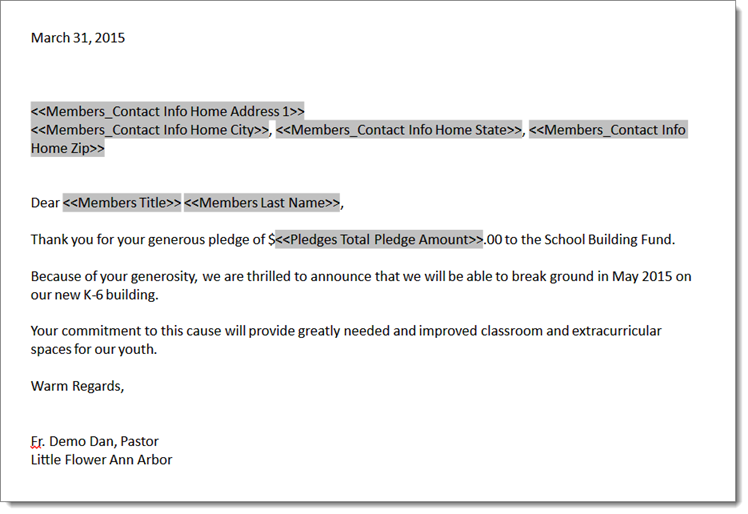
For example, selecting Members_Contact Info Home Address 1 from the menu replaces GIVER'S STREET ADDRESS. The result looks like this:

Repeat Step 2a - 2c until all of the merged fields in your document are replaced by the correct columns.
Using our example thank-you letter, after replacing the merge fields with the column selections, the document looks like this:
Proof the document If necessary, edit the content and your merged field selections. When done making changes, select the File tab. Then, click  to save the document.
In this step, you will merge the actual data derived from your query results into the merge fields in your main document.
 .
.The merge fields in your document are replaced with data query. The first recipient's copy is displayed, as shown in the following illustration:

Note that the details are personalized for the recipient (for example, the name, address, and the total pledged amount). The remainder of the letter contains the common content.
 (Next Record) to view the copy for the next recipient.
 (Merge to File) to open the Merge to File window:
 to close the Merge to File window.
The system downloads the file to your computer. The single file contains all of the individual documents or letters. You can print the
Navigate to the location on your computer where you downloaded the mail merge document.
Open the document.
From the File menu, select the Print option.
All of your merge documents are in a single file. Each copy is printed on a separate page.