Asking each minister to enter his or her own preferences, family preferences (if applicable), and schedule exceptions into the application is the recommended method because it is more efficient, and the information is likely to be more accurate and up to date. Your ministers can log in at any time and enter their preference information and schedule exceptions, relieving you from the time-consuming task of data entry. Over time, it is likely that your ministers’ preferences will change. This method ensures that the information available to the scheduler is more accurate and up to date because your ministers are responsible for keeping their own records current.
If you want your ministers to input their own preferences, you should communicate this expectation to them as soon as possible. Not only will your ministers need to enter their individual preferences but also those of their family members, if applicable.
Viewing Your Current Family Group and Member Preferences
Managing Exception Dates in a Schedule
Managing Event Exceptions in a Schedule
![]() Minister
instructions for these tasks are provided below for your reference so
that you can view instructions and screen illustrations if a minister
contacts you for assistance. These same Instructions are available to
your ministers in the Ministry Scheduler Help for Ministers. To access
the Help file, ministers should click the HELP
link at the top of the ParishSOFT Home page.
Minister
instructions for these tasks are provided below for your reference so
that you can view instructions and screen illustrations if a minister
contacts you for assistance. These same Instructions are available to
your ministers in the Ministry Scheduler Help for Ministers. To access
the Help file, ministers should click the HELP
link at the top of the ParishSOFT Home page.
![]() Be
aware that the instructions in this section are for use by members only
and are provided solely for reference should a minister contact you for
assistance with this task. These instructions differ from those an administrator
would follow to change a minister’s preferences. To view the procedures
an administrator uses to enter minister preferences, see this topic: Entering
Preferences and Scheduling Exceptions (Administrators only)
Be
aware that the instructions in this section are for use by members only
and are provided solely for reference should a minister contact you for
assistance with this task. These instructions differ from those an administrator
would follow to change a minister’s preferences. To view the procedures
an administrator uses to enter minister preferences, see this topic: Entering
Preferences and Scheduling Exceptions (Administrators only)
 .
.The Minister Preferences page is displayed:

This page has two main tabs, Family Preference and Member Preference, which respectively list the family’s and member’s ministries and current preference settings.
Log in to My Own Church.
.The Minister Preferences page is displayed:
This page has two main tabs, Family Preferences and Member Preferences, which respectively list the family’s and member’s ministries and current preference settings.
Select the Family
Preferences tab and then click  .
.
In Update Family Preferences window, locate the ministry whose preference setting you want to change.
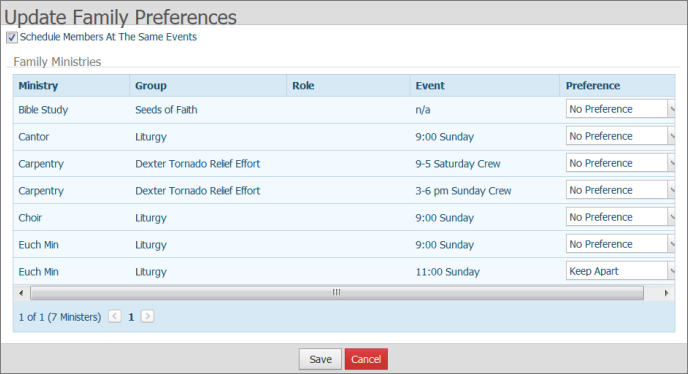
To change a preference setting for a ministry, select one of the following options in the Preference column:
No Preference: specifies that family members qualified to serve in this ministry should be scheduled as needed for the same event.
Keep Apart: specifies that family members qualified to serve in this ministry should not be scheduled together for the same event.
Prefer Together: specifies that family members (two or more) qualified to serve in this ministry should be scheduled together whenever possible.
Click  to save your changes.
Log in to My Own Church.
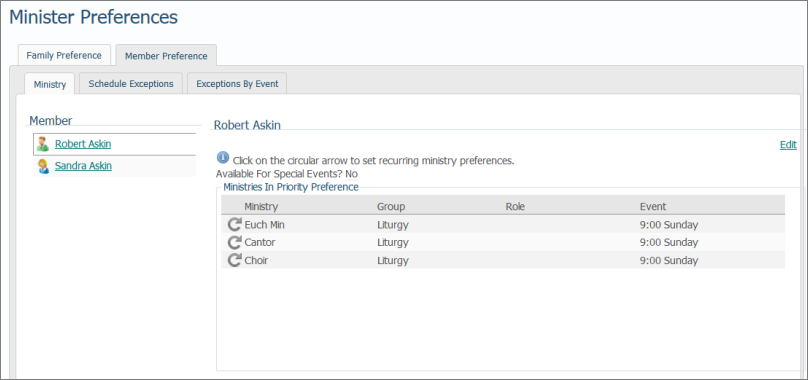
.The Minister Preferences page is displayed:
This page has two main tabs, Family Preferences and Member Preferences, which respectively list the family’s and member’s ministries and current preference settings.
Select the Member Preferences tab.
Select the Ministry tab. Under Member, select the individual whose preference settings you want to change.
If a ministry has recurring
events, you can specify the exact details of the minister's serving
preferences for that ministry. To the left of the desired ministry,
click ![]() .
.
The Willingness to Serve dialog for the selected ministry is displayed, for example:
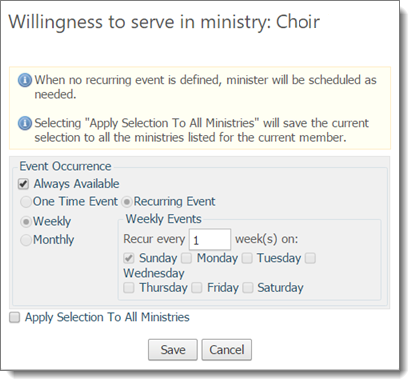
Do one of the following:
If the minister has no serving preference and is always available to serve in the ministry, leave the Always Available box checked.
If the minister can only
serve at a specific event, deselect the Always
Available checkbox. Then, select the One
Time Event checkbox. In the Event Date
field, click ![]() , and
then select the date of the event from the displayed calendar.
, and
then select the date of the event from the displayed calendar.
![]() For tips on using
the calendar
For tips on using
the calendar ![]() , see How
to Use the Calendar to Set a Date.
, see How
to Use the Calendar to Set a Date.
If the minister can serve at recurring events, deselect the Always Available checkbox. Then, select the Recurring Event checkbox. Next, select Weekly or Monthly. Under Weekly Events or Monthly Events, specify the rotational pattern. (For example, if you select Weekly, enter “1” to serve every week, “2” to serve every other week, and so forth.) Finally, specify the exact days of the week or month the minister is available to serve.
To globally apply the selections to all ministries, select the Apply Selection to All Ministries checkbox.
Click .png) to
save your changes.
to
save your changes.
To configure the minister's availability for special events and serving priorities, complete these steps:
Select the Edit link (on the far right) to open the Edit Member Preferences window, as shown below:
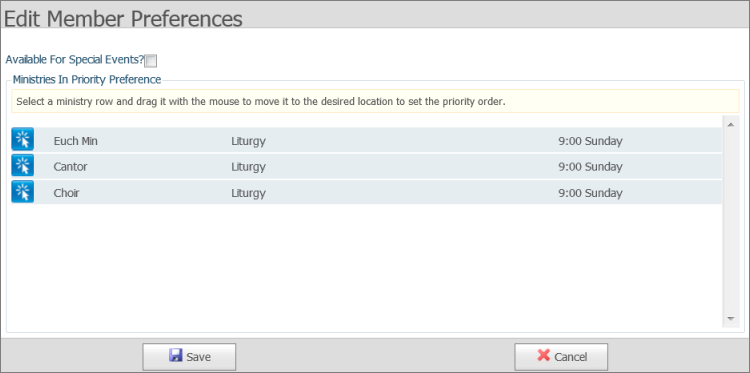
Do the following:
To indicate that the minister is available for all special events that are scheduled in the minister’s selected ministries, select the Available for Special Events? checkbox.
The ministries are listed in priority order of serving preference. To change the preference order, click and drag the ministry up or down the list until it is in the desired location. Then, release the mouse button.
Click
to save the preference changes.
Ministers can add exception dates to their records to indicate when they are unavailable to serve at a recurring event. Alternatively, they can delete an exception date that no longer applies. The following procedure shows you how to manage exception dates for recurring events.
Log in to My Own Church.
Select the My Ministry tab.
Click .
The Minister Preferences window is displayed.
Select the Member Preferences tab.
The left side of the tab lists all of the members of the logged-in minister’s family.
Select the desired family member. Then, select the Schedule Exceptions tab, as shown in the illustration below::

The family member's name is highlighted, and his or her schedule exceptions (unavailable dates) are shown on the right.
To modify exception dates for the selected minister, do any of the following that apply:
To add an exception date range:
Under Add New Date Range, select a date from each of the calendars in the Begin Date and End Date fields.
Click  .
.
The date range is added to the Schedule Exceptions list.
To delete an exception date range for the member:
To the left of the date
range you want to delete, click ![]() .
.
When, prompted to confirm
the deletion, click  .
.
A message is displayed to inform you that the date range was deleted.
Click
to clear the message.
To delete an exception date range for the entire family:
To the right of the date,
click ![]() (the icon
with the minus sign).
(the icon
with the minus sign).
A message is displayed to inform you that the date range was deleted.
Click
to clear the message.
To apply an exception
date range to the entire family, click ![]() (the icon
with the plus sign).
(the icon
with the plus sign).
To add “Snowbird Dates”
to the list of exception dates, click  . If a family
has specified “snowbird dates” in their Family Directory record, those
dates are automatically retrieved and added to the Schedule
Exceptions list.
. If a family
has specified “snowbird dates” in their Family Directory record, those
dates are automatically retrieved and added to the Schedule
Exceptions list.
To delete all exception dates that occurred in the past:
Click  .
.
A message is displayed to inform you that all past date ranges were removed.
Click to
clear the message.
Ministers can identify those recurring events at which they are unavailable to serve. To specify an event exception:
Log in to My Own Church.
Select the My Ministry tab.
Click .
Your ministry preferences are displayed.
Select the Member Preferences tab.
The left side of the tab lists all family members.
Select the desired family member. Then, select the Exceptions By Event tab:
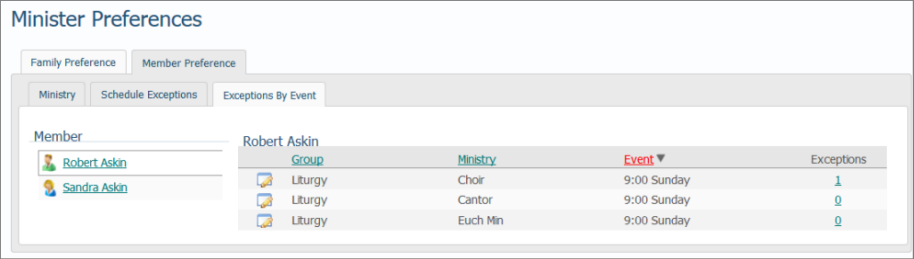
The Event column lists the events for which the selected member is currently unavailable. The Exceptions column shows the number of exceptions the member has entered for each listed event.
To edit an event exception,
click  to the left of the event.
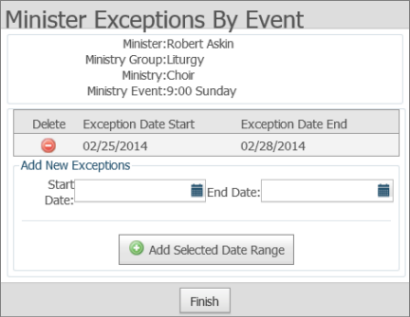
The Minister Exceptions By Event dialog for the selected event is displayed, for example:
Do one of the following:
To add an exception date: under Add New Exceptions:
Click ![]() in
both the Start Date and End
Date fields, and select a date from each calendar.
in
both the Start Date and End
Date fields, and select a date from each calendar.
Click  .
.
The date range is added to the list of exception dates.
Click  to
save.
to
save.
To remove an exception date:
To the left of the date
you want to remove, click ![]() .
.
The date is removed.
Click
to save.