Click  to display the Minister Directory page.
To the left of the minister’s
record that you want to edit, click  .
.
You can make changes to a single record or, if you want to make the same changes to more than one record, you can edit the records as a group (batch edit).
Editing a Single Minister Record
Editing Multiple Records (Batch Editing)
Click
to display the Minister Directory page.
To the left of the minister’s
record that you want to edit, click .
The Edit Minister window opens:
![]() An
asterisk (*
) indicates required information.
An
asterisk (*
) indicates required information.
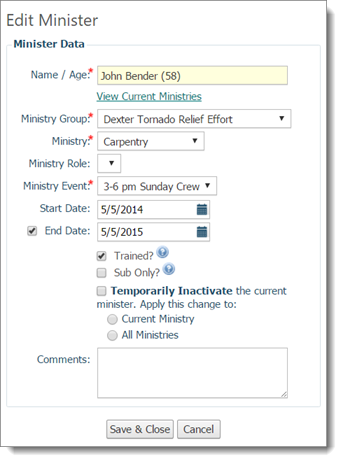
The member’s name and age are displayed at the top. Details of the member’s ministry record are displayed in the remaining fields.
Make changes to the member’s record. As desired, do one or more of the following:
Select a different ministry group, ministry, role (optional), or event.
Change
the assignment date. To do this, in the Start
Date and End Date fields, type
a date or click ![]() and
select a date.
and
select a date.
![]() For tips on using
the calendar
For tips on using
the calendar ![]() , see How
to Use the Calendar to Set a Date.
, see How
to Use the Calendar to Set a Date.
The date range you supply marks the starting and ending dates of the minister’s assignment in the selected ministry. If you do not want to supply an end date for the assignment, deselect the End Date checkbox.
Select the Trained? checkbox to indicate that the member has completed training and can be scheduled for the selected ministry.
![]() The auto-scheduler schedules
trained ministers only.
The auto-scheduler schedules
trained ministers only.
Select the Sub Only? checkbox to indicate that the member serves only as a substitute in this ministry.
![]() The auto-scheduler does
not automatically schedule a substitute minister.
The auto-scheduler does
not automatically schedule a substitute minister.
Select the Temporarily Inactivate checkbox to indicate that the minister’s participation is on hold. Then, indicate whether the minister is inactive for the current ministry only by selecting Current Ministry or for all ministries by selecting All Ministries.
![]() In Minister
Directory, the following icon is displayed to indicate that a minister
is temporarily inactive:
In Minister
Directory, the following icon is displayed to indicate that a minister
is temporarily inactive:![]() .
.
Add comments, if desired.
When done, click  to save the
information and exit the dialog box.
to save the
information and exit the dialog box.
Suppose that you want to make the same changes to multiple minister records. You can save time and reduce errors by editing the records as a group. This type of editing is called a batch-edit.
Click  to
open the Batch-Edit Ministers window:
to
open the Batch-Edit Ministers window:
![]() An asterisk (*)
indicates required information.
An asterisk (*)
indicates required information.
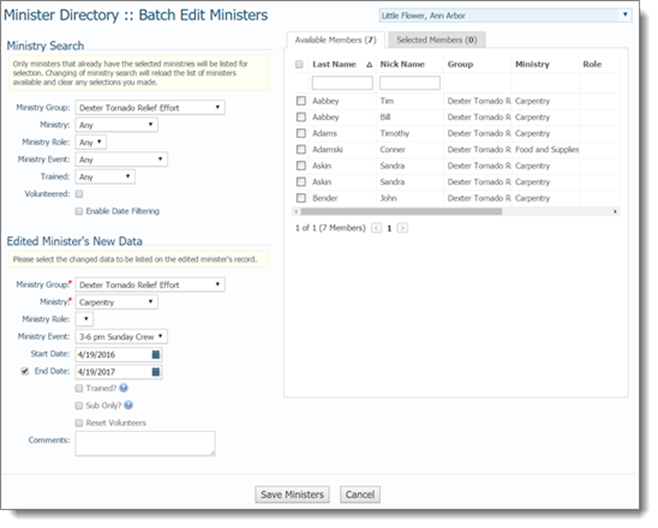
Before you can edit records as a group, you need to find the exact records you want to include in the group.
The top-left portion of the Batch Edit window contains search fields that enable you to search for records by ministry group, ministry, ministry role, ministry event, trained status, and volunteered status. You can specify multiple search criteria, but be aware that values for all selected search fields must match for the system to find a record. With each value you select, the Available Members list on the right updates to show you matching records. For example, if you select the Liturgy group and the Cantor ministry as search values, the Available Members list refreshes and shows you only ministers in the Liturgy > Cantor group. If you add Volunteered to your search, only those ministers who volunteered are included in the list.
![]() Selecting more search options
lets you refine your search and obtain more accurate results.
Selecting more search options
lets you refine your search and obtain more accurate results.
After you determine which records you want to edit as a group, the Edit Minister's New Data section in the left-bottom enables you to specify which fields to update. Simply indicate which fields to change by selecting new values in this section.
To apply changes to a group of records, complete the following:
Select your search criteria in the Ministry Search section. You can choose as many criteria as you want to narrow down the search.
With each selection, the Available Members list on the right refreshes and shows you the names of ministers who match the criteria you selected.
If you want to further limit your list to find ministers who are trained or not trained, select the desired option from the Trained list. If you want to include only those ministers who volunteered, select the Volunteered checkbox.
![]() Ministers whose time
of service has expired or is near expiration can recommission themselves
to their current ministries by logging in to My Own Church, and selecting
the Volunteer link under My
Ministry > Ministry Opportunities.
By checking the Volunteered box, you can
view ministers in that group.
Ministers whose time
of service has expired or is near expiration can recommission themselves
to their current ministries by logging in to My Own Church, and selecting
the Volunteer link under My
Ministry > Ministry Opportunities.
By checking the Volunteered box, you can
view ministers in that group.
To apply a date filter to the list, check the Enable Date Filtering box. In the Date Filter, enter dates and then select the link Apply Filter to refresh the contents of the member list.
Specify the changes you want to make. With each selection, the list refreshes and displays only eligible ministers:
In the Edit Minister's New Data section, select the new ministry group, ministry, role (optional), or event.
Select a new assignment
date range. To do this, in the Start Date
and End Date fields, type a date or
click ![]() and select a date.
and select a date.
Check the Trained? box to indicate that the ministers in the group have all completed training and can be scheduled for the selected ministry.
![]() The auto-scheduler schedules
trained ministers only.
The auto-scheduler schedules
trained ministers only.
Check the Sub Only? box to indicate that the ministers in the group will serve only as substitutes in the ministry.
![]() The auto-scheduler does
not automatically schedule a substitute minister.
The auto-scheduler does
not automatically schedule a substitute minister.
Select the individual minister records that you want make the changes specified in Step 2d. To do this, in the Available Ministers list select the checkbox to the minister’s name. Alternatively, the select the checkbox to the left of the Last Name column header to select all of the ministers in the Available Members list.
![]() To clear the check box,
select it again.
To clear the check box,
select it again.
If you want to view selected records only, select the Selected Members tab.
When ready to apply the changes,
click  . Then, click
  to
confirm the updates.
to
confirm the updates.
The Minister Directory is displayed to show the records updated with your changes.