Before merging duplicate records, you should review them on the Merge Queue page. This topic describes the main elements on this page.
Flexible and Responsive Columns
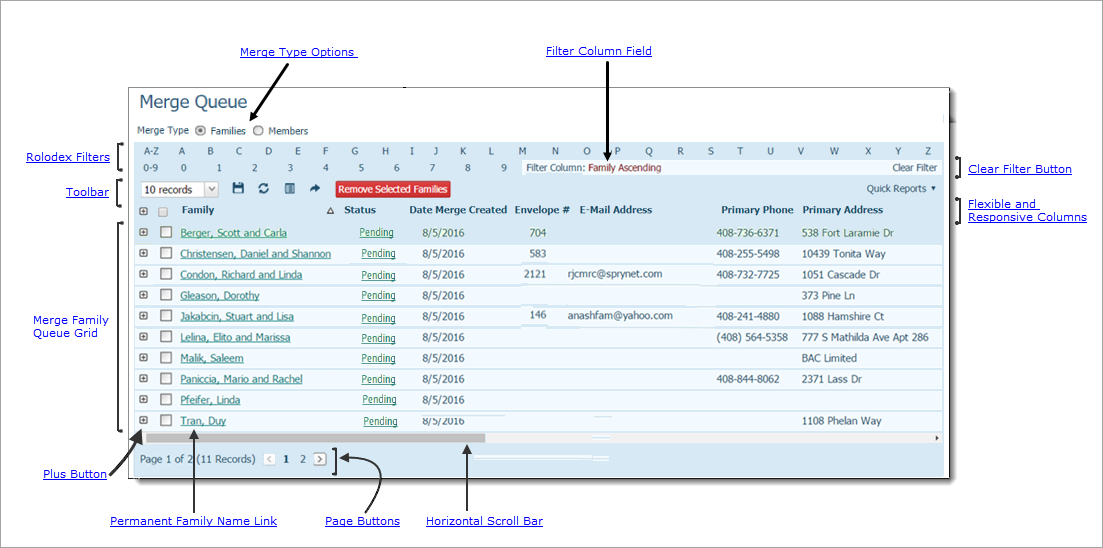
After you submit the duplicate records you want to merge, the system places those records in the Merge Queue where they await processing in the next overnight batch job. On the Merge Queue page, you can review those records prior to the merge.
Key elements of the page are identified in the callout links in the illustration below. Place your mouse pointer over a link (without clicking) to view a brief description of the element. For a more detailed description click the callout link to jump to an explanation later in this topic.
![]() The illustration
below shows the merge queue when the Families
option is selected as the Merge
Type. The merge queue is slightly different when the Members option is selected, but the
main elements are the same.
The illustration
below shows the merge queue when the Families
option is selected as the Merge
Type. The merge queue is slightly different when the Members option is selected, but the
main elements are the same.
The Merge button gives you access to the Merge utility, which includes access to the Merge Queue page. If the Merge button is not visible, you do not have Merge Family Access permissions tied to your login credentials. Contact your diocesan administrator for assistance if you need access to the utility but do not see the Merge button.
If you are a diocesan administrator or parish administrator, you can give staff members access to the Merge utility. For instructions, go to How to Give a Diocesan Staff Member Permission to Merge Duplicate Records or How to Give a Parish Staff Member Permission to Merge Duplicate Records.
The Merge Type options enable you to select which records show in the grid. Select one:
● Families: shows a list of family records scheduled to be merged overnight.
● Members: shows a list of member records scheduled to be merged overnight.
The rolodex filters are the set of letters and numbers located in two rows above the grid:

The filters enable alphabetic and numeric filtering of information contained in columns in the grid. Alphabetic filters apply to the columns that contain alphabetic information, for example, the Family column (in the Families grid) and the Member column (in the Members grid). Numeric filters apply to columns that contain numeric information, for example, the Date Merge Created column.
See Rolodex_Filters for step-by-step instructions that show you how to apply rolodex filters to a grid.
When you select a rolodex filter, the system highlights it to let you know it is selected. For example, in the following illustration, the A filter is selected:
When you apply a filter to a column, the Filter
Column field shows the name of the column and the direction in
which the information is sorted: ![]() ascending or
ascending or ![]() descending. In the above illustration, the Filter
Column field shows Family
Ascending, which lets you know that the information in the grid
is sorted on the Family column in ascending
(A to Z) order.
descending. In the above illustration, the Filter
Column field shows Family
Ascending, which lets you know that the information in the grid
is sorted on the Family column in ascending
(A to Z) order.
Click ![]() to clear the applied rolodex
filter settings. The system re-displays the all of the records in the
queue.
to clear the applied rolodex
filter settings. The system re-displays the all of the records in the
queue.
The toolbar is located at the top of the grid under the row of rolodex filters. The toolbar contains menus and buttons for performing common tasks on the grid.

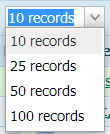
The Records menu lets you select the number of records (default = 10) to display in the grid. To change the number of records displayed at a time, select the desired option from the menu:
![]() To
speed page loading, select a lower value.
To
speed page loading, select a lower value.
 permanently
saves changes you make to the page layout. You can rearrange the columns
in the grid. If you move them, you can permanently save the new layout
by clicking this button.
permanently
saves changes you make to the page layout. You can rearrange the columns
in the grid. If you move them, you can permanently save the new layout
by clicking this button.
 resets
the page layout to the default configuration. You can rearrange the
columns in the grid. If you move them, you return the grid to the default
layout by clicking this button.
resets
the page layout to the default configuration. You can rearrange the
columns in the grid. If you move them, you return the grid to the default
layout by clicking this button.
 opens the Select Grid Columns window where
you can customize the Merge Queue grid
by selecting
the columns you want to include. By default, all columns are selected.
The following illustration shows the Select Grid
Columns window for family merges. Deselect the checkboxes for the
columns you do not want to include in the grid.
opens the Select Grid Columns window where
you can customize the Merge Queue grid
by selecting
the columns you want to include. By default, all columns are selected.
The following illustration shows the Select Grid
Columns window for family merges. Deselect the checkboxes for the
columns you do not want to include in the grid.

 exports records in the grid to a .csv file.
 (Families grid): if you determine that certain family records should not
be merged, remove them by clicking this button. For instructions on removing
a record from the queue, go to How
to Remove a Record from the Merge Queue.
(Families grid): if you determine that certain family records should not
be merged, remove them by clicking this button. For instructions on removing
a record from the queue, go to How
to Remove a Record from the Merge Queue.
 (Member grid): if you determine that certain member records should not
be merged, remove them by clicking this button. For instructions on removing
a record from the queue, go to How
to Remove a Record from the Merge Queue.
(Member grid): if you determine that certain member records should not
be merged, remove them by clicking this button. For instructions on removing
a record from the queue, go to How
to Remove a Record from the Merge Queue.
 :
click to create a Merge Queue quick report.
For instructions, go to How
to Create a Merge Queue Quick Report.
:
click to create a Merge Queue quick report.
For instructions, go to How
to Create a Merge Queue Quick Report.
The Merge Queue grid shows you the records scheduled to be merged in the next overnight batch job. Each record occupies a single row in the grid.
For each record listed in the families grid, the following information is provided:
![]() Use
the horizontal scroll bar at the bottom of the page to bring information
at the far-right into the visible area.
Use
the horizontal scroll bar at the bottom of the page to bring information
at the far-right into the visible area.
● Family: shows the name of the permanent family.
1 ![]() To
view information for a duplicate family, click
To
view information for a duplicate family, click  . To
view information for the permanent family, click the name link.
. To
view information for the permanent family, click the name link.
● Status: shows the status of each record either as Pending (waiting to be processed) or Failed (did not merge).
● Date Merge Created: the date the staff user took action to either add the duplicate member record as new or to merge the duplicate member record into the permanent family’s record.
● Envelope #: envelope number of the permanent family.
● Permanent family’s contact information (physical address, primary phone number, and email address).
● Permanent family’s registered organization ID and name of organization of registration.
● Diocesan ID, Family ID, and Family DUID: unique IDs that identify the permanent family.
For each record listed in the member's, the following information is provided:
![]() Use
the horizontal scroll bar at the bottom of the page to bring information
at the far-right into the visible area.
Use
the horizontal scroll bar at the bottom of the page to bring information
at the far-right into the visible area.
● Member: shows the name of the permanent member.
2 ![]() To
view information for a duplicate member, click . To
view information for the permanent member, click the name link.
To
view information for a duplicate member, click . To
view information for the permanent member, click the name link.
● Status: shows the status of each record either as Pending (waiting to be processed) or Failed (did not merge).
● Date Merge Created: the date the staff user took action to either add the duplicate member record as new or to merge the duplicate member record into the permanent member's record.
● Envelope #: envelope number of the permanent member.
● Permanent member's contact information (physical address, primary phone number, and email address).
● Permanent member's registered organization ID and name of organization of registration.
● Diocesan ID, Family ID, and Family DUID: unique IDs that identify the permanent member.
The Merge Family Queue grid has flexible and responsive columns that you can change as needed to suit your preference for viewing information. The columns have these features:
● Sortable: click a column header to sort entries in the grid based on the information in the column. For example, to sort in ascending order on the Family column, click the Family column header. To reverse the sort order, click the Family column again. For details on column sorting, go to Sorting_the_Display_of_Records.
● Resizable: grab the border between two columns to increase or decrease the width of one of them. For details on resizing columns, go to Changing_Column_Widths.
● Moveable: drag and drop columns in the grid to suit your preference the order in which the columns in the grid are arranged. For details on moving columns, go to Changing_Column_Widths and Rearranging_the_Columns.
(Plus
Button)Click to view information for
the duplicate family. The word “Duplicate” is appended to the family’s
name to identify it as a duplicate. Duplicate records are listed in the
order in which the user added them to the master family record.
To view information for all duplicate families at
the same time, click this button in the column header: .
You can use this information to verify that you are merging the right
families.
In the merge queue for families, the name link is associated with the permanent family. Clicking the link opens the permanent family's Family Details record in ParishSOFT Family Directory.
In the merge queue for members, the name link is associated with the permanent member. Clicking the link opens the permanent member's record in ParishSOFT Family Directory.
 : this
checkbox control appears next to each record in the grid. Select the checkboxes
to indicate which records you want to work with. For example, if you want
to delete one or more records, select the checkbox next to the record,
and then click .
: this
checkbox control appears next to each record in the grid. Select the checkboxes
to indicate which records you want to work with. For example, if you want
to delete one or more records, select the checkbox next to the record,
and then click .
 (the column header): select this checkbox in the
column header to select all records in the grid.
(the column header): select this checkbox in the
column header to select all records in the grid.
Each record in the grid occupies a single line that extends beyond the edge of the viewing area. To bring the information outside of the border into view, click and drag the horizontal scroll bar, located at the bottom of the grid, left or right.

If the grid contains multiple pages, the number of pages is displayed below the grid.
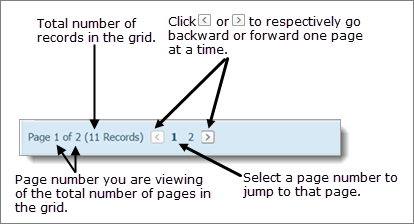
Select a page to go directly to that page in the list.
Alternatively, click  to page back or click
  to page forward through pages in the grid. The number of records in the
entire grid appears in parentheses.
to page forward through pages in the grid. The number of records in the
entire grid appears in parentheses.
How to Give a Diocesan Staff Member Permission to Merge Duplicate Family Records
How to Give a Parish Staff Member Permission to Merge Duplicate Records
How to Customize the Layout of a Page
How to Export Notification Records to a .csv File
How to Remove a Record from the Merge Queue
How to Create a Merge Queue Quick Report