Click  to display the Module Settings page.
Select the Census module.
The Secure Information feature enables authorized diocesan staff to view and edit sensitive information collected on the Secure Information tab in Member Details. Before staff members can use the Secure Information feature, a user with Diocesan Admin permissions must enable it and set up the secure fields. This topic shows Diocesan Admin users how to enable the Secure Information feature and how to set up the fields.
Step 1. Activate the Secure Fields Feature
Step 2. Assign Labels to Secure Fields
Access Requirements and Permissions
Sometimes organizations may find it necessary to collect additional information about members that may be considered sensitive or personal in nature, such as health and medical details (for example, blood type and test results), political affiliations, and education and employment history. The Secure Information feature in Member Details provides a means for organizations to collect personal information in custom data fields designated as "secure." The system provides a way for you to control who can see this information by restricting access to authorized staff only.
The Secure Fields setup is a two-step process. You can complete the setup steps in any order:
Step 1. Activate the Secure Fields Feature
Step 2. Assign Labels to Secure Fields
Secure Fields is a feature that must be activated and set up by the diocese before individual organizations within the diocese can use it. After activation, staff members with Diocesan Admin access within an organization can designate which staff can access the fields.
To activate the Secure Fields feature, complete the following:
Click to display the Module Settings page.
Select the Census module.
The Secure Fields setup is displayed in the right panel. By default, the Secure Fields option is disabled.
To activate the Secure Fields feature, select Enabled from the Secure Fields dropdown list:
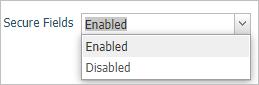
The Secure Fields feature is now activated for all organizations within the diocese. Authorized staff can see the Secure Information tab in Member Details and edit the secure fields.
![]() Authorized staff are those with an active assignment to the diocese and with Secure Field Access permissions enabled in their records
Authorized staff are those with an active assignment to the diocese and with Secure Field Access permissions enabled in their records
To save the setting, click  .
.
You can now create labels for the fields. To do this, go to Setting_Up_Secure_Fields, which follows.
In this step, you will assign labels to up to 10 secure fields. The labels define the type of information you want to collect about members on the Secure Information tab in Member Details.
Click to display the Module Settings page.
Click the Census module.
The labels setup is displayed at the bottom of the right panel:

You can create labels for up to 10 secure fields. In the text fields, type your labels.
![]() The first secure field accepts a date only, but you can define any label you want for the field. For example, Graduation Date.
The first secure field accepts a date only, but you can define any label you want for the field. For example, Graduation Date.
![]() If you leave a field blank, the field does not appear on the Secure Information tab in Member Details.
If you leave a field blank, the field does not appear on the Secure Information tab in Member Details.
To save the labels, click .
The labels you assigned appear on the Secure Information tab in each member’s record.
![]() Authorized staff can now enter information into the fields on the tab. If you need to give a staff member access to secure fields, go to How to Give a Diocesan Staff Member Access to Secure Fields.
Authorized staff can now enter information into the fields on the tab. If you need to give a staff member access to secure fields, go to How to Give a Diocesan Staff Member Access to Secure Fields.
Because secure fields may contain sensitive information, organizations should limit access to a few select staff. To be authorized to access the fields, a staff member must meet these requirements:
● Have an active assignment to the diocese. If you need to give a staff member an active assignment, go to How to Give a Staff Member an Active Assignment to the Diocese.
and
● For the active assignment, have the Secure Field Access permission enabled in their staff record. For instructions on setting this permission for the active assignment, go to How to Give a Diocesan Staff Member Access to Secure Fields.
About the Module Settings Page
How to Give a Diocesan Staff Member Access to Secure Fields