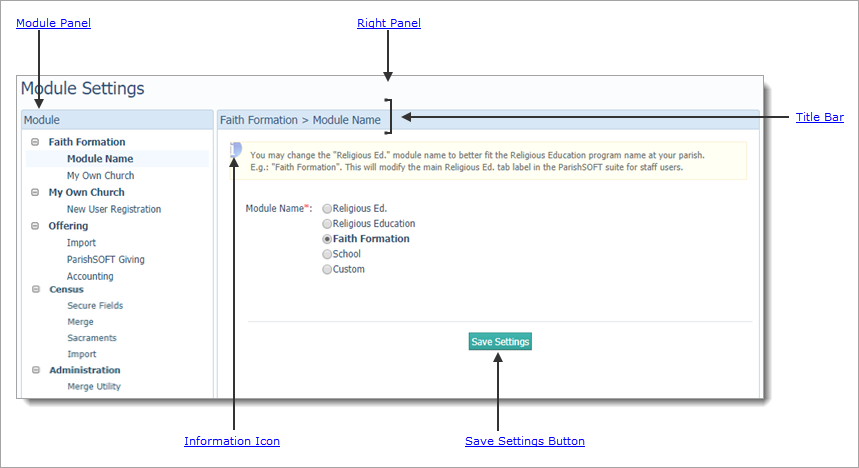
The Module Settings page provides a central location for you to configure settings associated with modules in the ParishSOFT Family Suite.
The illustration below identifies the main areas on this page. Place your mouse pointer over a link (without clicking) to view a general description of an area. Click the link to jump to the section in this Help topic that provides more detailed information.
The module panel lists the modules for which you can configure custom settings:
● Offering
● Census
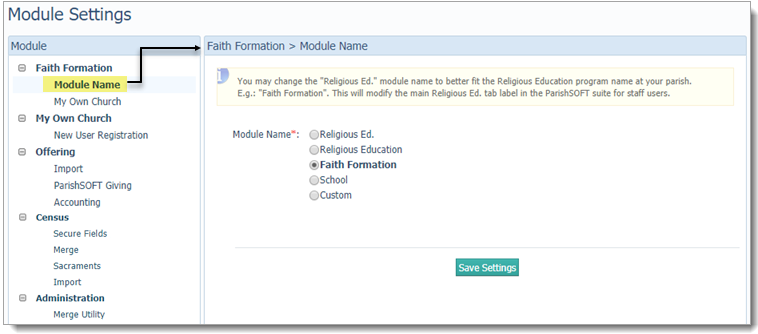
Each module has options you can configure. Selecting an option displays the settings you can configure in the right panel. For example:
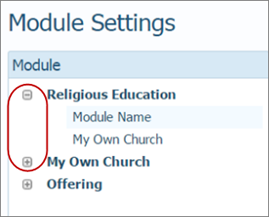
You can show or hide the options for a module by using these buttons, located to the left of the module's name:
 (Show): click
to open the list and show the options you can configure for the module.
(Show): click
to open the list and show the options you can configure for the module.
 (Hide): click to collapse the list and hide the individual options.
The Religious Education module has two configurable options:
By default, the Religious Education module is named "Religious Education". The Module Name option lets you change the name of the module to match the name of your organization's religious education program.
You can either select a new name from a pre-defined
list of names or create a custom name. After you click  ,
the system updates and members who log in see the module's new name on
a tab, as shown in the following illustration:
,
the system updates and members who log in see the module's new name on
a tab, as shown in the following illustration:

The My Own Church option lets you configure settings associated with the integration of the Religious Education module into My Own Church (MOC).
● Religious Education Access in My Own Church
This option has two settings:
MOC Access: by default, this option is disabled so that members have no access to online registration in Religious Education. If you enable the option, the system inserts the "My Education" tab in members' My Own Church portal. The tab provides access to the online registration feature in Religious Education.
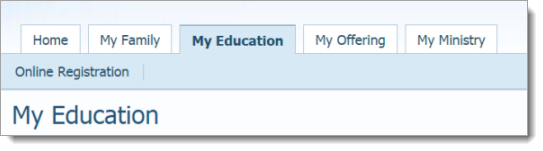
![]() In the previous illustration,
the inserted tab is labeled “My Education”. If desired, you can change
the name of the tab that members see in their My Own Church portal. For
details, go to MOC
Tab Label option.
In the previous illustration,
the inserted tab is labeled “My Education”. If desired, you can change
the name of the tab that members see in their My Own Church portal. For
details, go to MOC
Tab Label option.
MOC Tab Label: lets you change the name of the Religious Education tab that members see in their My Own Church. You can either choose a new label from a pre-defined list or create a custom label for the tab.
● Online Registration
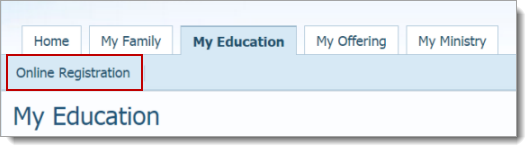
The Online Registration option gives users the ability to register online for religious education classes. By default, the Online Registration option is disabled. If you enable it, the Online Registration button on the Religious Education tab is activated, as shown in the following illustration:
![]() In the following illustration,
the Religious Education tab was renamed "My Education".
In the following illustration,
the Religious Education tab was renamed "My Education".
If you plan to enable online registration, we recommend that you leave the Online Registration option disabled initially while you set up the terms and classes that users can register for online. Then, when you are ready to launch the online registration feature, enable the option to allow church members to begin registering.
The New User Registration option provides two settings that let you control how the system handles new user registrations.
Most new user registration requests are pending until they are reviewed and approved by an administrator. However, the system also provides an Automatic User Approval feature that enables you to bypass manual review by an administrator and use the individual's email address as criteria to grant quick access to the system. The automatic approval feature has two options:
![]() The
two options are disabled by default, and they depend on each other. Specifically,
you must first enable the Match CURRENT
Email option. Then, the system activates the Match
PRIOR Email option to let you select the desired setting.
The
two options are disabled by default, and they depend on each other. Specifically,
you must first enable the Match CURRENT
Email option. Then, the system activates the Match
PRIOR Email option to let you select the desired setting.
● Match CURRENT Email: the system attempts to match the email address the user supplied with a current email address in an existing family or member record. Finding a match, the system approves the registration and automatically sends access information to the individual's current email address. By default, this option is disabled. To enable it, select Enabled.
● Match PRIOR Email: the system attempts to match the supplied email address with a prior (#1 or #2) email address in an existing family or member record. Finding a match, the system approves the registration and automatically sends access information to the individual's prior email address. By default, this option is disabled. To enable it, select Enabled.
The Offering module provides three configuration options:
![]() The
system keeps track of Import option and Accounting setting changes in
its audit tables. Specifically, the system captures the following information:
the type of change and the date it was made, the user ID or Member DUID
of the person making the change, and the ID of the organization for which
the change was made.
The
system keeps track of Import option and Accounting setting changes in
its audit tables. Specifically, the system captures the following information:
the type of change and the date it was made, the user ID or Member DUID
of the person making the change, and the ID of the organization for which
the change was made.
You can choose how you want the system to identify givers and match them to contributions in the contribution import file. Select one of the following:
● Envelope Number: use the envelope number to identify givers
● Diocesan ID: use the Diocesan ID to identify givers.
The ParishSOFT Giving group lets you activate features associated with the ParishSOFT Giving application.
● Enable ParishSOFT Giving Options checkbox

By default, this checkbox is not selected. When selected, the checkbox activates these three settings simultaneously:
Allows users to create a ParishSOFT Giving Validation report.
The ParishSOFT Giving Validation report, available on the Offering Reports page (select Contributions > ParishSOFT Giving Validation), shows contributions that came into ParishSOFT Offering from ParishSOFT Giving during the date range specified in the report setup.
Users can use the details provided in the report (for example, names of donors and contribution amounts) to verify that the information recorded in both systems matches exactly and that all contributions are accounted for. To find instructions on creating a ParishSOFT Giving Validation report, search the Help table of contents in the Offering module.
Allows users to create a ParishSOFT Giving Added Families report.
This report, available on the Family Directory Reports page (select Census > ParishSOFT Giving Added Families), lists the names of families and members who made electronic contributions through ParishSOFT Giving but had no ParishSOFT Family Directory record at the time, so the system automatically created one. You can use this report to determine whether the record the system created is indeed unique.
To find instructions on creating a ParishSOFT Added Families report, search the Help table of contents in the Family Directory module.
![]() The system performs various
checks (for example, looks for matching family and member email addresses
and home phone numbers) to ensure that no database record exists. Finding
no match, the system creates a new family record and sets the family status
to Inactive. You should use this report to verify that records added by
the system are unique. If you discover a duplicate record, use Duplicate
Checker to merge it.
The system performs various
checks (for example, looks for matching family and member email addresses
and home phone numbers) to ensure that no database record exists. Finding
no match, the system creates a new family record and sets the family status
to Inactive. You should use this report to verify that records added by
the system are unique. If you discover a duplicate record, use Duplicate
Checker to merge it.
● ParishSOFT Giving URL field

The ParishSOFT Giving URL field enables administrators in organizations that use ParishSOFT Giving to specify ParishSOFT Giving’s website address. After the address is saved, users in those organizations have direct access to ParishSOFT Giving from within the Offering and My Own modules in ParishSOFT Family Suite.
By default, the ParishSOFT Giving URL field is blank. Two options are available:
Leave the field blank (not recommended).
![]() Important
Important
If you leave the ParishSOFT Giving URL field blank, users in organizations that use ParishSOFT Giving will not have direct access to ParishSOFT Giving from the Offering and My Own Church modules in ParishSOFT Family Suite.
Enter and save the address of your ParishSOFT Giving website in the field.
After you save the change, users in organizations that use ParishSOFT Giving have direct access to your website. Specifically, when Admin users click the Online Giving tab in the Offering module, they will be taken directly to the ParishSOFT Giving Admin Login page (giving.parishsoft.com/cp). And, when church users click the Online Giving tab in the My Own Church module, they will be taken directly to the ParishSOFT Giving donor Login page.
![]() Important
Important
At any time, you can restore the default (“blank”) behavior of the ParishSOFT Giving URL field by removing the website address from the ParishSOFT Giving URL field. After you save the change, the system does the following:
● ParishSOFT Giving Integration checkbox

If an organization is licensed to use ParishSOFT Giving and ParishSOFT Offering, this option controls the activation of the integration to allow the two systems to work together.
By default, the option is enabled, which allows contributions submitted electronically in ParishSOFT Giving to be automatically entered into ParishSOFT Offering.
If an organization does not want to use the integration feature, deselect the option. Staff in the organization must then manually post ParishSOFT Giving contributions into the ParishSOFT Offering system.
The Accounting option, shown in the illustration below, provides a checkbox control used to help ensure the integrity of data transferred from ParishSOFT Offering into bank accounts in the ParishSOFT Accounting system:

By default the checkbox is not selected. Select the checkbox to force the system to create a deposit entry for a batch in ParishSOFT Accounting before it closes a batch. If the system detects that no deposit entry exists for a batch, the system will not close the batch.
The Census module provides options that enable users with Diocesan Admin permissions to configure secure fields, which are used by diocesan staff to collect sensitive and personal information about individual members. The secure fields are located in each member's profile on the Secure Information tab (in the Member Details tab).
However, before diocesan staff can view modify the information in secure fields, the Secure Fields feature must be enabled and the specific type of information to be collected must be defined. The Census module provides functionality to enable the Diocesan Admin user to enable the feature and define the fields.
![]() For
instructions on configuring secure fields, go to How
to Setup Secure Fields.
For
instructions on configuring secure fields, go to How
to Setup Secure Fields.
The Secure Field option gives access rights to secure fields. By default, the option is disabled. To give authorized users (those with Has Secure Field permissions) access, select Enabled from the Secure Fields dropdown list:
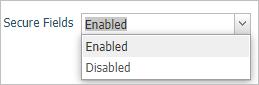
After access is granted, authorized users can view and edit fields on the Secure Information tab in Member Details.
The Secure Field labels section contains a form in which a user with Diocesan Admin permissions can specify the labels for up to 10 secure fields that appear on the Secure Information tab in Member Details.
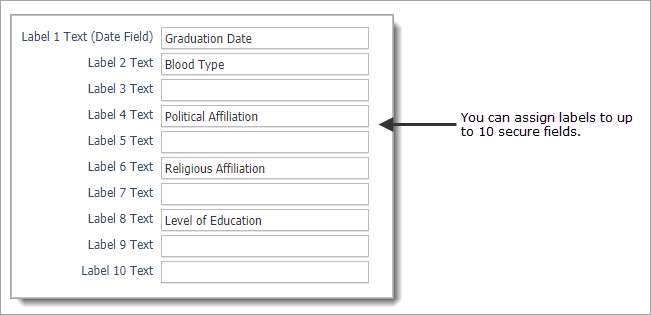
Field labels have a 30-character limit. The first secure field accepts a date only, but any label can be assigned to the field. For example, Graduation Date. If a field is left blank, it does not appear on the Secure Information tab in Member Details.
To protect members' privacy, do not use secure fields to collect highly sensitive data, such as social security numbers, bank account information, and personal medical information.
By default, only users with Diocesan Admin permissions can merge family records and grant Merge Family Access permission to staff. This section provides a checkbox control that enables users with Diocesan Admin permissions to globally grant family merge permission to parish administrators. In turn, parish administrators in their respective organizations can give themselves as well as selected staff permission to merge family records.
By default, the option is disabled, so only Diocesan
Admin users can perform merges. To delegate merge permission to parish
administrators, select the checkbox, as shown below. Then, click to activate the permission for organizations in your
diocese.

If you need step-by step instructions for globally granting merge family permission to parish administrators, go to How to Configure Global Permission to Merge Family Records.
![]() Important
Important
Note that enabling this option grants merge permission at the organization level only. In other words, it allows parish administrators to subsequently give merge permission to themselves and to designated staff within their organizations. Merge permission must be specifically granted by enabling an option in each selected staff member's record. For details, go to How to Give a Staff Member Permission to Merge Duplicate Family Records.
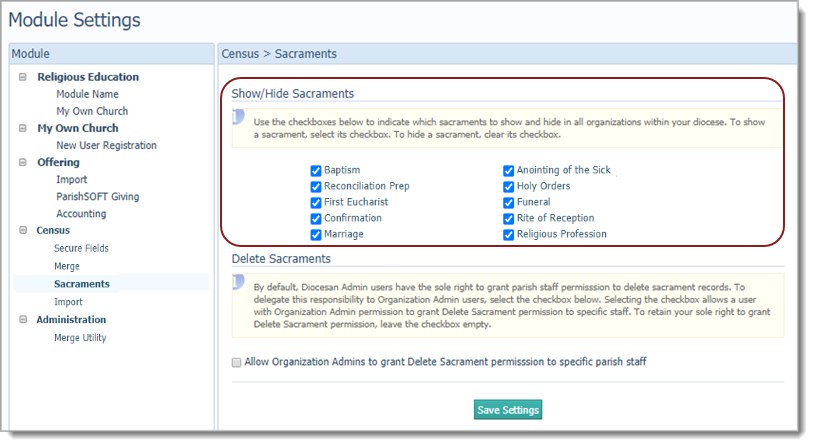
To assist with the task of managing sacrament data, the Sacraments page provides options that enable diocesan administrators to globally configure options that determine which sacrament data organizations can see and modify as well as delete.
● Show/Hide Sacraments
The checkbox controls in this section give diocesan administrators a way to choose which sacraments to hide or show in all of the organizations they manage. Note that, by default, all sacrament types are selected, which means —in all organizations—staff with the appropriate permissions can see and modify their data.
To globally hide a sacrament, simply
select (to clear) its checkbox. Be sure to click
to save your changes.
For any sacrament that you select to hide, the system does the following in Family Directory:
Removes the sacrament from the Sacraments tab in Member Details to prevent users in all organizations from viewing its details. If all sacraments are hidden, the tab itself is not displayed.
Removes the sacrament from the Reports > Sacraments menu.
Removes the sacrament from the Sacraments dropdown list on the Add/Edit Sacraments page to prevent users in all organizations from adding new sacrament records and editing existing ones.
Removes the sacrament from the Sacrament to Update dropdown list on the Group Sacrament Entry page to prevent users in all organizations from adding or viewing entries for the sacrament.
Removes the sacrament template from the ParishSOFT Templates group in Mail Merge.
For any sacrament that you select to hide, the system does the following in Religious Education:
Removes the sacrament from the Sacraments tab on the Classes page to prevent users in all organizations from viewing students’ sacrament data. If all sacraments are hidden, the tab itself is not displayed.
Removes the sacrament from the Sacraments List quick report.
Removes the sacrament template from the ParishSOFT Templates group in Mail Merge.
● Delete Sacraments
To maintain the highest control over sacrament records, diocesan administrators, by default, have the sole right to delete sacrament records and to grant deletion rights to other staff within the diocese. This section provides a checkbox control that enables diocesan administrators to globally grant delete sacrament permission to their parish administrators. In turn, parish administrators in their respective organizations can give themselves as well as selected staff permission to delete sacrament records.
By default, the option is disabled, so only diocesan administrators can delete sacrament records. If you want to allow parish administrators to grant delete permission to specific staff within their organizations, select this checkbox:

![]() Important
Important
Note that enabling this option grants delete sacrament permission at the organization level only. In other words, it allows parish administrators to subsequently give Delete permission to themselves and to designated staff within their organizations. Delete permission must be specifically granted by enabling an option in the staff record. For details, go to How to Give a Staff Member Permission to Delete Sacrament Records.
Be aware that the system maintains an internal log to document these details whenever a sacrament is deleted:
Date and time of the deletion
Username of the user who deleted the sacrament
First name and last name of the user who deleted the sacrament
Type of sacrament deleted (for example, Baptism)
Member DUID and Family DUID of the record associated with the deleted sacrament
The Import section contains an option that enables diocesan administrators to globally grant parishes the right to import contact data from third-party applications into their databases. By default, the diocese retains exclusive rights to import contact data into the databases of its parishes. A diocese can, however, delegate this right to the parishes. Parish administrators, in turn, can grant specific staff the permission to do the actual imports.
Use this checkbox control to grant or deny all parishes in your diocese the right to import contact information from external applications:

By default, the right to import is disabled. To grant all parishes in the diocese the right to import contact data, select the checkbox.
For step-by-step instructions on granting parish permission to import contact data, go to How to Configure Global Permission to Import Contact Data.
The Administration module provides these options used to configure how the Merge Utility handles sacrament data during the process of merging family records:
● Prefer Completed Sacraments: when merging data for corresponding sacraments, instructs the system to keep the data for whichever sacrament is marked as “Completed.” If the sacrament in both records is marked “Completed,” keep the data in master record.
● Prefer Fields with Data: if sacrament data exists in the duplicate record but not in the master record, instructs the system to copy the data from the duplicate record into the empty fields in the master record.
● Force Selections: if both the duplicate and master record have sacrament data in corresponding fields, instructs the system to prompt the user to review and resolve the conflict.
The information in the right panel changes to show content related to the option selected for a module in the Module panel.
The title bar at the top of the panel shows the name of the module and the option selected in the left panel.
If you see the Information icon ![]() within a shaded
box, take time to read the text, which provides useful information and
tips to help you make decisions. If you see this icon next to an option,
place your mouse pointer over the icon (without clicking) to display the
infotip.
within a shaded
box, take time to read the text, which provides useful information and
tips to help you make decisions. If you see this icon next to an option,
place your mouse pointer over the icon (without clicking) to display the
infotip.
After you select settings, click to save them to
the database.
How to Rename the Religious Education Module
How to Configure Religious Education and My Own Church
How to Configure Settings for How the System Handles New User Registrations
How to Configure Settings for Contributions Imported into the Offering Module
How to Activate Features for ParishSOFT Giving
How to Configure Global Permission to Import Contact Data
How to Configure Global Permission to Merge Family Records
How to Merge Duplicate Family Records
How to Give a Parish Staff Member Permission to Delete Sacrament Records
How to Give a Parish Staff Member Permission to Merge Duplicate Family Records