Flexible and Responsive Columns
Each time an administrator processes a change request or new user registration request, the system records the request and the action taken in a historical log on the Suspense History page. Each entry shows the status of the request so that you can see whether the requested change was approved or denied.
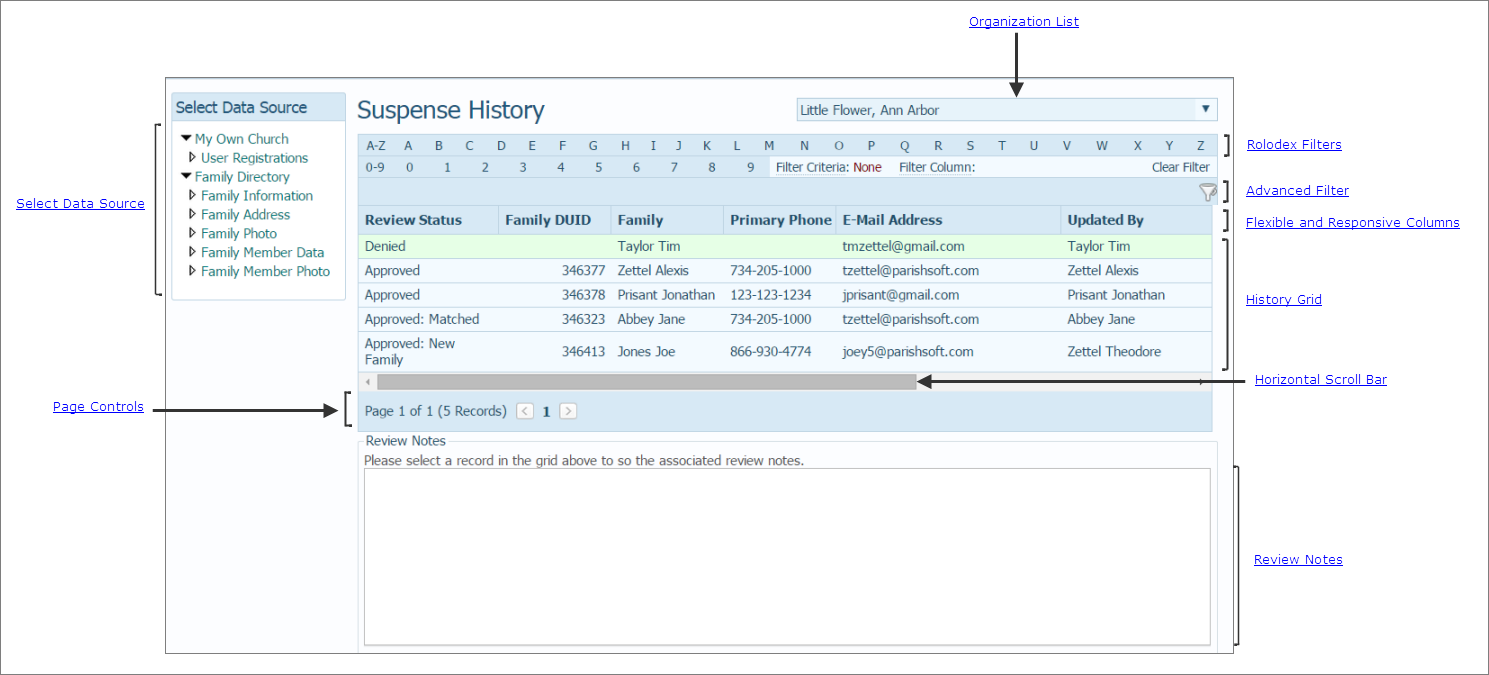
The illustration below identifies the main areas on this page. Place your mouse pointer over a link (without clicking) to view a general description of an area. Click the link to jump to the section in this Help topic that provides more detailed information.
The organization associated with your ParishSOFT login credentials automatically appears in the Organization list, as shown in the upper-right corner. If you manage multiple organizations, select the organization whose history logs you want to view. Or, select All Organizations to view the logs for all of the organizations you manage.
![]() If you select an organization for which you do not have viewing rights, a message is displayed to inform you that you are not authorized to access the organization. See your System Administrator for assistance.
If you select an organization for which you do not have viewing rights, a message is displayed to inform you that you are not authorized to access the organization. See your System Administrator for assistance.
The Select Data Source section, located on the left, lists the two groups of history logs:
● My Own Church
● Family Directory
Within each group are options that let you filter the contents of the log. For example, selecting the Family Address option in the Family Directory group enables you to view requests to change family address information.
The Suspense History section shows the historical logs for change requests associated with My Own Church and Family Directory. This section contains features that enable you to organize the entries and create filtered views so that you can focus on specific items of interest.
Any log entry created by the system is listed in the History grid. For each entry, you can view details for the request, including the status of the request (for example, "Approved"), the name of the member who made the request, when the request was made, and when it was reviewed and by whom. If the reviewer entered any notes into the record, select the entry to view the associated notes.
The alphanumeric rolodex gives you the ability to retrieve and display only those records that start with the selected alphabetic or numeric character. See How to Filter Records for instructions on using the rolodex.

To clear the rolodex filters, click Clear Filter.
The advanced filter lets you enter multiple criteria (for example, review status and reviewer) and then display records matching the criteria you specify. Click ![]() to display the Advanced Filter setup. For instructions on using this filter, see How to Filter Records.
to display the Advanced Filter setup. For instructions on using this filter, see How to Filter Records.
To clear the Advanced filter, click ![]() .
.
The Suspense History grid has flexible and responsive columns that you can change as needed to suit your preference for viewing information. The columns have these features:
● Sortable: click a column header to sort entries in the grid based on the information in the column. For details, go to Sorting_the_Display_of_Records.
● Resizable: grab the border between two columns to increase or decrease the width of one of them. For details, go to Changing_Column_Widths.
● Moveable: drag and drop columns in the grid to suit your preference for viewing information. For details, go to Changing_Column_Widths and Rearranging_the_Columns.
Each record occupies a single row in the grid. To bring the information that extends beyond the borders of the grid into view, click and drag the horizontal scroll bar left or right.

If the grid contains multiple pages, the number of pages is displayed below the grid. Select a page to go directly to that page in the list. Alternatively, click  to page back or click
  to page forward through pages in the grid. The number of records appears in parentheses.
If the reviewer entered notes into the record related to the change request or to the action taken, the notes appear in this field.
How to Customize the Layout of a Page