This topic shows you how to send an e-mail message to one or more ministers in your organization. You can send an e-mail from the Minister Directory and Scheduling pages.
To send an e-mail message, you need a Web-based e-mail client or program, such as Gmail or Hotmail, or Microsoft Outlook.
Using a Web-based Email Program
There are several ways to select your e-mail recipients:
You can use the basic filters and the advanced filter options to create a list of e-mail recipients. You can then send an e-mail message to individuals in the filtered list.
You can use the page buttons to advance through the records in the list to find individuals. You can then individually select them. The application stores your selections as you move from page to page.
You can select all of the individuals displayed on the page or list that you are viewing, by clicking the checkbox heading.
![]() To deselect currently
selected individuals, click the checkbox heading again.
To deselect currently
selected individuals, click the checkbox heading again.
 to open the View
Recipients window.
to open the View
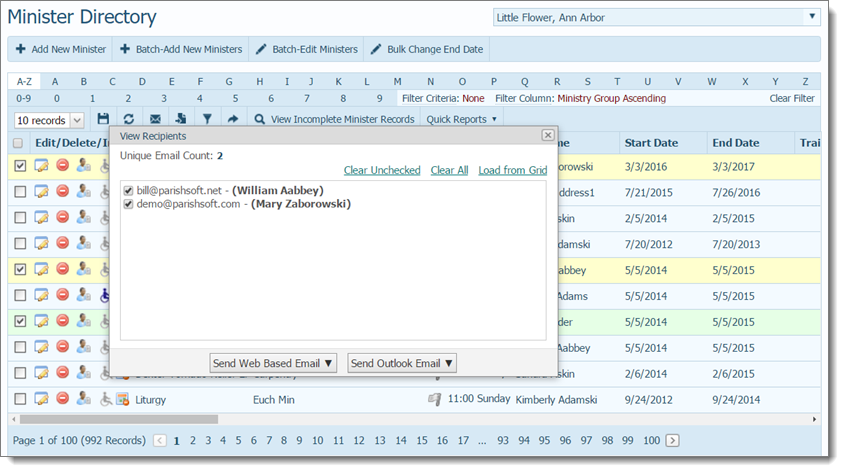
Recipients window.The window lists the e-mail addresses of the recipients you selected. For example:
![]() Only unique e-mail addresses
are included. If you select multiple recipients who have the same e-mail
address, the application selects the first individual it encounters with
the duplicate e-mail address and puts that individual in the View
Recipients list.
Only unique e-mail addresses
are included. If you select multiple recipients who have the same e-mail
address, the application selects the first individual it encounters with
the duplicate e-mail address and puts that individual in the View
Recipients list.

 to close
the window.
 .
.The View Recipients window re-opens. The individuals you selected are added to the list.
![]() If you selected recipients
from a filtered list, the Load from Grid
function loads all unique e-mail addresses from that filtered list. If
you selected recipients from your entire Family List or Member List, the
application loads all unique e-mail addresses from that list.
If you selected recipients
from a filtered list, the Load from Grid
function loads all unique e-mail addresses from that filtered list. If
you selected recipients from your entire Family List or Member List, the
application loads all unique e-mail addresses from that list.
 . Then, do the following:
![]() Be aware that the e-mail
addresses of multiple recipients listed in the To:
and Cc: lines can be seen by all
other recipients. This is typically not desirable because it makes your
recipients' e-mail addresses public. Consider using the Bcc:
line to keep your recipients' e-mail addresses private
Be aware that the e-mail
addresses of multiple recipients listed in the To:
and Cc: lines can be seen by all
other recipients. This is typically not desirable because it makes your
recipients' e-mail addresses public. Consider using the Bcc:
line to keep your recipients' e-mail addresses private
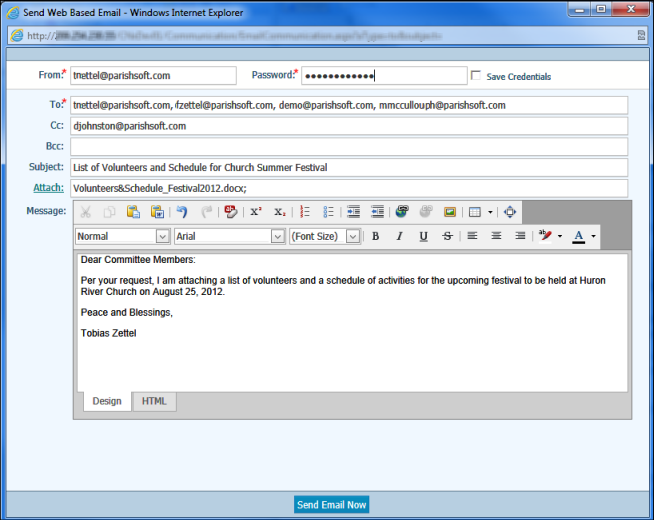
The Send Web Based E-mail window opens.
![]() If the window does not
open, check that you enabled pop-up windows to display in your browser.
For instructions on enabling pop-up windows, go to Allowing_Pop-Up_Windows.
If the window does not
open, check that you enabled pop-up windows to display in your browser.
For instructions on enabling pop-up windows, go to Allowing_Pop-Up_Windows.
By default, the application puts your e-mail address in the From: line the sender and in the To: line as the first e-mail recipient.
![]() You can use your keyboard's
Delete key to delete an e-mail address.
For example, if you do not want to receive a copy of your e-mail message,
you can delete your e-mail address from the To:
line. You can also cut or copy one or more e-mail addresses from one line
and then paste them into another line. You must use a comma to separate
e-mail addresses.
You can use your keyboard's
Delete key to delete an e-mail address.
For example, if you do not want to receive a copy of your e-mail message,
you can delete your e-mail address from the To:
line. You can also cut or copy one or more e-mail addresses from one line
and then paste them into another line. You must use a comma to separate
e-mail addresses.
Complete the fields in the e-mail header:
(Optional) Type (or copy and paste) e-mail addresses in the remaining e-mail recipient fields.
Type the subject of your e-mail message in the Subject: line.
If you have
a file to attach, click Attach. Browse
to the location on your hard drive and select the file. Click  to close the Attach File(s) window.
In the Message field, type the body content of your e-mail message.
Select a format for the body content of the message.
Design: Rich Text Format (RTF), the default message format for Web-based e-mail. Supports formatting, including bullets and alignment, various font styles and sizes, and background and text colors.
HTML: an HTML version of the body content for recipients who prefer HTML e-mail.
In the Password field, type the password you use to log in to your web-based e-mail application. If you want the system to remember your password, check the Save Credentials box.

To
send your e-mail message, click  .
.
![]() To
use Outlook, you must have both Outlook and Internet Explorer installed
on your computer. Your browser must be Internet Explorer and you must
also enable Internet Explorer's ActiveX controls. To enable ActiveX controls,
see How to Enable
ActiveX Controls in Internet Explorer.
To
use Outlook, you must have both Outlook and Internet Explorer installed
on your computer. Your browser must be Internet Explorer and you must
also enable Internet Explorer's ActiveX controls. To enable ActiveX controls,
see How to Enable
ActiveX Controls in Internet Explorer.
![]() You can use the basic
filters and the advanced
filter options to create your e-mail distribution list. You can then
send an e-mail message to individuals in the filtered list.
You can use the basic
filters and the advanced
filter options to create your e-mail distribution list. You can then
send an e-mail message to individuals in the filtered list.
![]() You can use the page buttons
at the bottom of the page through the records in the list so that you
can individually select the desired recipients for your e-mail message.
The application stores your selections as you move from page to page.
You can use the page buttons
at the bottom of the page through the records in the list so that you
can individually select the desired recipients for your e-mail message.
The application stores your selections as you move from page to page.
![]() To select all of the individuals
displayed on the page or list that you are viewing, click
To select all of the individuals
displayed on the page or list that you are viewing, click  (located in the
header). A checkmark
  appears next to each entry in
the grid. To deselect currently selected individuals, click
  again. The checkmarks
are removed.
 to open the View
Recipients window.
to open the View
Recipients window.The window lists the recipients you selected. For example:
![]() Only unique e-mail addresses
are included in this list. If you have multiple recipients in a list who
have the same e-mail address, the application selects the first individual
it encounters with the duplicate e-mail address and puts that individual
in the View Recipients list.
Only unique e-mail addresses
are included in this list. If you have multiple recipients in a list who
have the same e-mail address, the application selects the first individual
it encounters with the duplicate e-mail address and puts that individual
in the View Recipients list.

 to close
the window.
 .
.The View Recipients window is re-displayed. The individuals you selected are added to the list.
![]() If you selected recipients
from a filtered list, the Load from Grid
function loads all unique e-mail addresses from that filtered list. For
example, if you selected recipients from your entire Minister Directory,
the application loads all unique e-mail addresses from that list.
If you selected recipients
from a filtered list, the Load from Grid
function loads all unique e-mail addresses from that filtered list. For
example, if you selected recipients from your entire Minister Directory,
the application loads all unique e-mail addresses from that list.
 . Then, do the following:
![]() Be aware that the e-mail
addresses of multiple recipients listed in the To:
and Cc: lines can be seen by all
other recipients. This is typically not desirable because it makes your
recipients' e-mail addresses public. Consider using the Bcc:
line to keep your recipients' e-mail addresses private.
Be aware that the e-mail
addresses of multiple recipients listed in the To:
and Cc: lines can be seen by all
other recipients. This is typically not desirable because it makes your
recipients' e-mail addresses public. Consider using the Bcc:
line to keep your recipients' e-mail addresses private.
Select the line in which you want the selected recipients' e-mail addresses to appear:
To: typically used for recipients to whom you are directly communicating. If have multiple recipients in the To: line, each recipient can see the e-mail addresses of all other recipients.
Cc: (short for Carbon Copy or Courtesy Copy) recipients who receive a copy of your e-mail message.
Bcc: (short for Blind Carbon Copy) typically used for recipients to whom you are not directly communicating, but whom you want to receive a copy of your e-mail message. E-mail addresses of recipients listed in the Bcc: line cannot be seen by other recipients.
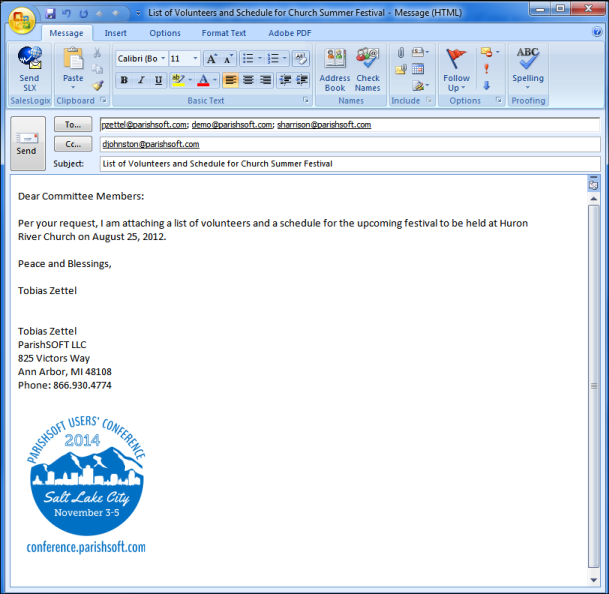
Outlook opens. By default, the application puts your e-mail address in the To: line as the first e-mail recipient.
Complete the fields in the e-mail header:
(Optional) Type e-mail addresses in the remaining e-mail recipient fields.
Type the subject of your e-mail message in the Subject: line.
If you have
a file to attach, click  . Browse to the location
on your hard drive and select the file. Click
  to attach the file.
In the Message field, type the body content of your e-mail message:

To
send, click  .
.