
Configuring Ministry Scheduler entails adding all of your ministry groups, ministries, and events. If desired, you can specify roles, but that task is optional.
Adding Additional Ministries to a Ministry Group
(optional) Defining Minister Roles
It is advisable to plan ahead for how you are going to use your ministry records by creating a configuration that provides the type of output you desire. See Planning Your Configuration for suggestions and examples of some common configuration scenarios to help you get started on a configuration that meets your needs.
If you are migrating to Ministry Scheduler from the desktop Time & Talent application, your data is automatically imported into Ministry Scheduler. You configuration task entails reviewing the imported data and then using the procedures in this topic to add missing groups, ministries, and events.
If you are a first time user, it is assumed that you have completed creating all of your family and member records in ParishSOFT Family Directory. Your configuration task entails manually configuring Ministry Scheduler from scratch by following the procedures in this topic in the order given.
The following illustration gives you an idea of what a complete configuration can look like:
Examples of ministry groups are liturgy, charitable groups, youth groups, choirs, trainers, and athletic groups, to name a few. For each group you add, you must also identify one of its ministries and an event for that ministry. Complete this procedure for each group that you want to add.
In the Groups section, click  .
.
The Add Ministry Group dialog box is displayed:
![]() The asterisk (*) indicates that the information is required.
The asterisk (*) indicates that the information is required.

Type a name for the group in the Group Name field and for the ministry in the Ministry Name field.
![]() If you decide later that you want to change a name that you enter, see Changing the Name of a Group, Ministry, or Role for instructions.
If you decide later that you want to change a name that you enter, see Changing the Name of a Group, Ministry, or Role for instructions.
If you want the name of the ministry to be viewable by members who log in to My Own Church, leave the Public checkbox selected. Otherwise, deselect the Public checkbox.
If you selected the Public checkbox, a blue “people” icon ![]() is displayed next to the group’s name on the Configuration page. The blue color indicates that members can see the ministry listed as a volunteer opportunity on their My Ministry tab when they log in to My Own Church. If you do not check the Public box, the “people” icon displayed on the Configuration page has no color
is displayed next to the group’s name on the Configuration page. The blue color indicates that members can see the ministry listed as a volunteer opportunity on their My Ministry tab when they log in to My Own Church. If you do not check the Public box, the “people” icon displayed on the Configuration page has no color ![]() , indicating that the ministry is private and visible only to administrators.
, indicating that the ministry is private and visible only to administrators.
Type a name for the event and select a time. If the event has no time, check the Check For No-Time Event box.
In the Event Occurrence section, do one of the following:
![]() For tips on using the calendar
For tips on using the calendar ![]() , see How to Use the Calendar to Set a Date.
, see How to Use the Calendar to Set a Date.
If the event takes place on a single occasion, select the One Time Event option. Click ![]() and then select the date for the event.
and then select the date for the event.
If the event takes place on multiple occasions:
Select the Recurring Event option. Click ![]() and then specify a start date.
and then specify a start date.
Select one of the end date options.
Indicate whether the event occurs weekly or monthly.
Specify the number of weeks and the day or days of the week the event takes place on.
Click  .
.
The group is added to the Groups section along with the ministry and event information you provided.
If a group contains other ministries, you need to add them to the group. For each ministry that you want to add to a group, complete the following:
In the Groups section, select the desired group.
In the Ministries section, click to display the Add Ministry dialog box:
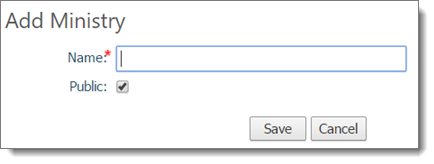
In the Name field, type the name of the ministry (for example, "Usher").
If you want the ministry to be viewable to members who log in to My Own Church, leave the Public box checked (the default). Otherwise, clear the Public box.
![]() Members who log in to My Own Church and select the Volunteer link under My Ministry > Ministry Opportunities will see all of the ministries that are marked "Public" and be able to select them to volunteer.
Members who log in to My Own Church and select the Volunteer link under My Ministry > Ministry Opportunities will see all of the ministries that are marked "Public" and be able to select them to volunteer.
Click  .
.
The name of the ministry is added to the list of ministries for the group you selected. If you checked the Public option, members can see the name of the ministry on the My Ministry tab after logging in to My Own Church.
If desired, you can define specific roles or positions for which ministers in a given group and ministry are qualified to assume. Roles typically correspond to a specific job, skill, or duty, such as “group leader” or “secretary”.
For each role that you want to define, complete the following:
In the Groups section, select the desired group.
In the Roles section, click to display the Add Ministry Role dialog box:

In the Name field, type the name of the role (for example, “team leader” or “counselor”).
Click .
The role is added to the list of roles for the group you selected.
When you added a group, you defined a single event for the group. If a group serves at more than one event, you need to add all events to the group. For each event that you need to add, complete the following:
In the Groups section, select the desired group.
In the Events section, click to display the Add Event setup dialog box:

You can supply a name for the event and configure details about it, such as the time and date, frequency (monthly or weekly), and recurrence. You can also indicate whether the event is special and whether it fulfills an obligation for Sunday Mass.
In the Name field, type the name of the event (required).
![]() If you want to show the time of the event, include the time as part of the name of the event when you type it in the Name field (for example, type “2nd Sunday Mass Meeting 11am”).
If you want to show the time of the event, include the time as part of the name of the event when you type it in the Name field (for example, type “2nd Sunday Mass Meeting 11am”).
Provide detailed information for the event. For descriptions of the fields, see Event Fields.
Click .
The event is added to the list of events for the group, ministry, and role (optional) you selected.
<Back to schedule creation diagram>