Before you undertake the detailed task of configuring Ministry Scheduler, gather information about your organization's ministry groups and use that information to plan your configurations. Thinking things out in advance is a worthwhile investment of your time. For one, planning can help ensure that you create configurations that meet your organization's needs. Planning can also save you time and effort in the long run by enabling you to avoid mistakes that can cause you to have to undo and redo configurations.
This topic provides ideas and suggestions to help you plan and configure Ministry Scheduler. The information applies to both Time & Talent users and first-time users of Ministry Scheduler.
Understanding Ministry Scheduler's Configuration Categories
Defining Your Groups and Ministries
Should a Group Be Configured as a Ministry Group or a Ministry?
What Type of Output Do You Want?
What Types of Reports Do You Need?
Evaluating Your Configurations
Ministry Scheduler provides four main categories to enable you to define the structure of your organization's ministries:
● Group: a group is the highest level element in your configuration and consists of separate, independent entities in your organization. Groups can contain subgroups, called ministries (see next item in this list), which share activities and events in common with the top-level group. If you define events for a group, they are uniquely associated with the group only—not with its individual subgroups, if specified. In the reporting system, you can track and filter on individual groups. However, you cannot roll up group-level data for aggregate reporting.
● Ministry: a ministry is a subgroup within the top-level Groups category (see previous item in this list). Ministries within a group share events and activities with the other ministries in the group. Events are associated with the Groups category only—not with the individual ministries, if specified. In the reporting system, you can track and filter on a ministry and you can roll up ministry-level data for aggregate reporting.
● Role: a role is a position to be filled by one or more qualified ministers (for example, "service leader", "coach", or "speaker"). A role, furthermore, is a configuration grouping, but in the reporting system, it functions as a text label only. This means that you cannot track or filter on a role and view role-associated data.
![]() If a
role is an important data element that you want to track and view in your
reports, one creative solution is to use the Ministries
group to specify the role. Then, you can filter on the
role and view its data in your reports. For example, if you have a need
to filter on catechists, create a ministry named "Catechist".
If a
role is an important data element that you want to track and view in your
reports, one creative solution is to use the Ministries
group to specify the role. Then, you can filter on the
role and view its data in your reports. For example, if you have a need
to filter on catechists, create a ministry named "Catechist".
● Event: an event is an organization's meetings or gatherings (for example, a Mass, a worship service, a festival, or a youth board meeting). As previously mentioned, events configured in this category are directly associated with the Groups category only.
If you are interested in viewing and tracking a group's events, a good starting point is to make a list of events associated with your top-level group. (In the application, this entails creating the group first and then adding events to it.) If your top-level group has subgroups (defined in the Ministries category), keep in mind that events are not unique to ministries but to the top-level group only. If it is important to keep a ministry's events separate, elevate the ministry to the Groups category. In other words, make the ministry a group.
As you analyze your organization, you need to think about how your organization's ministries fit into the aforementioned configuration categories.
To get the most out of the application, configure Ministry Scheduler to mimic the current structure of your organization and its ministries. If your final configurations match up precisely, you will find it easier to extract minister data and, more importantly, produce reports that present that data in meaningful ways to you and your ministers.
As an important first step, identify all of your organization's groups and ministries. If any of your ministries can be subdivided into smaller groups, you should also identify those subgroups as well. In addition, list each group's events. No detail is required at this stage. Simply listing your groups and mapping them to their respective events is sufficient. We recommend that you define your groups on paper or in a word processing document so that you can see everything in writing before committing your configurations to the application.
After you have all of your groups listed, you need to figure out how to best fit them into the design of the application; that is, into the four configuration groups listed earlier. For certain groups, it may be difficult for you to determine whether or not they should be configured as a top-level group (in the Groups category) or as a subgroup (in the Ministries category). To make this determination, ask yourself "how will this group be managed?" Consider whether the group will be managed as an independent entity with events that are unique and separate from those of other groups in your organization or whether the group will be managed as a subgroup where it will share resources (people) and events with peer subgroups. After you make a determination about the group's characteristics, consider these suggestions:
● If a group is entirely independent and has its own unique set of events, it probably makes sense to configure that group as a top-level group in the Groups category. For details, go to How to Add Ministry Groups, Ministries, Events, and Roles.
For example, suppose you have a Boy Scouts group and a Girl Scouts group in your organization. And, supposed that each group is primarily focused on its own activities and shares few activities and events with the other group. In this case, you would probably want to create separate top-level groups: Boy Scouts and Girl Scouts.
● If a group functions as part of a larger group and shares resources and events with other peer subgroups, it probably makes sense to configure it as a subgroup in the Ministries category. For details, go to How to Add Ministry Groups, Ministries, Events, and Roles.
For example, suppose the Boy Scouts group and the Girls Scout group often work together and share activities and events. In this case, you would probably want to indicate that peer relationship by configuring them as subgroups or ministries within a top-level group. You could label the top-level group "Scouts" (in the Groups category), and add "Boy Scouts" and "Girl Scouts" as subgroups (in the Ministries category).
Consider these factors when trying to decide whether to make a group a ministry group or a ministry:
● Standalone groups cannot be aggregated. That is, Ministry Scheduler's reporting system cannot roll up data in the Groups category and produce summary or aggregate reports of your top-level groups. The subgroup level is the highest level at which you can get aggregate views of your data. Therefore, if one of your goals is to roll up data and do summary reporting, you will achieve that goal more efficiently if you configure the group as a subgroup. At the Groups level, you can generate individual lists and schedules by group, but you will have to do any summary or aggregate reporting outside of the application.
● The scheduler aims to create fair and balanced schedules for your ministers. It will attempt to prevent double-scheduling of ministers that belong to a group that contains shared ministries.
● Having a lot of ministry groups can present a usability disadvantage when you are working in the application. While the application's list boxes can accommodate many items, the default size of the box determines how many items are visible at a time. If a list contains too many items, you will have to use the scroll bar to view them all. And, the longer a list, the longer it takes for you to locate the group you are looking for.
Every church's needs are unique, and there are a variety of ways to configure Ministry Scheduler to meet those needs. Before you jump in and modify existing configurations or create ones from scratch, give careful thought and consideration to what types of output you want.
Ministry Scheduler is designed to support volunteer management activities, specifically the scheduling of volunteers and the tracking of their contact information, skills, availability, and interest. The application enables you to easily create schedules and organize ministers who volunteer to serve at weekly worship services and church-sponsored special events, such as church programs and social gatherings like festivals and picnics.
If your organization has less than 50 active volunteers, you may require no more than several simple lists to manage your ministers' assignments and associate your volunteers with specific events and serving dates/times. However, if your organization consists of several hundred volunteers or more, your scheduling requirements will necessarily be more detailed and complex. You may need to fill a number of individual assignments as well as assignments of those who serve collectively in minister groups. To add to the complexity, you may need to set up schedules for one-time events and rotating schedules for recurring events. Your schedules may need to take into account various contingencies, such as your ministers' availability and serving preferences, vacation and exception (block-out) dates, and special training or screening requirements.
If your goal is to manage events for groups and fill time slots with individual volunteers or groups of volunteers, the output you desire is a schedule. At a minimum, you will need to define all of your top-level (main) groups (Groups) and specify each group's activities (Events). If a top-level group contains subgroups (Ministries), such as "choir member", "greeter", or "food server", you can represent this secondary level of detail by adding each subgroup (as a separate ministry) to the main group's configuration. You can then track, schedule, and report on each top-level group and, if needed, break out and generate schedules and assignment lists by subgroup.
Ministry Scheduler is also designed to simplify the process of creating and managing rosters or lists of ministers. A roster can be as simple as a list of names of ministers who belong to a certain group, but a roster can also contain other useful information. With Ministry Scheduler, you can create a variety of rosters, each designed to serve a specific purpose. For example, you can create a talent pool roster comprised of ministers who have special skills, volunteer interests, or types of knowledge. You can also create an "always available" roster that lists ministers in your organization who are available to serve on work days, in undesirable time slots or locations, or on short notice. Having a special "availability" roster can come in handy when you need to quickly backfill a minister who cannot serve due to a scheduling conflict or illness.
If your goal is to build a roster, your desired output is a list. At a minimum, a roster configuration contains a top-level group (Group). A slightly more complex roster can be configured to organize ministers into subgroups (Ministries) by function, skill, or position. Because a typical roster has no events associated with it, most likely you will not need the Event category in your configuration.
![]() The application
requires that you add an event for each group that you configure. To satisfy
the requirements of the application, you can give the event a general
label, such as "Any Event" or "n/a".
The application
requires that you add an event for each group that you configure. To satisfy
the requirements of the application, you can give the event a general
label, such as "Any Event" or "n/a".
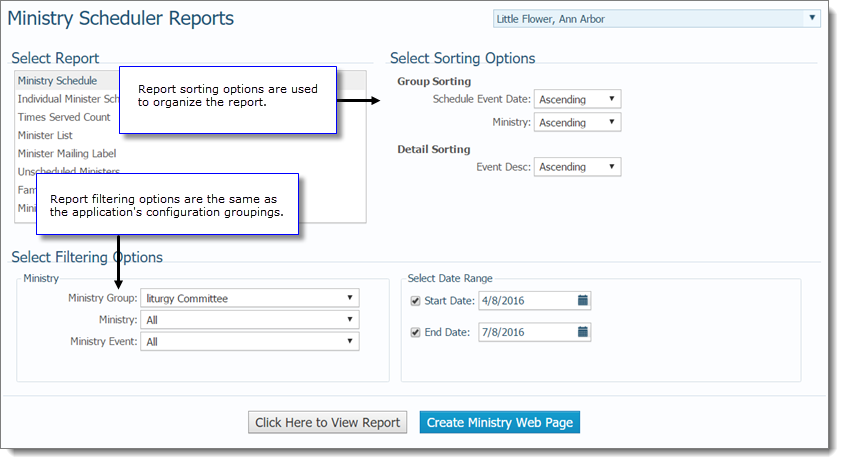
The reports are your output, and a well-planned configuration enables you generate reports that meet your needs. As you develop your configurations, think about the types of reports you will want to create.
In the reporting system, the filters are tools that simplify reporting, enabling you to view subsets of your data. Note that the report filters correspond exactly to the three primary configuration categories: Group, Ministries, Events.
![]() The Role configuration group
is not associated with a report filter. It merely functions as a text
label for data entry.
The Role configuration group
is not associated with a report filter. It merely functions as a text
label for data entry.
This one-to-one correspondence between the report filters and configuration categories is significant. That is, when you select and apply report filters to your minister records, the application searches for data that matches the filter criteria you specify. If your configurations are set up to correctly reflect your organization's groups and structure, the filters—when applied—will obtain better matches, and you will be able to generate the types of reports you desire.
![]() Sorting options
enable you to format and organize the information in the report
for easier reading.
Sorting options
enable you to format and organize the information in the report
for easier reading.
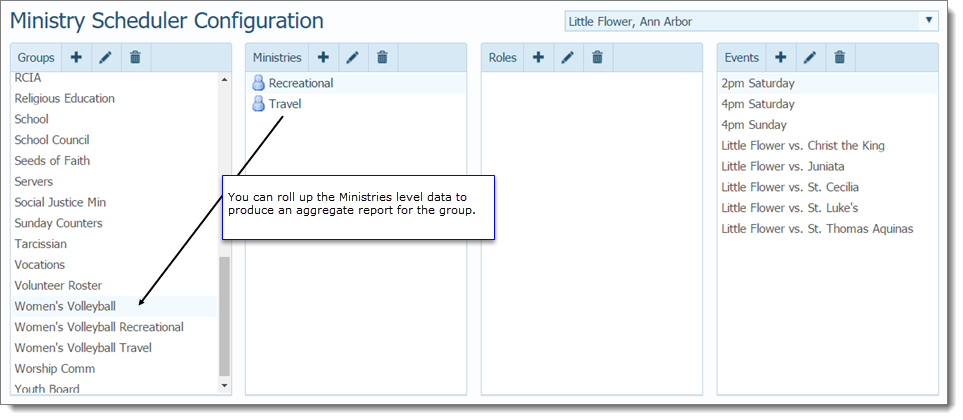
Consider the following configuration in which the top-level Women's Volleyball group consists of two ministries, Recreational and Travel. For any configuration like this composed of subgroups or ministries, you can produce an aggregate (roll-up) report for the top-level group that combines data from all of the subgroups you created in the Ministries category.
![]() Any
group in the Groups level category
is an independent entity whose data cannot be aggregated or rolled up
in the reporting system. You can produce separate groups-level reports.
However, if you want to roll up groups-level data, you must do this outside
of Ministry Scheduler.
Any
group in the Groups level category
is an independent entity whose data cannot be aggregated or rolled up
in the reporting system. You can produce separate groups-level reports.
However, if you want to roll up groups-level data, you must do this outside
of Ministry Scheduler.
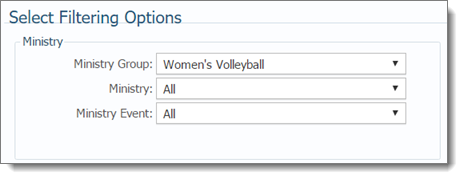
For example, from this configuration, you can produce an aggregate schedule for the entire Women's Volleyball group by selecting Ministry Schedule as the report type, and then selecting the desired filtering options:
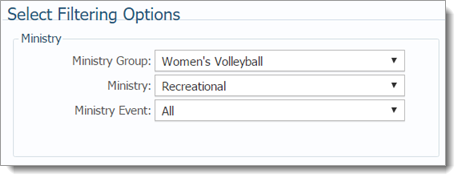
From the same configuration, you can a generate separate schedule for each ministry. Again, by selecting the desired filters:
We recommend that you create a few test configurations that reflect common usage and then evaluate them before investing a lot of time in setting up the application. Following is a suggested process for creating and testing your configurations:
Review the configuration scenarios shown in the topic Examples of Configuration Scenarios.
Create a few configurations that match your organization.
View the results of your configurations:
Make sure you see what your ministers see. To check how a configuration looks to your ministers, do the following:
Log in to your account.
Select the Home tab under Quick Links, select the My Own Church link.
Select the
My Ministry tab, and then click  .
.
View how your groups appear on the Ministry Opportunities list. If you do not like what you see, make the necessary revisions and then recheck.
Generate a few test reports and schedules to see if you achieve the desired output.
After you are satisfied with the test configurations you created and their output is acceptable, proceed to configure Ministry Scheduler.
About the Ministry Scheduler Configuration Page
Configuring Ministry Scheduler
How to Add Ministry Groups, Ministries, Events, and Roles
How to Edit and Delete Ministry Groups, Ministries, Events, and Roles
Examples of Configuration Scenarios