Click  to display the Schedule Options page:
This procedure shows you how to specify a start date for the scheduler and how to specify the number of ministers needed for each ministry event in your organization.
Click to display the Schedule Options page:

The page has two tabs, which allow you to configure two general setup options that determine how scheduler operates:
General
The Times Served Start Date value is the date you specify as the start date. The scheduler uses that date to start counting of the number of times each minister has served.
![]() One of the fundamental principles of the automated scheduler is to create fair and balanced schedules. This means that scheduling is done as evenly and accurately as possible. To enable the scheduler to accomplish this goal, it needs you to specify the date when it should begin keeping track of the number of times the ministers in your organization have served.
One of the fundamental principles of the automated scheduler is to create fair and balanced schedules. This means that scheduling is done as evenly and accurately as possible. To enable the scheduler to accomplish this goal, it needs you to specify the date when it should begin keeping track of the number of times the ministers in your organization have served.
You should check the value of the Times Served Start Date every time you generate a schedule to make sure that the scheduler uses the correct date as a starting reference.
Ministers Needed
This tab lists all of your ministry events. You must specify how many people should be scheduled for each event. The scheduler uses this information to make ministry assignments.
Select the General tab. Then, click the Edit General Schedule Options link on the far right.
The General Schedule Options window opens:

Under Times Served Type, choose one of these options:
Time Frame: select a time frame (0 Months (Current Day), 1 Month, 3 Months, 6 Months, 9 Months, or 12 Months). The scheduler will count back the selected number of months from the current date (that is, today’s date minus the selected number of months) and use that date to start counting the number of times your ministers have been scheduled.
![]() To enable the scheduler to create the fairest and most balanced schedules, we recommend that you set the first day of the interval for which you are scheduling as the start date (for example, 1/1 to 1/31; 6/1 to 12/31). Doing so resets the “times served” start date to zero for the scheduling period, and the times served count begins on the same date for all of your ministers.
To enable the scheduler to create the fairest and most balanced schedules, we recommend that you set the first day of the interval for which you are scheduling as the start date (for example, 1/1 to 1/31; 6/1 to 12/31). Doing so resets the “times served” start date to zero for the scheduling period, and the times served count begins on the same date for all of your ministers.
Specific Date: supply the exact date that you want the scheduler to begin counting the times your ministers have been scheduled.
Click  to save your selection and return to the General tab.
Select the Ministers Needed tab to display the Ministers Needed dialog box:
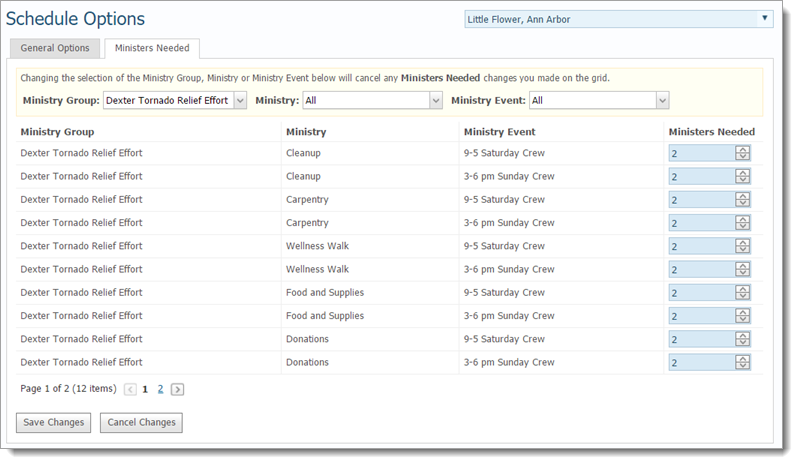
At the top of the tab, select the options from the Ministry Group, Ministry, and Ministry Event lists.
After each selection, the content refreshes and information matching your selection is displayed.
For each event, select the number of ministers required in the Ministers Needed column.
When done, click  .
.
The following message is displayed: Your changes have been saved.
![]() You can save changes a page at a time, several pages at a time, or after you make all of your Ministers Needed selections. To save selections a page at a time, make your selections on the page and then click . To save changes several pages at a time, make your selections on a page and then use the Page buttons at the bottom to advance to subsequent pages. When ready to save all changes, click .
You can save changes a page at a time, several pages at a time, or after you make all of your Ministers Needed selections. To save selections a page at a time, make your selections on the page and then click . To save changes several pages at a time, make your selections on a page and then use the Page buttons at the bottom to advance to subsequent pages. When ready to save all changes, click .
 to dismiss the message and return to the Ministers Needed tab.
After you save all of your Ministers Needed selections, your basic configuration of the scheduler is completed.
You are now ready to generate a schedule. See How to Generate a Schedule.
About the Scheduling Options Page
<Back to schedule creation diagram>