You can manually schedule ministers for events, you can use the auto-scheduler, or a combination of both methods. The procedures in this topic guide you through both methods.
Manually Scheduling Specific Ministers for an Event
Using the Auto-scheduler to Create a Schedule
If you have not done so already, set up the scheduler. After you complete the setup, you are ready to generate schedules.
● If you have specific ministers that you want to manually schedule for an event, follow the instructions to manually schedule ministers for events.
● If you want the auto-scheduler to make your minister selections for you, follow the instructions to use the auto-scheduler to create a schedule.
Suppose that you want to schedule specific ministers for a special event or a one-time-only service. In such instances, you can manually select the ministers you want and assign them to the event. If the ministers-needed requirement for the event is still unmet, you can then run the auto-scheduler to fill any open slots in the event’s schedule. Follow these steps to manually assign ministers to an event.
![]() If you need to find out who is currently assigned to an event or if you want to see a list of ministers who are available to serve, see How to View the Status of Minister Assignments for an Event. Then, return to this procedure to input your changes.
If you need to find out who is currently assigned to an event or if you want to see a list of ministers who are available to serve, see How to View the Status of Minister Assignments for an Event. Then, return to this procedure to input your changes.
 to display the Scheduling page.
 .
.The following message is displayed: Successfully generated schedule events.
 to dismiss the message.
The Scheduling page lists all of your events.
Then, click  (on the top-right).
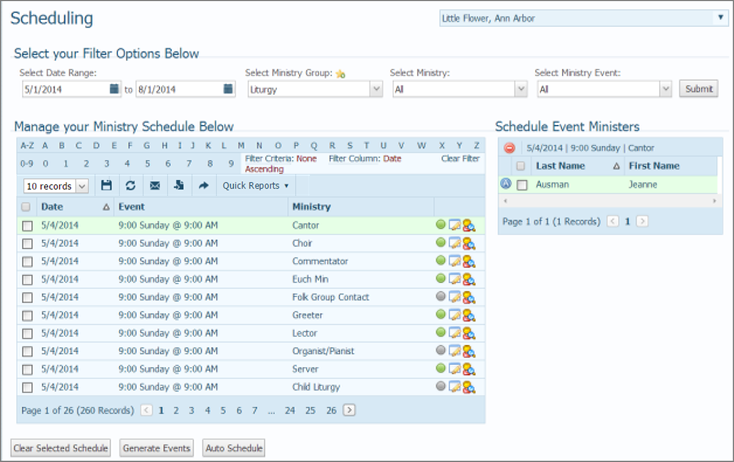
The content refreshes, and a list of events matching your filter selections is displayed. The status icons on the right indicate the following:
![]() To specify the minister requirement (ministers needed) for an event, go to How to Set Up the Scheduler.
To specify the minister requirement (ministers needed) for an event, go to How to Set Up the Scheduler.
![]() (Green): All of the ministers required for the event have been assigned.
(Green): All of the ministers required for the event have been assigned.
![]() (Green with an asterisk): The event is overscheduled (has more ministers than needed).
(Green with an asterisk): The event is overscheduled (has more ministers than needed).
![]() (Gray): No ministers are assigned to this event because no minister requirement is specified in the setup for the event. (To specify the number of ministers needed, see How to Set Up the Scheduler. )
(Gray): No ministers are assigned to this event because no minister requirement is specified in the setup for the event. (To specify the number of ministers needed, see How to Set Up the Scheduler. )
![]() (Yellow) The minister requirement specified for this event has not been met. Some ministers are scheduled, but the number needed has not been satisfied.
(Yellow) The minister requirement specified for this event has not been met. Some ministers are scheduled, but the number needed has not been satisfied.
![]() (Red) None of the needed ministers are currently assigned to this event.
(Red) None of the needed ministers are currently assigned to this event.
 to display the Manual Scheduling page for the event that you want to manually schedule.
The Ministers Needed field shows you the number of ministers required for the event. The Current Schedule Event Ministers grid shows the names of ministers currently selected for the event.
For example to view ministers who indicated that they can serve as substitutes only for the selected event, select the Sub-Only option.
 .
.A message is displayed to inform you that the selected ministers are now scheduled for the event.
to dismiss the message.The ministers you assigned are now listed in the Current Schedule Event Ministers section on the left. This icon is displayed to indicate that the minister was manually scheduled by the administrator: ![]() .
.
 .
.The main Scheduling page is displayed. The ministers you added are displayed in the Schedule Event Ministers list on the right.
If you need to schedule additional ministers, you can continue to add them manually by repeating this procedure. Or, you can run the auto-scheduler and let it help you fill remaining open slots for you. See Using_the_Autoscheduler_to_Create_a_Schedule.
Follow these steps to have the autoscheduler create a schedule for you:
to display the Scheduling page.For example, in the following illustration, we selected Group=Women's Volleyball, Ministry=Travel, Event=Little Flower vs. Christ the King.

.The application loads your filter selections.
 .
.The automatic scheduling process begins. After the process completes, the following message is displayed: Successfully auto scheduled.
to dismiss the message and view the generated schedule that matches your filter selections.In the following illustration, you can see the schedule generated by the auto-scheduler that matches the filter selections entered in Step 2:
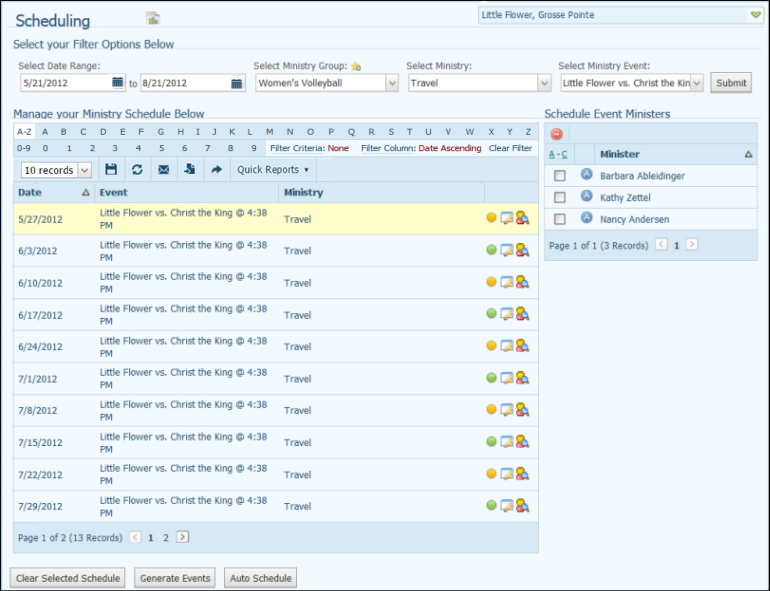
The status icons on the right indicate the following:
![]() (Green): All of the ministers required for the event have been assigned.
(Green): All of the ministers required for the event have been assigned.
![]() (Green with an asterisk): The event is overscheduled (has more ministers than needed).
(Green with an asterisk): The event is overscheduled (has more ministers than needed).
![]() (Gray): No ministers are assigned to this event because no minister requirement is specified in the setup for the event. (To specify the number of ministers needed, see How to Set Up the Scheduler. )
(Gray): No ministers are assigned to this event because no minister requirement is specified in the setup for the event. (To specify the number of ministers needed, see How to Set Up the Scheduler. )
![]() (Yellow) The minister requirement specified for this event has not been met. Some ministers are scheduled, but the number needed has not been satisfied.
(Yellow) The minister requirement specified for this event has not been met. Some ministers are scheduled, but the number needed has not been satisfied.
![]() (Red) None of the needed ministers are currently assigned to this event.
(Red) None of the needed ministers are currently assigned to this event.
How to Add Ministers and Remove Ministers from a Schedule
Troubleshooting Scheduling Results
How to View the Status of Minister Assignments for an Event
Publishing_a_Ministry_Schedule_to_the_Web
<Back to schedule creation diagram>