This topic shows you how to create, upload, and import a file containing your organization’s contributions from non-ParishSOFT systems into ParishSOFT Offering.
![]() You must
have View + Add/Edit
and Import permissions to
import a file containing contributions from non-ParishSOFT
systems.
You must
have View + Add/Edit
and Import permissions to
import a file containing contributions from non-ParishSOFT
systems.
The import file can have any name, but it must have a .csv (comma separated value) extension and meet the file header and contribution data requirements detailed in the tables in the following sections. The file must contain contribution records only—no pledge records are accepted. To view an example of an import file, see Import_File_Example.
After you create the file save it to your hard drive. Make note of where you save the file because you will need to locate it when you do the import.
The first row of the import file contains the header. The header is required and must contain the following information:
Column |
Expected Data |
Description |
A |
H |
Identifies the header row. |
B |
Organization ID |
Organization ID. |
C |
2 |
Identifies the type of data in the file. 2: indicates that the file contains contributions only. |
Contribution data immediately follows the header row. Each contribution record occupies a single row. The following tables detail the required and optional data in a contribution record.
The data required in each contribution record is identified in the following table. If a given record is missing any this data, the system cannot import it.
Column |
Expected Data |
Description |
A |
C |
C: Identifies a contribution record. |
B |
Envelope # |
Family envelope number. Data in this column is required if your system is configured to use the family envelope number as the preferred identifier for family and member contributions. The option that sets the envelope number as the identifier is located in the Administration module on the Module Settings page. Only a user with organization administrator privileges can configure the option.
|
C |
Amount |
Contribution amount in xx.xx format. |
D |
Date |
Contribution date in mm/dd/yyyy format. |
E |
Fund ID |
Fund ID. |
A contribution record can contain the data defined in the following table, but this data is not required.
Column |
Expected Data |
Description |
F |
Check number |
Check number. Any combination of alphanumeric characters. Up to 50 characters allowed. |
G |
Cash, Credit, Check |
Payment Type. |
H |
Memo |
Memo text. Any combination of alphanumeric characters. Up to 980 characters allowed. |
I |
Pledge DUID |
Pledge ID. Must be an integer. Letters, symbols, and spaces are not allowed. |
J |
External Contribution ID |
External Contribution ID. |
K |
Diocesan ID |
Diocesan ID. Any combination of alphanumeric characters. Up to 20 characters allowed. Data in this column is required if your system is configured to use the Diocesan ID as the preferred identifier for family and member contributions. The option that sets the Diocesan ID as the identifier is located in the Administration module on the Module Settings page. Only a user with organization administrator privileges can configure the option.
|
L |
0 or 1 |
0: indicates that the contribution is not anonymous. 1: indicates that the contribution is anonymous. |
The following illustration shows you an example of an import file containing contribution data from non-ParishSOFT systems. Note that the first row contains header information. The remaining rows in the file contain contribution data in the imported records:

Click the Offering tab. Then,
click  to display
the Import page:

If you manage multiple organizations, select the desired organization from the Organization list.
Upload the file containing the contributions and Pledges to ParishSOFT Offering. To do this, complete these steps:
Click  .
.
In the Open
window, navigate to the location where you saved the .csv file. Select
the file, and then click  .
.
The name of the file appears to the left of the Browse button. A green bar shows you the progress of the upload.
The system processes the file, and then does one of the following:
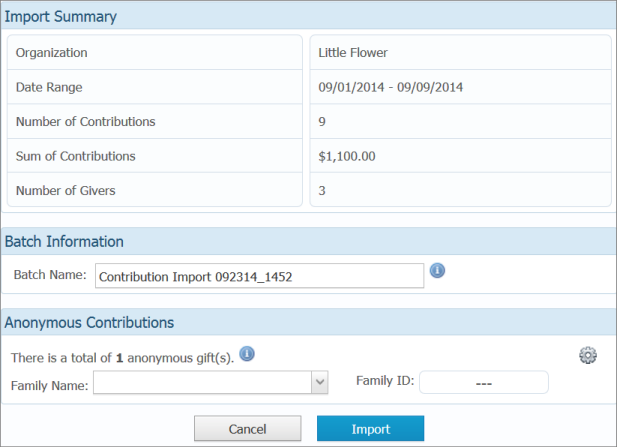
Displays the Import Summary page if it can successfully read the contents of the file. You can use the summary to verify that the contents of the file are correct before importing it.
![]() The summary includes
information only from records in the funds you have permission to access.
The summary includes
information only from records in the funds you have permission to access.

OR
Displays an error message or warning if it detects a problem with the file.
Do one of the following:
If the Import Summary page is displayed, complete Steps 4a - 4d below:
Review the summary information to make sure it is correct. Do one of the following:
If the information is correct, go to Step 4b.
If
you uploaded the wrong file, click  . Then, repeat
Step 3 to upload the right file.
The system creates a batch record and gives it a name, which is shown in the Batch Name field. Make note of the record's name. After the file is imported, the system places it on the Batch Management page where you view its details.
Do one of the following:
If you want to change the name of the batch record, type a new name in the Batch Name field.
If you do not want the change the name of the batch record, go to Step 4d.
Under Anonymous Contributions, a message is displayed that lets you know whether the file contains anonymous gifts. Do one of the following:
If
the file contains anonymous gifts, click  in the Family Name field. Select the name of your organization's
anonymous (fictitious) family. In the Family
ID field, the system automatically
enters the family DUID associated with the family you selected.
![]() If you have an anonymous
or fictitious family (in Family Directory) set up to receive anonymous
gifts, select the name of that family from the list. If you don’t see
the name, select (Search for
an Existing Family) to locate the family.
If you have an anonymous
or fictitious family (in Family Directory) set up to receive anonymous
gifts, select the name of that family from the list. If you don’t see
the name, select (Search for
an Existing Family) to locate the family.
![]() If you do not have
an anonymous or fictitious family set up in Family Directory, you can
quickly create one by selecting (Add
New Anonymous Family).
If you do not have
an anonymous or fictitious family set up in Family Directory, you can
quickly create one by selecting (Add
New Anonymous Family).
![]() If you want to remove
the name of a family from the Family Name
list, click
If you want to remove
the name of a family from the Family Name
list, click ![]() .
.

If the file contains no anonymous gifts, go to Step 6.
OR
If an error message is displayed, go to this topic for information about how to resolve the error: How to Resolve Errors for Contribution Imports from Non-ParishSOFT Systems. Fix the problem. Then, come back to this procedure, starting at Step 4 to upload the file and retry the import.
Click  .
.
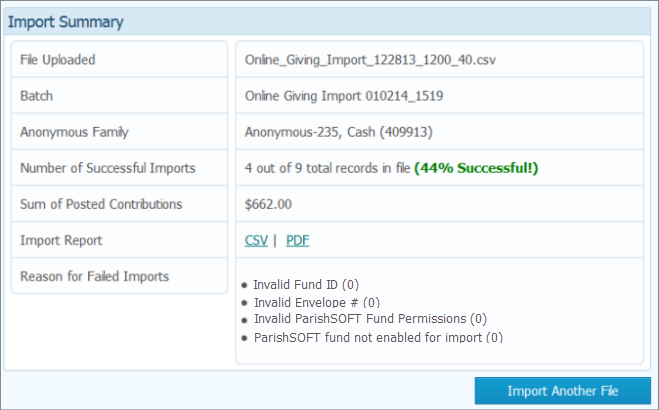
The system processes the file and attempts to import records into ParishSOFT Offering. When processing completes, the system displays the Import Summary:

The summary includes details about the import, including the name of the import file, the number of successfully imported records, the total dollar amount of contributions in the file, and the reasons why the system failed to import certain records in the file.
Take one of the following actions:
Click
![]() to
import another file.
to
import another file.
If the Import Summary indicates that the import was less than 100% successful, click PDF or CSV to view the import report. Fix the errors identified in the report, and then re-import the file. If the file contains contributions with external contribution IDs, re-importing the file will result in duplicate records. We recommend that you delete any duplicate records.
Exit the summary. To do this, simply go click a button (for example, Batches or Reports) to go to another area of the application or click SIGN OUT to exit the application.
How to Resolve Errors for Contribution Imports from Non-ParishSOFT Systems