Select All and Clear All Records Buttons
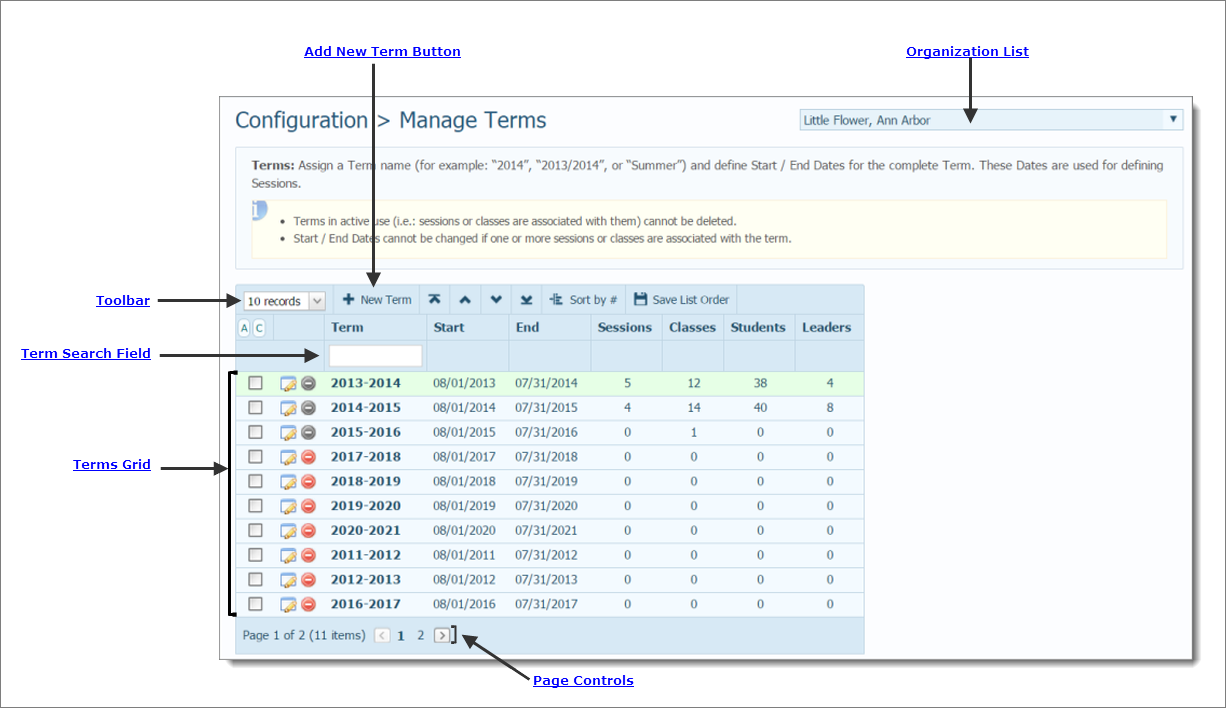
The Manage Terms page provides a central location for you to manage terms in your program. On this page, you can do the following:
● Edit term details (the name and starting and ending dates of the term)
The illustration below identifies the main areas on the Manage Terms page. Place your mouse pointer over a hyperlink (without clicking) to view a general description of an item. Click the hyperlink to jump to the section on this page that gives you more detailed information.
The organization associated with your ParishSOFT login credentials automatically appears in the Organization list, which is located in the upper-right corner of the Manage Terms page.

If you manage multiple organizations, click  , and then select the organization whose records you want to work with from the list:

The toolbar is located above the Terms grid. The toolbar contains the a menu and buttons that enable you to perform useful grid-related functions:
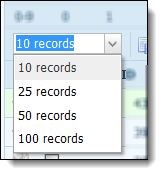
By default, ten records per page are displayed. To change the number of records that you can view on each page, select the desired option from the menu:
![]() To speed up page loading, select a lower value.
To speed up page loading, select a lower value.
 : adds a new term record. For instructions on adding a term record, go to How to Add a New Record. For tips on creating a new term record, go to Tips_for_Creating_a_New_Term_Record.
Use these buttons to move terms in the list up or down to change their position in the list:
 : check the box next to a term (or terms), and then click this button to move the term to the top of the list.
![]() We recommend that you use this button to move the term you want to work with to the top of the list. After you save the list order, the term always appears first so you can quickly find it.
We recommend that you use this button to move the term you want to work with to the top of the list. After you save the list order, the term always appears first so you can quickly find it.
 : check the box next to a term (or terms), and then click this button to move the select term up one position in the list.
 : check the box next to a term (or terms), and then click this button to move the selected term down one position in the list.
: check the box next to a term (or terms), and then click this button to move the selected term to the bottom of the list.
 : if you use any of the Move Records buttons to change the sort order of the terms in the Terms column, click this button to undo the sort and re-sort the list to the original entry order.
 : after using any of the Move Records buttons to change the sort order of the terms in the Terms column, click this button to permanently save the new list order.
The Terms grid lists all of the terms in your program. For each term listed, you can see the name, start and end dates, and term details, including the number of sessions and classes in the term.
 selects all records in the grid.
 deselects all records in the grid.
To locate a term, type the first one or two characters in the term's name in the Term search field. The list updates to show you the names of terms matching your search criteria.
Use the following buttons to manage the terms in the grid:
![]() indicates a term that cannot be deleted because it is in active use.
indicates a term that cannot be deleted because it is in active use.
The number of pages and records in the Terms grid are displayed at the bottom of the page.

Select a page to go directly to that page in the list. Alternatively, click  to page back or click
  to page forward through the list.
 Move Records Buttons