This topic shows you how to add a new term record and provides tips to help you make decisions when creating a term record.
Tips for Creating a New Term Record
A term is a period of time during which classes in your religious education program are in held. The length of a term is defined by the start and end dates entered into the term's record when you create it and save it to your system.
A term is considered "active" if it has one or more sessions or classes associated with it. You cannot delete an active term from your system nor can you change an active term's start and end dates.
Below are a few tips to follow when creating a new term record.
● Use unique and descriptive names for terms
You can name a term whatever you want. However, the system requires that term names be unique. To differentiate among the terms in your system, create term names that are sufficiently descriptive, for example, "Summer 2014" (instead of "Summer") or "2015 - 2016".
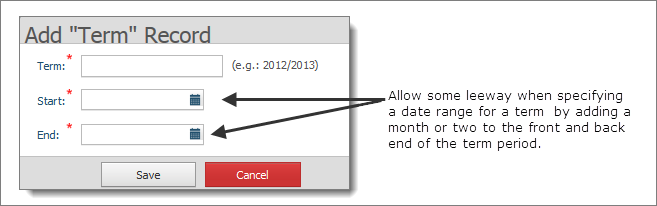
● Specify a date range longer than you need
When you create a new term record, the system requires you to specify a date range for the term. After you attach sessions and classes to a term, the system will not allow you to change the term's start and end dates. Therefore, as a best practice, we recommend that you extend the date range of the term period by adding a month or two at the beginning and end of the term's actual start and end dates. In other words, make the term period longer than you think you need. Doing so can help you better manage unanticipated schedule changes.
Suppose, for example, that you need to add make-up dates to a term for classes missed due to foreseen circumstances, such as cancellations due to inclement weather or instructor absence. If the term's start and end dates provide sufficient leeway, you can easily add dates to accommodate your make-up classes.
● Overlap term dates, if necessary
The terms you create can have overlapping start and end dates. For example, you can create a fall term that ends some time in June and a summer term that starts some time in May.
● Make the term the default selection
If you will be working mostly with the data for a specific term, it is a good idea to make that term the default selection. Doing so can save keystrokes in the long run, especially when you are doing data entry work.
To make a term the default selection:
Display any page that contains a Term list (for example, the Student Directory page).
As shown in the illustration below, select the term you are working with from the Term list:

The selected term now becomes the default selection in the Term list on the current page and on all other pages that contain a Term list (for example, on the Student Directory and Leaders pages). To change the default term, simply select a different term.
 . Then, select the Manage Terms option to open the Configuration
> Manage Terms page.
. Then, select the Manage Terms option to open the Configuration
> Manage Terms page. .
.
![]() Term dates cannot
be changed later if the term has sessions or classes attached to it. Therefore,
it is a best practice to specify a date range longer than you think you
need. For details, see Tips_for_Adding_a_New_Term_Record.
Term dates cannot
be changed later if the term has sessions or classes attached to it. Therefore,
it is a best practice to specify a date range longer than you think you
need. For details, see Tips_for_Adding_a_New_Term_Record.
 to save the new term.
The terms list is updated. The new term appears in the grid on the Configuration > Manage Terms page.
![]() If you plan to work mostly
with the term you just created, we recommend that you select the term
from the Term list on any page that contains a Term list. The term always
appears first so you can quickly find it.
If you plan to work mostly
with the term you just created, we recommend that you select the term
from the Term list on any page that contains a Term list. The term always
appears first so you can quickly find it.