
This topic describes the elements on the Add By Family page. For step-by-step instructions on how to use the Add by Family feature to add a student to a class, go to How to Add a Student to a Class from the Family Record.
Step 2: Find Family & Add Individuals to Classes
Responsive and Flexible Columns
The Add Student by Family page provides a method for adding a student to a class by letting you search Family Directory records to locate the student's family. After you find the student's family, you can quickly add students in the family to any available class in your program.
The illustration below identifies the main areas on the Add Student by Family page. Place your mouse pointer over a hyperlink (without clicking) to view a general description of an item. Click the hyperlink to jump to the section on this page that gives you more detailed information.
The organization associated with your ParishSOFT login credentials automatically appears in the Organization list, which is located in the upper-right corner of the Add Student by Family page.

If you manage multiple organizations, click  , and then select the organization whose records you want to work with from the list:

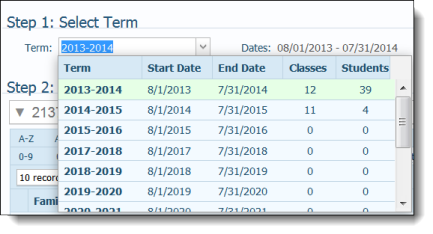
The Term list includes all of the terms you have set up in your program. The first step in the process of adding a student by family requires you to select the term in which the class you want to add the student to is offered.
Step 2 in the Add Student by Family process requires you to find the student's family.
This section includes a family grid that shows the names of families and members in your organization. Most of the features in this section are designed to help you quickly locate the student's family record. After you find the family, functions are available to let you drill down to view additional information about the family that can help you verify that you have the right family.
The search box enables you to enter a specific value to search for a family in your database. You can use one of the following methods to locate the family you are looking for:
● If you know the family's last name or the member's first name, type it in the search field. Then, click ![]() to search.
to search.
OR
● Click  , and then from the group of checkbox controls, select the column that contains the value you are searching for. In the search box, type the value you are looking for. Then, click
 ![]() to search.
to search.
The results of your search are displayed in the grid.
Click this link to remove the value from the search field and clear search results from the family grid.
The rolodex filters are located in two rows above the family list grid. The top row contains the alphabetic filters, which apply to columns containing alphabetic data (for example, Family and City). The bottom row contains the numeric filters, which apply to columns containing numeric data (for example, Envelope # and Primary Phone).
The Filter Criteria and Filter Column fields, identified in the illustration below, let you know which filter is selected (in the illustration below, the A filter is selected) and which column the filter is applied to (in the illustration, it is applied to the Family column).

The filters allow you to view content in the grid fits a specific criteria and hide content that does not. For example, selecting the A filter and applying it to the Family column lets you view only those families and individuals whose last name starts with "A". Selecting the 2 filter and applying it to the Envelope Number column lets you view only those families that have envelope numbers beginning with the number "2". For an explanation of how to use the rolodex filters, go to How to Filter Records.
Click this button to clear the criteria currently loaded into the rolodex filters. Before selecting new filter criteria, you should clear the contents of the filter first by clicking this button.

The toolbar is located directly under the row of rolodex filters. The toolbar contains the following menus and buttons that enable you to perform useful grid-related functions:
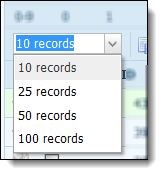
● # Records Menu
By default, ten records per page are displayed. To change the number of records that you can view on each page, select the desired option from the menu:
![]() To speed up page loading, select a lower value.
To speed up page loading, select a lower value.
● Grid Buttons
Use the Grid buttons to modify the content and layout of the grid:
 lets you choose which columns of information to display in the grid.
 resets grid layout back to the default settings.
![]() permanently saves your changes to the layout of the grid.
permanently saves your changes to the layout of the grid.
● 
If you can't find the family you are looking for, you may need to add it to your database. Clicking this button opens the Find Family window where you can search your Family Directory records to find out if the family you are looking for has a record in the database. If a record does not exist, you can add the new family to Family Directory.
The family records grid lists your family records. If you apply the rolodex filters, the grid updates and shows information that matches your filter criteria.
The grid has responsive and flexible columns, allowing you to change them as needed to suit your preference for viewing information. The columns have these features:
● Sortable: click a column header to sort entries based on the information in the column. For details, go to Sorting_the_Display_of_Records.
● Resizable: grab the border between columns to increase or decrease the width of one of them. For details, see Changing_Column_Widths.
● Moveable: drag and drop columns in the grid to suit your preference for working with the information. For details, see Changing_Column_Widths and Rearranging_the_Columns.
If desired, you can permanently save your layout changes or reset the grid back to the defaults.
All family and member names in the grid are hyperlinks. Clicking the link under a name opens the named family or members family record.
●  (More): clicking this button to the left of a member's or family's name expands the record to let you view additional information, including the names of other family members and their roles, ages, birth dates, grade levels (if students), as shown in the illustration below:
![]() After you click , the button changes to
After you click , the button changes to  .
.

Name link: clicking a name link opens the individual's Member Details tab in Family Directory.
Class Assignment column: contains options that let you select the class and grade you want to add the student to.
Special Needs and Special Notes: If a member's record includes special needs, leader, or student notes, the notes are shown in a row under the member's name.
 : adds the student to the selected class and grade.
● (Less): clicking this button closes and hides the expanded record.
![]() After you click , the button changes to .
After you click , the button changes to .
Each record occupies a single line in the list. To bring the information that extends beyond the borders of the page into view, click and drag the horizontal scroll bar left or right.

The number of pages and records in the family records grid are displayed at the bottom of the page. The following illustration identifies the page control buttons and their meaning:
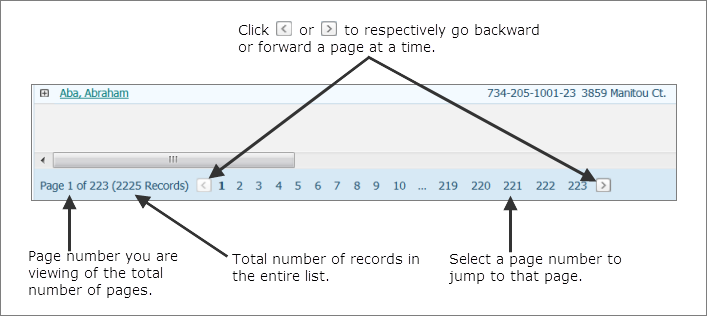
Select a page to go directly to that page in the list. Alternatively, click  to page back or click
  to page forward through the list.
How to Add a Student to a Class from the Family Record