How to View and Act On Pending Registrations
After a member submits a registration request for a class through the My Own Church portal, the system marks the request as pending. This topic show administrators and staff users how to view and act on pending registrations.
- Click
 . Select the Pending Registrations option to display the Pending Registrations page.
- If you have access to multiple organizations, select the organization whose registration requests you want to review from the Organization list.
- In the Term list, select the term containing the registration you want to review. .
The page refreshes to show you the names of students with pending online registration requests for classes in the selected term. For example:
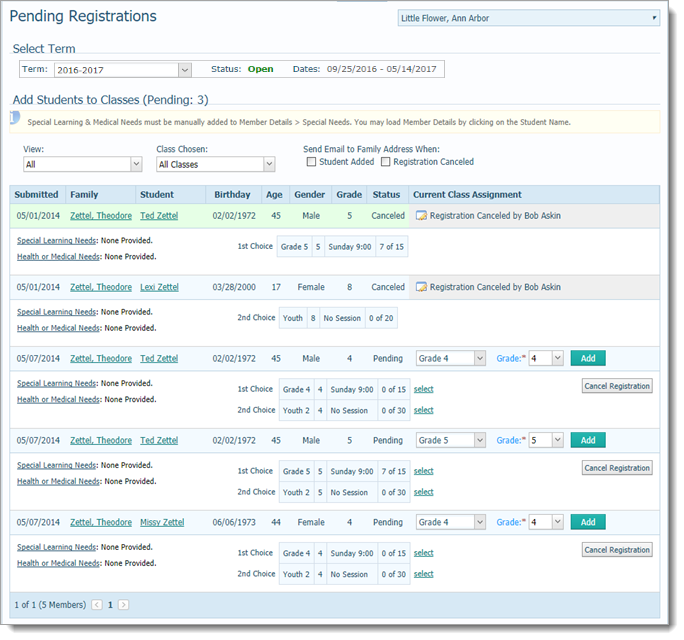
You can now take action on the registration requests.
- By default, the Add Students to Classes grid is filtered to show all registration types and all classes. To filter the grid, do one or both of the following:
- In the View dropdown list, select Pending Placement to see the pending requests only.
- In the Classes Chosen dropdown list, select specific classes (you can select more than one) to view registration requests for those classes only.
The grid refreshes to show registration requests matching your filter criteria.
- If desired, you can have the system send an email to the family to notify them that you registered the student for a selected class or, in the case of cancellation, that the class is not being offered. To do this, select the Student Added and/or Registration Canceled checkboxes above the grid.
 The email is system-generated and cannot be customized. It simply informs the student that the registration was completed successfully or that the registration was canceled.
Each row in the grid contains a registration record showing the date the registration was submitted, the student's name, and other personal information (for example, the student's age and gender) to help you identify the student.
- To take action on a registration request, do one of the following for each student:
- If the student has once class choice, click
 to finalize the registration and add the student to the class.
- If the student has multiple class choices, click the select link to the right of the class you want to add the student to. Then, click to finalize the registration and add the student to the class.
- Sometimes you need to cancel registrations for a class because the class is now full or the student submitted a registration after the deadline. For whatever reason, if you must cancel the registration for a given class, click
 . The registration is canceled, and the name of the individual who canceled the class is displayed.
If you mistakenly cancel a registration request, click  to undo the cancelation and re-open the record. You can then click to finalize the registration and add the student to the class.
- If a family specified special or medical needs for a student, that information does not automatically transfer. You must manually add it. To do this, click the student's name link to open his or her Member Details record. Then, put the record in edit mode, select the Special Needs checkbox, and then type the information in the Special Needs area. Be sure to save the record.
- To verify that a student was added to a class, open the Student Directory page. Select the term and class. The student's name appears in the class list.
Related Topics
About the Pending Registrations Page
About the Student Directory Page
<Back to top>