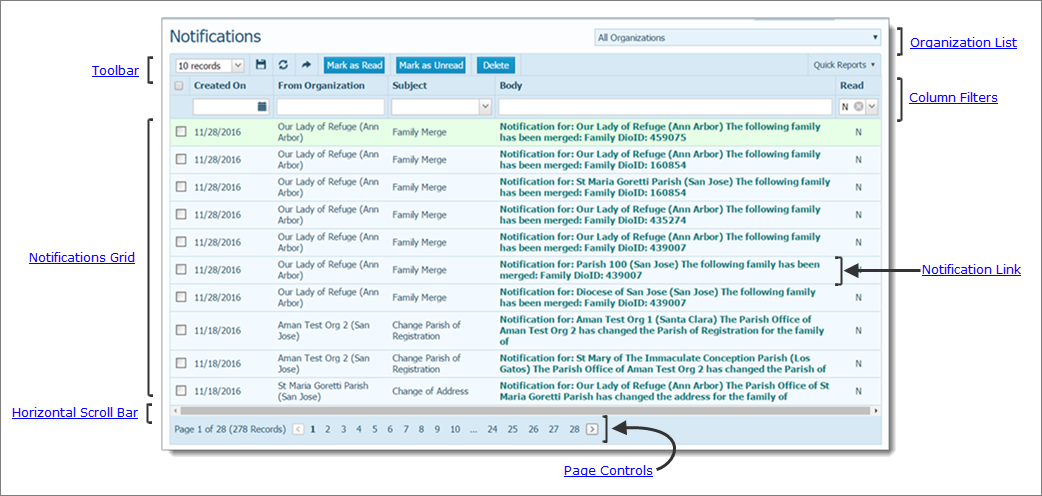
The Notifications page alerts administrators to changes made to family records in the organizations they manage. This topic describes the main elements on this page.
Flexible and Responsive Columns
The Notifications page serves as a main source of communication to administrators to keep them updated about changes made to family records in the organizations they manage. A notification appears on this page whenever any one of the following events occurs:
• Change in a family’s registration from one organization to another.
• Change in a family’s address.
• Updates to a family's or member's record resulting from a duplicate merge.
The illustration below identifies the main features on this page. Place your mouse pointer over a link (without clicking) to view a general description of a feature. Click the link to jump to the section in this Help topic that provides more detailed information about the feature.
To view notifications an organization, you must have Organization administrator or Diocesan administrator privileges.
The organization associated with your ParishSOFT login credentials automatically appears in the Organization list, located in the upper-right corner of the page. If you manage multiple organizations, select the organization whose notifications you want to view. Or, select All Organizations to view notifications for all of the organizations you manage.
![]() If
you select an organization for which you do not have viewing rights, a
message is displayed to inform you that you are not authorized to access
the organization. See your System Administrator for assistance with accessing
an organization for which you are denied access.
If
you select an organization for which you do not have viewing rights, a
message is displayed to inform you that you are not authorized to access
the organization. See your System Administrator for assistance with accessing
an organization for which you are denied access.
The toolbar is located at the top of the Notifications grid. The toolbar contains menus and buttons for performing common functions on this page. Those functions are described below.
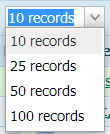
The Records menu lets you select the number of records (default = 10) to display in the grid. To change the number of records displayed at one time, select the desired option from the menu:
![]() To
speed page loading, select a lower value.
To
speed page loading, select a lower value.
 permanently
saves changes you make to the page layout. You can rearrange the columns
in the grid. If you move them, you can permanently save the new layout
by clicking this button.
permanently
saves changes you make to the page layout. You can rearrange the columns
in the grid. If you move them, you can permanently save the new layout
by clicking this button.
 resets
the page layout to the default configuration. You can rearrange the
columns in the grid. If you move them, you can return the grid to the
default layout by clicking this button.
resets
the page layout to the default configuration. You can rearrange the
columns in the grid. If you move them, you can return the grid to the
default layout by clicking this button.
 exports records in the Notifications grid
to a .csv file. For instructions, go to
How to
Export Notification Records to a .csv File.
exports records in the Notifications grid
to a .csv file. For instructions, go to
How to
Export Notification Records to a .csv File.
 :
changes the status of the selected notifications to "Read."
A Y in the Read
column indicates that the notification was read. For instructions on changing
a notification's status, go to How
to Manage Notifications in the Notifications Grid.
:
changes the status of the selected notifications to "Read."
A Y in the Read
column indicates that the notification was read. For instructions on changing
a notification's status, go to How
to Manage Notifications in the Notifications Grid.
 :
changes the status of the selected notifications to "Unread."
An N in the Read
column indicates that the notification is unread. For instructions on
changing a notification's status, go to How
to Manage Notifications in the Notifications Grid.
:
changes the status of the selected notifications to "Unread."
An N in the Read
column indicates that the notification is unread. For instructions on
changing a notification's status, go to How
to Manage Notifications in the Notifications Grid.
 : deletes
the selected notifications from the grid. For instructions on deleting
a notification, go to How
to Manage Notifications in the Notifications Grid.
: deletes
the selected notifications from the grid. For instructions on deleting
a notification, go to How
to Manage Notifications in the Notifications Grid.
 :
click to create a Notifications quick report.
For instructions, go to How
to Create a Notifications Quick Report.
:
click to create a Notifications quick report.
For instructions, go to How
to Create a Notifications Quick Report.
The Notifications grid lists all of the notifications received for events occurring in the organization selected from the Organization list. As shown in the following illustration, each notification occupies a single row in the grid.

Newly added notifications are marked "not read"
(the status in the Read column is set to
N) and presented in bold type. The notifications
in the grid are sorted in descending order ![]() (from most recent to least recent) on the Created On column. You can change the sort
order to descending
(from most recent to least recent) on the Created On column. You can change the sort
order to descending ![]() by clicking
the column heading. The columns provide the following information about
an event:
by clicking
the column heading. The columns provide the following information about
an event:
● Created On: shows date the event occurred (when the change was made).
● From Organization: displays the name of the organization in which the event occurred (where the change was made). In the column header field, you can type a few letters of the organization’s name to filter the grid to show notifications received for that organization only.
![]() To clear existing text
from a search filed, select the text and then press the Delete
key on your keyboard.
To clear existing text
from a search filed, select the text and then press the Delete
key on your keyboard.
● Subject: shows the text extracted from the subject line of notifications sent to organizations to inform them of changes. In the column header field, you can type a word or words to search for specific types of notifications.
For example, to find notifications pertaining to address changes, type “address” in the field. Alternatively, click and select a specific subject type from the menu; for example, selecting FAMILY MERGE shows all notifications pertaining to family merges.
![]() To clear existing text
from a search filed, select the text and then press the Delete
key on your keyboard.
To clear existing text
from a search filed, select the text and then press the Delete
key on your keyboard.
● Body: provides a link to the full text of the notification. Click the link to open a separate window where you can view the notification's details.
● Read: filters the grid so that you can limit the notifications showing in the grid to those previously read (Y), those not read (N), or those read and unread (All).
![]() IMPORTANT
IMPORTANT
If you change the Read filter to Y (Read) or to All (Read and Not Read), leave and then return to the Notifications page, by default, the grid reloads and shows "Not Read" (Read = N) notifications only.
The column headers contain built-in filters that allow you to search for specific notifications in the grid. Filtering is especially useful when you want to quickly find a specific notification or view a group of notifications of the same type. When you filter the grid, you temporarily hide certain notifications so that you can view only those that meet your criteria. You can filter the list on one criterion (one column) or further refine your list by filtering on several criteria (several columns) of data at the same time.
The grid contains three types of column filters:
● Date
A text search filter consists of an input field into which you enter a word or group of words you want to search for. The Body column header is an example of a text search filter. To use a text search filter, simply type the desired text into the field, as shown in this illustration:
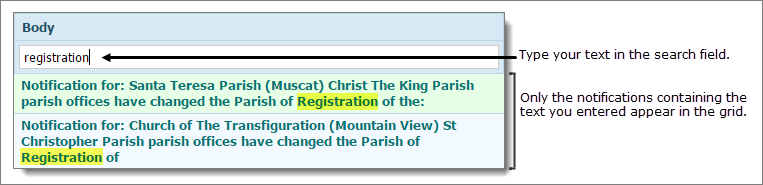
The grid refreshes. If the system discovers notifications containing the text you entered, they automatically appear in the grid.
![]() To
clear existing text from a search filed, select the text and then press
the Delete key on your keyboard.
To
clear existing text from a search filed, select the text and then press
the Delete key on your keyboard.
A dropdown list filter contains a list of options that when selected displays related notifications. The Read column header is an example of a dropdown list filter. To use a dropdown list filter, select the desired option from the list, as shown in this example:
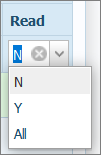
The grid refreshes. Notifications matching the filter you selected now show in the grid. For example, selecting the Y option causes the grid to display read notifications only.
![]() IMPORTANT
IMPORTANT
If you change the Read filter to Y (Read) or to All (Read and Not Read), leave and then return to the Notifications page, by default, the grid reloads and shows "Not Read" (Read = N) notifications only.
A date filter enables you to specify a date limits the notifications displayed to those matching the date you specify. The Created On column header is an example of a date filter. To use a date filter, type the desired date into the field, and then press Enter. Alternatively, click the calendar icon and select a date from the calendar, as shown in this illustration:

The grid refreshes. Notifications matching the date you selected automatically appear in the grid.
To clear an applied filter:
● Click
![]() . (This button only appears in certain fields.)
. (This button only appears in certain fields.)
OR
● Select the value appearing in the field, and then press the Delete key on your keyboard.
The grid refreshes, and all notifications are visible again.
The Notifications grid has flexible and responsive columns that you can change as needed to suit your preference for viewing information. The columns have these features:
● Sortable:
click a column header to sort entries in the grid based on the information
in the column. For example, to sort in ascending order on the Read
column, click the Read column header. The
icon on the header indicates the direction of the sort: ![]() (ascending). To
reverse the sort order, click the Read
column again. The icon on the header indicates the direction of the sort:
(ascending). To
reverse the sort order, click the Read
column again. The icon on the header indicates the direction of the sort:
![]() (descending). For details on column sorting, go to
Sorting_the_Display_of_Records.
(descending). For details on column sorting, go to
Sorting_the_Display_of_Records.
● Resizable: grab the border between two columns to increase or decrease the width of one of them. For details on resizing columns, go to Changing_Column_Widths.
● Moveable: drag and drop columns in the grid to suit your preference the order in which the columns in the grid are arranged. For details on moving columns, go to Changing_Column_Widths and Rearranging_the_Columns.
 : this
checkbox control appears next to each notification. Select the checkboxes
to indicate which notifications you want to work with. For example, if
you want to delete one or more notifications, select each notification's
checkbox. Then, click .
: this
checkbox control appears next to each notification. Select the checkboxes
to indicate which notifications you want to work with. For example, if
you want to delete one or more notifications, select each notification's
checkbox. Then, click .
 (the column header): select this checkbox in the column header to select
all notifications in the grid.
(the column header): select this checkbox in the column header to select
all notifications in the grid.
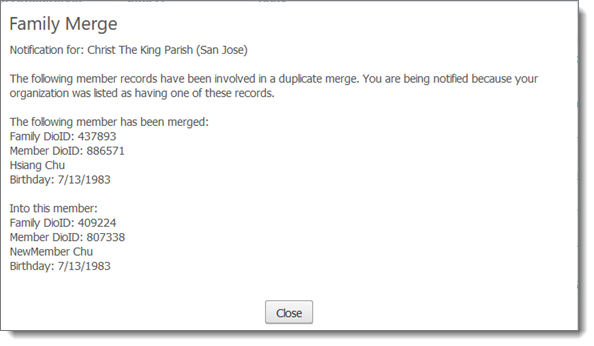
The Body column in the grid contains a link that, when clicked, opens a window where you can view the full text of the notification. Here's an example of the text for a notification pertaining to a family merge:
After you close the window, you return to the grid. In the Read column, the system indicates the notification's status as Y (meaning read).
Each notification in the grid occupies a single line that extends beyond the edge of the viewing area. To bring the information outside of the border into view, click and drag the horizontal scroll bar, located at the bottom of the grid, left or right.

If the grid contains multiple pages, the number of pages is displayed below the grid.

Select a page to go directly to that page in the list.
Alternatively, click  to page back or click
  to page forward through pages in the grid. The number of records in the
entire grid appears in parentheses.
to page forward through pages in the grid. The number of records in the
entire grid appears in parentheses.
How to Customize the Layout of a Page
How to Export Notification Records to a .csv File
How to Manage Notifications in the Notifications Grid
How to Create a Notifications Quick Report