![]() To
send an email message you need a web-based email client or program, such
as Gmail or Hotmail, or Microsoft Outlook.
To
send an email message you need a web-based email client or program, such
as Gmail or Hotmail, or Microsoft Outlook.
Using a Web-based Email Program
 to display the Organization Management page.
 .
.The View Recipients window opens to show the email addresses of the organizations you selected.
 to close
the window and return to the Organization
Management page..
to close
the window and return to the Organization
Management page..The View Recipients window is re-displayed. The email addresses of the organizations you selected are added to the list.
.png) to clear
the list. You can then add new recipients to the list, if desired.
to clear
the list. You can then add new recipients to the list, if desired. . Then, select the line
in which you want the selected recipients' email addresses to appear:
. Then, select the line
in which you want the selected recipients' email addresses to appear:![]() Be
aware that the email addresses of multiple recipients listed in the To: and Cc:
lines can be seen by all other recipients. This is typically not desirable
because it makes your recipients' email addresses public. Consider using
the Bcc: line to keep your recipients'
email addresses private.
Be
aware that the email addresses of multiple recipients listed in the To: and Cc:
lines can be seen by all other recipients. This is typically not desirable
because it makes your recipients' email addresses public. Consider using
the Bcc: line to keep your recipients'
email addresses private.
The Send Web Based Email window is displayed. By default, the application puts your organization's email address in the From: line as the sender and in the To: line as the first email recipient. For example:
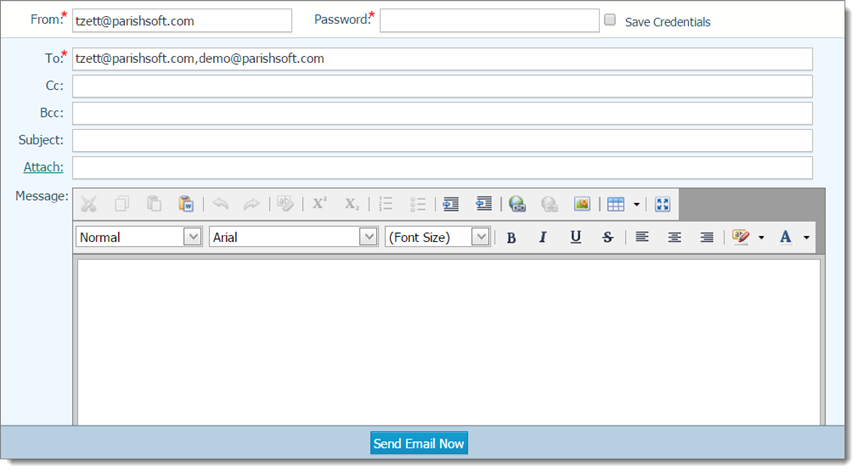
![]() You
can use your keyboard's Delete key
to delete an email address. For example, if you do not want to receive
a copy of your email message, you can delete your organization's email
address from the To: line. You can
also cut or copy one or more email addresses from one line and then paste
them into another line. You must use a comma to separate email addresses.
You
can use your keyboard's Delete key
to delete an email address. For example, if you do not want to receive
a copy of your email message, you can delete your organization's email
address from the To: line. You can
also cut or copy one or more email addresses from one line and then paste
them into another line. You must use a comma to separate email addresses.
If you have a file to attach, click the Attach link. In the Attach File(s) window, browse to the location on your hard drive and select the file to attach. Then, close the Attach File(s) window.
![]() The easiest way to format
your text is to type it all first, and then use the formatting buttons
to apply formatting to elements of your message text.
The easiest way to format
your text is to type it all first, and then use the formatting buttons
to apply formatting to elements of your message text.
 .
.![]() To use Outlook,
you must have both Outlook and Internet Explorer installed on your computer.
Your browser must be Internet Explorer and you must also enable Internet
Explorer's ActiveX controls.
To use Outlook,
you must have both Outlook and Internet Explorer installed on your computer.
Your browser must be Internet Explorer and you must also enable Internet
Explorer's ActiveX controls.
Click to display the
Organization Management page.
In the Organization List section in the left panel, select the checkbox for each organization you want to send an email to.
In toolbar at the top of the Organization List section in the left panel, click .
The View Recipients window opens to show the email addresses of the organizations you selected.
Verify that the recipients' list is correct. If necessary, do the following:
To add more recipients to the list in the View Recipients window:
Click
to close the window and return to the Organization
Management page.
Select the names of organizations that you want to add.
Click .
The View Recipients window is re-displayed. The email addresses of the organizations you selected are added to the list.
To remove one or more email addresses from the View Recipients window, clear the checkbox to the left of each email address. Then, select Clear Unchecked to remove them.
To
remove all email addresses from the list,
select Clear
All. Then, click to clear the list.
You can then add new recipients to the list, if desired.
To remove all email addresses from View Recipients window and load all unique email addresses from your selected recipients, select Load from Grid.
 . Then, select the line
in which you want the selected recipients' email addresses to appear:
. Then, select the line
in which you want the selected recipients' email addresses to appear:![]() Be
aware that the email addresses of multiple recipients listed in the To: and Cc:
lines can be seen by all other recipients. This is typically not desirable
because it makes your recipients' email addresses public. Consider using
the Bcc: line to keep your recipients'
email addresses private.
Be
aware that the email addresses of multiple recipients listed in the To: and Cc:
lines can be seen by all other recipients. This is typically not desirable
because it makes your recipients' email addresses public. Consider using
the Bcc: line to keep your recipients'
email addresses private.
To: typically used for recipients to whom you are directly communicating. If have multiple recipients in the To: line, each recipient can see the email addresses of all other recipients.
Cc: (short for Carbon Copy or Courtesy Copy) recipients who receive a copy of your email message.
Bcc: (short for Blind Carbon Copy) typically used for recipients to whom you are not directly communicating, but whom you want to receive a copy of your email message. Email addresses of recipients listed in the Bcc: line cannot be seen by other recipients.
Outlook opens. By default, the application puts your email address in the To: line as the first email recipient.
Complete the fields in the email header:
(Optional) Type (or copy and paste) email addresses in the remaining email recipient fields.
Type the subject of your email message in the Subject: line.
If you have
a file to attach, click  . Browse to the location
on your hard drive and select the file. Click
. Browse to the location
on your hard drive and select the file. Click  to attach the file.
In the Message field, type the body content of your email message. If desired, use the buttons on the formatting toolbar to format your message exactly the way you want it to appear.
![]() The easiest way to format
your text is to type it all first, and then use the formatting buttons
to apply formatting to elements of your message text.
The easiest way to format
your text is to type it all first, and then use the formatting buttons
to apply formatting to elements of your message text.
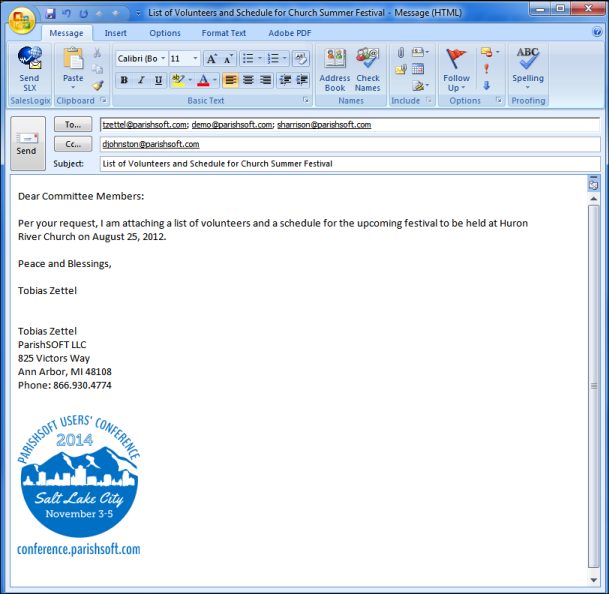
To
send the email, click  .
.
About the Organization Management Page
How Enable ActiveX Controls in Internet Explorer