A mail merge template is a document that you can use as a basis for creating other documents that you want to use for mass mailings, such as form letters and announcements. You can create a new template from scratch or you can open an existing document that is stored on your computer and use that document as the basis for a creating a mail merge template. This topic explains the merge fields and shows you how to use them to create a template.
Understanding the Merge Fields
Creating a Template from Scratch
Creating a Template from an Existing Document
When you create a mail merge template, you put the content together by combining your custom text with merge fields you select from Insert Merge Field menu, available in the Mail Merge program:
When you select a field from the menu, the system inserts it into your document at the cursor location and places the name of the field between angled brackets << >>. The fields function as placeholders for information extracted from fields in database records. When you run the merge process, the system replaces the merge fields with actual data, resulting in a document that appears personalized for each recipient.
With just a few clicks, you can generate a document or form letter for hundreds of members and families in your organization.
You format the merge fields the same way you do the regular text in your document. Following are a few examples of ways to format the appearance of information brought into your document by a merge field.
If you want to put a comma after a merge field, simply insert the merge field and then type the comma, as shown in this example:
Dear <<Informal Name>>,
If you want to add a space between merge fields, insert the first field, press the spacebar on your keyboard to insert the space, and then insert the next field. For example:
<<State/Region>> <<Postal Code>>
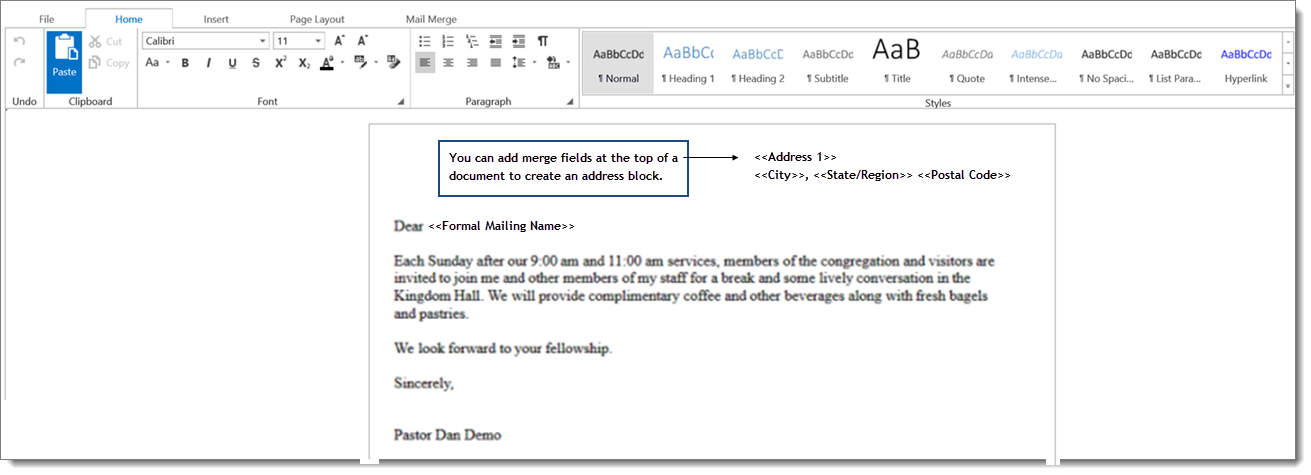
If you want to move your cursor to a tab spot to enter a merge field, keep pressing the Tab key until the cursor is in the right location. Then, insert the merge field. You can use this method to create an address block in a form letter. For example:
Press the Tab key to move the insertion point to the right side of your letter. Then, insert the desired address fields: <<Address 1>>, <<Address 2>>, <<City>>, <<State/Region>>, and <<Postal Code>>. Use the Enter key and the Tab key to line up the fields correctly and be sure insert the correct punctuation between merge fields:
<<Address 1>>
<<City>>, <<State/Region>> <<Postal
Code>>
To italicize or bold a merge field, insert the merge
field. Select the merge field, and then go to the Home
tab and click  (Italicize)
or
(Italicize)
or  (Bold). If you want to apply both styles simultaneously,
select the merge field, and then click both buttons to create the desired
effect, as shown in this example:
(Bold). If you want to apply both styles simultaneously,
select the merge field, and then click both buttons to create the desired
effect, as shown in this example:
Dear <<Formal Mailing Name>>,
To change the capitalization style of the text brought
in by a merge field, select the merge field. Then, go to the Home
tab and click  .
From the displayed menu, select the style you want to use.
.
From the displayed menu, select the style you want to use.
Before creating a mail merge template, it is a good idea to familiarize yourself with the merge fields available. The table below lists the merge fields you can insert into your documents. These fields pull actual data values from the Family Directory database. Examples of actual data are listed in the last column.
Merge Field |
Description |
Examples of Merged Data |
<<Formal Mailing Name>> |
Formal mailing name (name used on correspondence with the member). This name typically includes the individual's title. |
Mr. Jack Feinstein Ms. Elizabeth Hanson |
<<Informal Name>> |
Member's first and last name only. |
William Aabbey Melinda Acosta |
<<Formal Salutation>> |
Formal name including title. For example, Mr., Dr., or Professor. |
Dr. Shaquille O'Neal Professor Garfield Mr. and Mrs. Kukulka |
<<Family Last Name>> |
Family's last name. |
Harbaugh Manuel |
<<First Names>> |
First names of members. |
Carolyn Omar |
<<Address 1>> |
Main address including the street number and name. |
825 Victor's Way |
<<Address 2>> |
Extra address line that shows an apartment, suite, or building number. |
Apt. 143 Suite 2000 |
<<City>> |
Name of city for the family's home residence. |
Ann Arbor Traverse City |
<<State/Region>> |
State or region for the family's home residence. |
Michigan New Jersey |
<< Postal Code>> |
Postal or ZIP code.
|
48108 |
<<Plus 4>> |
Expanded zip code consisting four extra digits at the end of the zip code that determine a specific location within that zip code. |
1964 |
<<Carrier Route>> |
Unique nine-digit code that represents the carrier route used by the US Postal Service mail delivery system. |
92019C005 |
<<Email Address>> |
Family's email address. |
jsmith@aol.com |
<<Family Phone>> |
Family's principal telephone number. |
734-205-1000 |
<<Family Envelope #>> |
Family's envelope number.
|
207 |
<<Registration Status>> |
Registration status. |
True (registered) False (not registered) |
<<Registration Date>> |
Date the member's registration took effect. |
3/21/2013 |
<<Family ID>> |
A unique value assigned at the parish level to identify a family within the parish organization only. |
18707 |
<<Family DUID>> |
A unique value assigned at the diocesan level to identify a family. |
345542 |
<<Diocesan ID>> |
A unique value used to identify the family. This field appears in the family record if the organization the family belongs to is set up to use the Diocesan ID instead of the Family DUID to identify families. (This setup is done in the Administration module.) |
28412345 |
<<Family Group>> |
Group to which the family belongs. |
Inactive Student Catechist |
<<Map Code>> |
A short code that represents a specific location on the earth. A location's map code consists of two groups of letters and digits separated by a dot. |
ZSR.3J 4J.RB |
<<Registered Org ID>> |
ID of the organization in which the family is registered. |
2137 |
<<Organization of Registration>> |
Name of the organization in which the family is registered. |
Little Flower Church of the Transfiguration |
If you manage multiple organizations, select the desired organization from the Organization list.
On the toolbar, click
 (Mail Merge).
From the menu, select Merge Selected Records
(0).
(Mail Merge).
From the menu, select Merge Selected Records
(0).
![]() The
number in parentheses represents the number of records you selected from
the grid. In this case, no records are selected because you are just making
a template.
The
number in parentheses represents the number of records you selected from
the grid. In this case, no records are selected because you are just making
a template.
The Mail Merge window opens:

Select the create a new one link.
A blank document page is displayed.
Type your text in the document text area. For example:
![]() Your
ParishSOFT session times out after about 30 minutes of inactivity. It
is a good idea to save your work frequently so you do not lose the text
of your document if your session ends unexpectedly.
Your
ParishSOFT session times out after about 30 minutes of inactivity. It
is a good idea to save your work frequently so you do not lose the text
of your document if your session ends unexpectedly.

If desired, change the look of your document by doing the following:
![]() Position
your mouse (without clicking) directly on items on a tab's toolbar to
display the infotip that describes the item's function.
Position
your mouse (without clicking) directly on items on a tab's toolbar to
display the infotip that describes the item's function.
![]() For
formatting tips, go to Formatting_Merge_Fields.
For
formatting tips, go to Formatting_Merge_Fields.
Use the features on the Home tab's toolbar (see previous illustration) to change the format and fonts used in your document. For example, you can use the controls to change the font and font size and to bold and italicize text. You can quickly create numbered and bulleted lists, indent and center text, add headings to divide your content into sections, and change the color behind paragraphs of text.
Use the options on the Page Layout tab to change the design of your document. For example, you can change the page margins, add a background color, and create multiple columns of text. Use the Breaks option to add page breaks to the document.
If desired, insert a graphic into the document. To do this:
![]() The
graphic file must be located on your computer. The file can contain a
photograph or an image of your organization's logo.
The
graphic file must be located on your computer. The file can contain a
photograph or an image of your organization's logo.
In the document text area, click your mouse exactly where you want to insert the graphic.
Select the Insert tab (see previous illustration).
Click
 (Inline Picture)
to open the Insert Image window.
(Inline Picture)
to open the Insert Image window.
Select the From your computer option.
Click
 . Navigate to the location on your computer where
the graphic file is stored. Select the file, and then click
. Navigate to the location on your computer where
the graphic file is stored. Select the file, and then click  .
.
The name of the file appears in the file name field.
Click
 to insert the graphic at the cursor location.
![]() To
remove the graphic, select it and then press the Delete
key on your keyboard.
To
remove the graphic, select it and then press the Delete
key on your keyboard.
![]() If
you put the graphic in the wrong place, you can easily move it. To do
this, first select the graphic. On your keyboard, press CTRL
+ X (to delete it). Next, click your mouse button where the graphic
belongs. Finally, click CTRL+V
to insert it.
If
you put the graphic in the wrong place, you can easily move it. To do
this, first select the graphic. On your keyboard, press CTRL
+ X (to delete it). Next, click your mouse button where the graphic
belongs. Finally, click CTRL+V
to insert it.
You can now add merge fields to the document. To do this, complete the following:
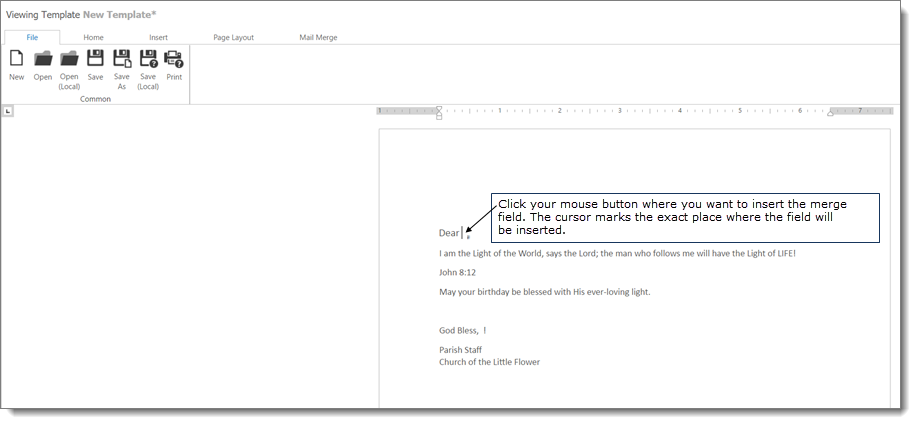
Click your mouse in the location where you want to insert the first merge field.
The cursor marks the location, as shown in this illustration:

Select the Mail Merge tab.
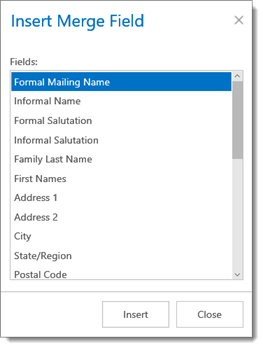
Click  (Insert Merge Field) to open the Insert Merge Field window:
The Fields menu lists the merge fields you can select to insert into the document. For descriptions of the fields, go to Available_Merge_Fields.
![]() The
Insert Merge Field window remains
open until you click X (in the top right
corner) or click
The
Insert Merge Field window remains
open until you click X (in the top right
corner) or click  . If the window
is blocking your view, you can move it out of the way by placing your
cursor at the top of the window near the title. The cursor changes to
this drag icon:
. If the window
is blocking your view, you can move it out of the way by placing your
cursor at the top of the window near the title. The cursor changes to
this drag icon: ![]() . Click and
drag the window to the desired location. Release the mouse button to "park"
the window in that location.
. Click and
drag the window to the desired location. Release the mouse button to "park"
the window in that location.
Select the desired merge
field from the Fields menu, and then
click  .
.
The merge field is inserted in the document at the cursor location. In the following example, we inserted this merge field between the word "Dear" and the comma: <<Formal Mailing Name>>:
![]() If
you make a mistake, select the inserted field to highlight it, and then
press Delete on your keyboard.
If
you make a mistake, select the inserted field to highlight it, and then
press Delete on your keyboard.

Click your mouse in the
document where you want to place the next merge field. Then, go back
to the Fields menu and select the desired
field. Click to insert
it into the document.
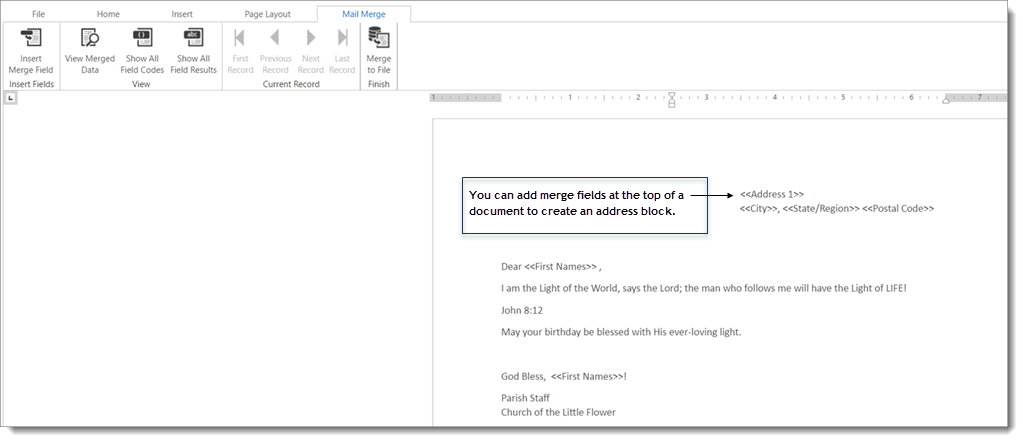
For example, suppose that you want to add an address block at the top of your document. Click inside the document on the line where you want to insert the address. You may need to press the Tab key to move the cursor to the far-right side of the document. Then, go back to the Fields menu and select the <<Address 1>> field to insert it. Click in the document text area again and repeat the previous steps until your address block looks like something like this:
Repeat
Step 7e until you place all of the merge fields in the correct positions
in your template. Then, click  to close the Insert
Merge Field window.
to close the Insert
Merge Field window.
When done inserting merge fields, save the template. Choose one of the following methods:
Save the template to the My Templates or Global Templates folder. To do this:
Select the File tab.
Click
 (Save) or
  (Save As) to open the
Save New Template window.
(Save As) to open the
Save New Template window.
In the Template Name field, type the name of the template.
If you want other users in the database to be able to view your template, select the Global checkbox to save the template in the Global Templates folder. Alternatively, leave the Global box deselected to save the template in the My Templates folder where only you can see and use it.
Select the Read Only checkbox if you want to lock the template. Locking a template prevents future changes from being made to it.
Click
 .
.
The template is now available for use in a mail merge. For instructions on performing a Mail Merge, go to How to Perform a Mail Merge.
OR
Save the template to your local computer. To do this:
Select the File tab.
Click
 (Save Local).
In the Save As window, select the file type from the dropdown list.
Click
 to download the file to your computer. Make
note of where you saved the file.
to download the file to your computer. Make
note of where you saved the file.
Go to the location where you saved the file. Open it, and then save it with a new name.
The template is now available for use in a mail merge. For instructions on performing a mail merge, go to How to Perform a Mail Merge.
You may find it easier to use an existing document as the basis for a mail merge template. After you open the existing document, you can edit its contents and formatting as appropriate for your mail merge document. Then, save the document as a template that can be reused. Supported text files are .rtf, .txt, .doc, and .docx only.
![]() If
you have a Microsoft Word template file (.dot),
you must first save it as a .doc or .docx before
you can use it as the basis for a mail merge template.
If
you have a Microsoft Word template file (.dot),
you must first save it as a .doc or .docx before
you can use it as the basis for a mail merge template.
If necessary, select the desired organization from the Organization list.
On the toolbar, click
(Mail Merge).
From the menu, select Merge Selected Records
(0).
![]() The
number in parentheses represents the number of records you selected from
the grid. In this case, no records are selected because you are just creating
a template.
The
number in parentheses represents the number of records you selected from
the grid. In this case, no records are selected because you are just creating
a template.
The Mail Merge window opens:
Click the open one link.
The Open Local Document window opens.
![]() Supported file types are
as follows: .rtf,
.txt, .doc, and .docx.
Supported file types are
as follows: .rtf,
.txt, .doc, and .docx.
Click .
Navigate to the location on your computer where the file you want
to use is stored. Select the file. Then, click .
The name of the file you selected now appears in the file name field.
![]() If you selected the wrong
file, click
If you selected the wrong
file, click  to remove it from
the file name field.
to remove it from
the file name field.
Click .
The contents of the file are inserted into the document text area. For example:

If desired, change the look of your document by doing the following:
![]() Position
your mouse (without clicking) directly on items on a tab's toolbar to
see the infotip that describes the item's function.
Position
your mouse (without clicking) directly on items on a tab's toolbar to
see the infotip that describes the item's function.
![]() For
formatting tips, go to Formatting_Merge_Fields.
For
formatting tips, go to Formatting_Merge_Fields.
Use the features on the Home tab's toolbar (see previous illustration) to change the format and fonts used in your document. For example, you can use the controls to change the font and font size and to bold and italicize text. You can quickly create numbered and bulleted lists, indent and center text, add headings to divide your content into sections, and change the color behind paragraphs of text.
Use the options on the Page Layout tab to change the design of your document. For example, you can change the page margins, add a background color, and create columns of text. Use the Breaks option to add page breaks to the document.
If desired, insert a graphic you have stored on your local computer into the document. To do this:
![]() The
graphic file must be located on your computer. The file can contain a
photograph or an image of your organization's logo.
The
graphic file must be located on your computer. The file can contain a
photograph or an image of your organization's logo.
In the document text area, click you mouse exactly where you want to insert the graphic.
Select the Insert tab (see previous illustration).
Click
(Inline Picture)
to open the Insert Image window.
Select the From your computer option.
Click
. Navigate to the location on your computer where
the graphic file is stored. Select the file, and then click .
The name of the file appears in the file name field.
Click
to insert the graphic at the cursor location.
![]() To
remove the graphic, select it and then press the Delete
key on your keyboard.
To
remove the graphic, select it and then press the Delete
key on your keyboard.
![]() If
you put the image in the wrong place, select it . On your keyboard, press
CTRL + X (to delete it). Next, click
your mouse button in right location. Finally, click CTRL+V
to insert it.
If
you put the image in the wrong place, select it . On your keyboard, press
CTRL + X (to delete it). Next, click
your mouse button in right location. Finally, click CTRL+V
to insert it.
You can now add merge fields to the document. To do this, complete the following:
Click your mouse in the location where you want to insert the merge field.
The cursor marks the location, as shown in this illustration:
Select the Mail Merge tab.
Click
(Insert Merge Field) to open the Insert Merge Field window.
The Fields menu lists the merge fields you can select to insert into the document. For descriptions of the fields, go to Available_Merge_Fields.
![]() The
Insert Merge Field window remains
open until you click X (in the top right
corner) or click . If the window
is blocking your view, you can move it out of the way by placing your
cursor at the top of the window near the title. The cursor changes to
this drag icon:
The
Insert Merge Field window remains
open until you click X (in the top right
corner) or click . If the window
is blocking your view, you can move it out of the way by placing your
cursor at the top of the window near the title. The cursor changes to
this drag icon: ![]() . Click and
drag the window to the desired location. Release the mouse button to "park"
the window in that location.
. Click and
drag the window to the desired location. Release the mouse button to "park"
the window in that location.
Select the desired merge
field from the Fields menu, and then
click .
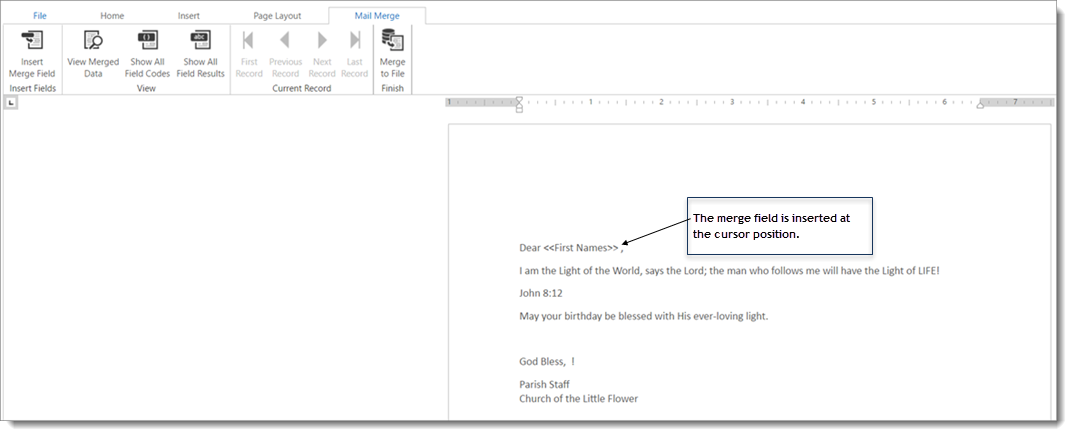
The merge field is inserted in the document at the cursor location. In the following example, we inserted this merge field between the word "Dear" and the comma: <<First Names>>:
![]() If
you make a mistake, select the inserted field to highlight it, and then
press Delete on your keyboard.
If
you make a mistake, select the inserted field to highlight it, and then
press Delete on your keyboard.
Click your mouse in the
document text area where you want to insert the next merge field.
Then, go back to the Fields menu and
select the desired merge field. Click to insert
it into the document.
For example, suppose that you want to add an address block at the top of your document. Click inside the document on the line where you want to insert the address. You may need to press the Tab key to move the cursor to the far-right side of your document. Then, go back to the Fields menu and select the <<Address 1>> field to insert it. Click in the document text area again and repeat the previous steps until your address block looks something like this:
Repeat
Step 8e until you place all of the desired merge fields in the correct
positions in your template. Then, click  to close
the Insert Merge Field window.
to close
the Insert Merge Field window.
When done inserting merge fields, save the template. Choose one of the following methods:
Save the template to the My Templates or Global Templates folder. To do this:
Select the File tab.
Click
(Save) or (Save As) to open the
Save New Template window.
In the Template Name field, type the name of the template.
If you want other users to be able to view your template, select the Global checkbox to save the template in the Global Templates folder. Alternatively, leave the Global box unchecked to save the template in the My Templates folder where only you can see and use it.
Select the Read Only checkbox if you want to lock the template. Locking a template prevents future changes from being made to it.
Click
.
The template is now available for use in a mail merge. For instructions on performing a Mail Merge, go to How to Perform a Mail Merge.
OR
Save the template to your local computer. To do this:
Select the File tab.
Click
(Save Local).
In the Save As window, select the file type from the dropdown list.
Click
to download the file to your computer. Make
note of where you saved the file.
Go to the location where you saved the file. Open it, and then save it with a new name.
The template is now available for use as a mail merge document. For instructions on performing a mail merge, go to How to Perform a Mail Merge.
How to Manage Mail Merge Templates
How to Edit the Contents of a Mail Merge Template