This topic shows you how to use the Mail Merge process to create hardcopy output of documents that you can use for mass mailings to ministers, families, and members in your organization. In Family Directory, the Mail Merge feature is available on the Family List, Member List, Family Workgroup, and Member Workgroup pages.
![]() You
cannot use the output of Mail Merge to send personalized email to recipients.
Mail Merge is intended for mass emails. To send personalized email, use
the application's email function.
You
cannot use the output of Mail Merge to send personalized email to recipients.
Mail Merge is intended for mass emails. To send personalized email, use
the application's email function.
Printing a Mail Merge Document
Mail Merge is an ideal solution for creating formal announcements, form letters, or any other type of document that you want to mail in bulk to a large number of people, yet you want to personalize to appear more personal.
The final document is based on a Mail Merge template that contains both fixed content and placeholders, called merge fields. These placeholders represent unique data (for example, recipients' actual names and addresses) that is stored in your database. The fixed content, on the other hand, consists of custom text you create either from scratch within Mail Merge or from an existing text document stored on your local computer. The fixed text content can even include a graphic, such as a photograph or your church logo.
When you run Mail Merge, the process outputs a document that contains both the fixed text content typed in the template and the actual values from your database as represented by the merge fields (placeholders) you insert.
For example, suppose you are creating a template of a letter to welcome new members. The salutation in the template might contain the following fixed text and merge fields:
Dear <Title> <Firstname> <Lastname>,
The body of your welcome letter follows the salutation. When you run Mail Merge, a welcome letter is generated for each record you pre-select from the grid (for example, on the Family List page). Using our example, when you run the Mail Merge and view the merged data, the following output is generated for the salutation:
Dear Mr. Henry Abing,
Note that the merge fields in the salutation, <Title> <Firstname> <Lastname>, are replaced with actual values from the corresponding fields in your database, and the fixed text, "Dear" and the comma punctuation (,) remain unchanged.
As you can see, you can produce multiple letters from a single template, yet by adding merge fields you can ensure that each document or letter appears personalized for your recipients.
To perform a mail merge, you need the following:
● A data source.
The data source is your ParishSOFT database. Mail Merge pulls in the data from your database to populate the merge fields that you insert into your document.
● A recipient list
The recipient list is comprised of the set of records you want to work with. The list is created by selecting individuals from a grid (for example, the Family List grid).
● A Mail Merge template.
A template is a document that contains defined merge fields and your custom text. The template must exist and be located in the My Templates, Global Templates, or ParishSOFT Templates folder or stored in a folder on your local computer. If do not have a temple, you must create one or use one of the ParishSOFT templates. For instructions on creating a template, go to How to Create a Mail Merge Template.
![]() Before
you can perform a Mail Merge, you must have the Mail Merge template you
want to use. If you need to create a template, go to How
to Create a Mail Merge Template.
Before
you can perform a Mail Merge, you must have the Mail Merge template you
want to use. If you need to create a template, go to How
to Create a Mail Merge Template.
If you manage multiple organizations, select the desired organization from the Organization list.
Create a list of recipients. Depending on the page you are working on, do the following:
On the Family List or Member List page, select the recipients from the grid.
On the Family Workgroups or Member Workgroups page, select the desired workgroup in the left panel to display its members. Then, in the right panel select the recipients from the grid.
Use any of these methods to find and select recipients:
Use the rolodex filters, "fuzzy" search filters, or the advanced filter to create a list potential recipients, and then select the checkbox next to the name of each person you want to create the document for.
Use the page buttons to advance through the records in the grid to find the names of individuals you want to create the document for. Then, individually select the checkbox next to the name of each recipient. The application stores your selections as you move from page to page in the grid.
Select all of the individuals on the page
of the grid you are viewing, by selecting this checkbox in the column
header:  .
.
![]() To
deselect all selected individuals, select the checkbox again.
To
deselect all selected individuals, select the checkbox again.
In the toolbar, click  (Mail Merge). From the displayed menu,
select one of the following options:
(Mail Merge). From the displayed menu,
select one of the following options:
Merge Selected Records: merges the selected records only into the mail merge document. The number in parentheses is the number of records selected in the grid.
Merge All Records: merges all records in the grid into the mail merge document.
The Mail Merge window opens. For example:

The templates are stored on your local computer or in one of the these folders listed at the top of the window:
My Templates: templates stored in this folder are accessible to the logged-in user only. No other users can view these templates unless the logged-in user shares the templates. The templates in the My Templates folder reside on the ParishSOFT server where your database is hosted—not on your local computer.
Global Templates: templates stored in this folder are shared by all users in the database. Other users can open the templates in this folder and save them to their personal My Templates folder or to their local hard drive. The templates in the Global Templates folder reside on the ParishSOFT server where your database is hosted—not on your local computer.
ParishSOFT Templates: templates stored in this folder are provided by ParishSOFT. These templates are read only and are provided as samples that you can use. You can view these templates and use them as a basis for developing your own, but if you want to edit them, you must first save them to the Global Templates folder or to your My Templates folder. The templates in the ParishSOFT Templates folder reside on the ParishSOFT server where your database is hosted—not on your local computer.
By default, a list of the templates in the My Templates folder is displayed.
Do one of the following:
To open a template in the My Templates folder, click the template's link.
To open a template in the Global Templates or ParishSOFT Templates folder, select the folder to open it. Then, select the template's link.
To open a template stored on your computer,
select the open one link. Click  . Navigate to the location on your computer where the
template is stored and open it. The name of the template appears in
the file name field. Click
. Navigate to the location on your computer where the
template is stored and open it. The name of the template appears in
the file name field. Click  .
.
The contents of the selected template are displayed in the document text area. For example:
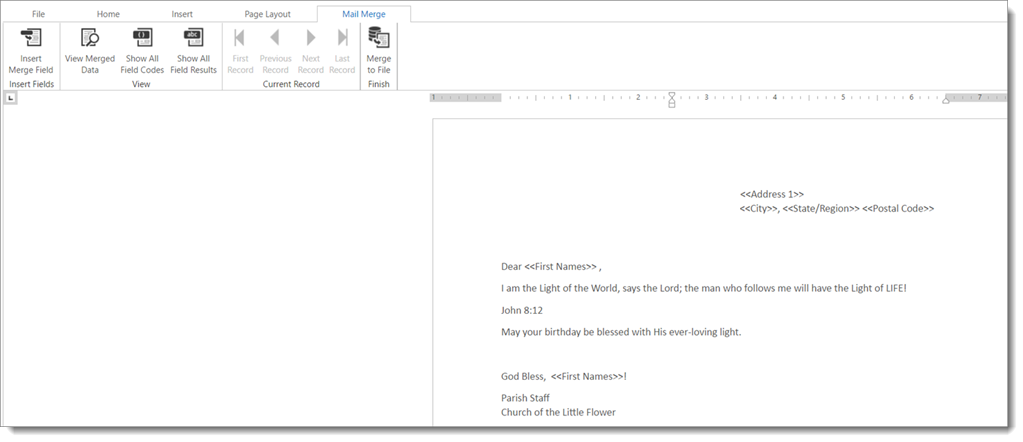
The template contains both the fixed text and merged fields in the document. Merged fields are enclosed in angled brackets (<< >>).
Preview your document. Follow these steps:
Review the document. If necessary, edit the content and your merged field selections.
![]() Misspelled
words are flagged with a wavy red underline. Right-click the underlined
word to display a list of suggestions. Select the correctly spelled word
from the list to replace the misspelled one.
Misspelled
words are flagged with a wavy red underline. Right-click the underlined
word to display a list of suggestions. Select the correctly spelled word
from the list to replace the misspelled one.
After making your changes, select the File tab and then click  to save them.
Preview all documents in the set. To do this,
select the Mail Merge tab. Then, click
 .
.
The merge fields in the document are replaced with actual data from the records of individuals you selected in the grid. The first recipient's copy of the document displayed. For example:
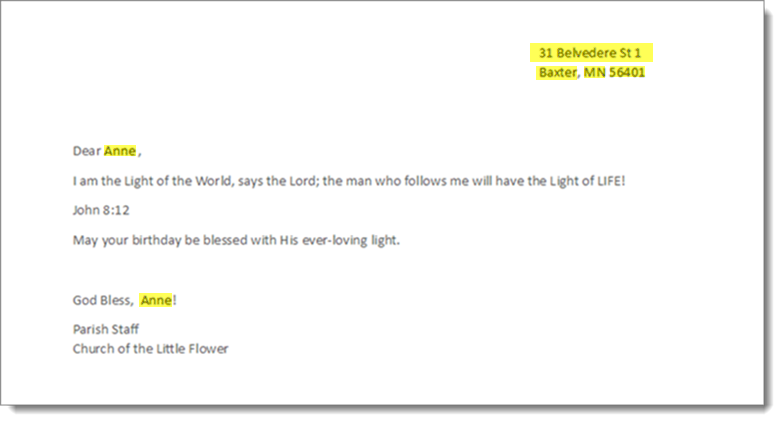
If you have multiple recipients, click  to view the next recipient's copy.
Repeat Step 5d until you finish previewing each recipient's copy of the document, making sure that each one is correct.
Finalize the merge by completing these steps:
On the Mail Merge
tab, click  (Merge
to File) to open the Merge to File
window:
(Merge
to File) to open the Merge to File
window:

From the Merge mode dropdown list, select one of these options:
New Section: specifies that the next merged fields start in a new section or page in the document. If you have headers and footers in your document, select this option. If you are creating a plain document, such as a form letter, select this option to provide a page break between each recipient's copy of the document.
New Paragraph: specifies that the next merged fields start with a new paragraph.
Join Tables: joins rows, resulting from a mail merge involving a table with merged fields, into a whole table.
From the Choose file type dropdown list, select the document's file type. Mail Merge supports these file types:
.doc and .docx: a Microsoft Word document file. This file is readable by Microsoft Word only.
.rtf: Rich Text Format file. This file is readable by most word processing programs in different operating environments and with different operating systems.
.txt: a plain text file. This file is readable by any text editing or word processing program.
Click  to close the Merge to File window.
The system downloads the file to your computer. The single file contains all of the individual documents or letters.
All of your merge documents are contained in a single file. Follow these steps to print the file.
Navigate to the location on your computer where you downloaded the file.
Open the file.
From the File menu, select the Print option.
Select options to print the entire document, a range of pages, or a specific page.
If you print the entire document, each document is printed on a separate page.
How to Create a Mail Merge Template
How to Edit the Contents of a Mail Merge Template
How to Manage Mail Merge Templates