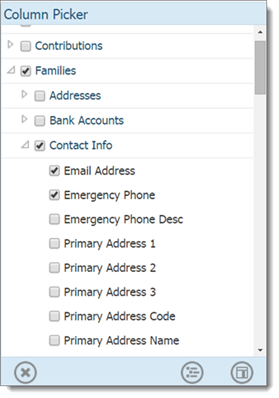
In the Column Picker panel, find the group that contains the column you need. Then, click  to expand group to view all of the columns in the group.
Removing a Column from a Query
When designing a query, you must tell ParishSOFT IQ which columns contain the information you need. To include a column in a query, you must add it using any one of the methods described below.
In the Column Picker panel, find the group that contains the column you need. Then, click to expand group to view all of the columns in the group.
![]() Some groups contain subgroups. Expand the subgroup to view the columns within it.
Some groups contain subgroups. Expand the subgroup to view the columns within it.
![]() At this point, the order in which you select the columns does not matter. You can change the order in which the columns appear in your results later.
At this point, the order in which you select the columns does not matter. You can change the order in which the columns appear in your results later.
When the cursor is in the correct position, its appearance changes to a double-arrow, as shown in the following illustration:

Click the column and drag it into the Result Columns panel, making sure that you place it directly on top of the [Add new column] link. Then, release the mouse button.
The column is now added to the query.
Repeat Steps 3 and 4 until all of the columns you need in the query are listed in the Result Columns panel.
The order in which the columns are listed in the Result Columns panel determines the order in which the columns will display in your results. If you want to change the order, go to How to Reorder the Columns in Your Query Results for instructions.
![]() Using the Column Picker works well when you initially choose columns for your query because you can select them and with a single click of a button add them all at once. If you need to add more columns later, consider using the other two methods (Drag and Drop and Add Column Link), which let you add columns individually. If you use the Column Picker to add more columns, you will need to deselect the columns you already added to avoid having duplicate column entries in the Result Columns panel.
Using the Column Picker works well when you initially choose columns for your query because you can select them and with a single click of a button add them all at once. If you need to add more columns later, consider using the other two methods (Drag and Drop and Add Column Link), which let you add columns individually. If you use the Column Picker to add more columns, you will need to deselect the columns you already added to avoid having duplicate column entries in the Result Columns panel.
In the Column Picker panel, find the group that contains the columns you need. Then, click to expand group to view all of the columns in the group.
![]() Some groups contain subgroups. Expand the subgroup to view the columns within it.
Some groups contain subgroups. Expand the subgroup to view the columns within it.
![]() At this point, the order in which you select the columns does not matter. You can change the order in which the columns appear in your results later.
At this point, the order in which you select the columns does not matter. You can change the order in which the columns appear in your results later.
 .
.The selected columns are added to the Result Columns panel on the right.
The order in which the columns are listed in the Result Columns panel determines the order in which the columns will display in your results. If you want to change the order, go to How to Reorder the Columns in Your Query Results for instructions.
The selected column is added to the Result Columns panel.
The order in which the columns are listed in the Result Columns panel determines the order in which the columns will display in your results. If you want to change the order, go to How to Reorder the Columns in Your Query Results for instructions.
If you change your mind and do not want to include a particular column, you can easily remove it.
In the Results Column panel, position your cursor on the column you want to delete.
Slide your cursor to the right until you see this button, and then click it: .png) .
.
The column is immediately removed from the query.
Sometimes, you select the wrong column or decide that you want to use a different column in your query. Use this procedure to replace a column:
In the Results Column panel, click the link in the Expression column for the column you want to replace.
A list of columns is displayed.
From the list, find the name of the column you want to replace and select it.
The original column is replaced with your selection.