How to Create a New Query
A query enables you to pull information from your database based on criteria you specify. This topic steps you through the processes of creating, running, modifying, and saving a new query.
Creating a New Query
Running a Query
Modifying a Query
Saving a Query
Creating a New Query
 If you are a beginner, you may find it helpful to review some suggestions that can help you save time and avoid some design problems. For details, go to Suggestions for Designing Queries.
-
Click  .
.
-
Choose the columns that contain the information you want to include in the query. To do this, complete these steps:
-
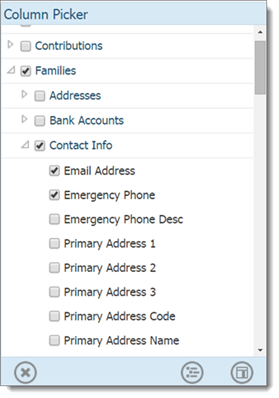
In the Column Picker panel, find the group that contains the columns you need. Then, click  to expand the group to view the columns.
Some groups contain subgroups. Click to expand the subgroup to view the columns within it.
- Scroll down the list and select the checkboxes next to the columns you need. For example:
At this point, the order in which you select the columns does not matter. You can change the order in which the columns appear in your results later.
- Add the columns to the Result Columns panel by doing one of the following:
- One-by-one, drag each column to the Result Columns panel, making sure that you place each column directly on top of the [Add new column] link.
- At the bottom of the Column Picker panel, click
 .
.
- If you need to add more columns to the query, either use the drag-and-drop method or the add column link method. Continue adding columns until all of the columns you need in the query are showing in the Result Columns panel.
- Be aware that the order in which the columns are listed in the Result Columns panel is the same order in which they appear in your results. If you want to change the order in which the columns appear in your results, complete the following:
You can also drag use the drop-and-drop method to re-order columns. To learn how to use this alternative method, go to Using_Drag-and-Drop_to_Reorder_Columns.
- Place your cursor on top of the name of the column you want to move. Slide the cursor to the left until you see this icon:
 . Click it to display this menu:
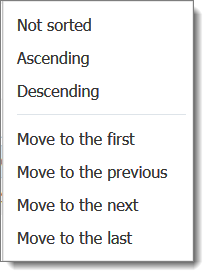
- The column order options are at the bottom of the menu. Select the desired option to move the column into the desired position:
- Move to the first: moves the column to the top of the Result Columns list. After you run the query, this column's results appear first in the Query Results panel.
- Move to the previous: moves the column up one position in the Result Columns list.
- Move to the next: moves the column down one position in the Result Columns list.
- Move to the last: moves the column to the last position in the Result Columns list. After you run the query, this column's results display last in the Query Results panel.
- If you want to summarize a column's data, you need to apply an aggregate function to it. To do this:
For information about aggregate functions, go to How to Calculate a Column's Data (Aggregate Functions).
- In the Results Column, place your cursor on top of the name of the column whose data you want to summarize.
- Slide your cursor to the right until you see this icon:
 . Click it to display the aggregate functions menu:
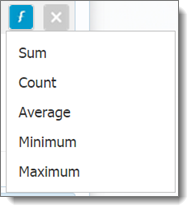
- Select the function you want to apply to the column's data.
For example, if you want to count the data in the column, select Count. The name of the function is added to column name to indicate it will be applied to the column's data, as shown below:

To remove the function from the column, click again.
- By default, the information in a column is not sorted. If you want to a column's information to display in a specific order, you need to specify a sorting order. Do the following for each column whose data you want to sort:
- Place your cursor on top of the name of the column. Slide the cursor to the left until you see this icon: . Click it to display this menu:
- The sort order options are in the group at the top of the menu. Select one of these sort options:
- Ascending: sorts the column's results in ascending order. For numeric results, sorts the information from lowest to highest. For alphabetic results, sorts the information in A to Z order. For dates and times, sorts the information from least recent to most recent.
- Descending: sorts the column's results in descending order. For numeric results, sorts the information from highest to lowest. For alphabetic results, sorts the information in Z to A order. For dates and times, sorts the information from most recent to least recent.
- By default, no conditions are applied to columns in the query. Conditions are criteria your can apply to a column to limit the results. For each column you need to apply a condition to, do the following:
If necessary, take a look at some examples of query conditions to help you think about your own query criteria.
- Click the [Add new condition] link in the Query Conditions panel.
- Select the column that you want to apply the condition to.
A condition statement that applies to that column's data is displayed. For example, selecting the Families > Family DUID column displays this condition statement:

- Specify the condition by selecting an operator and a value. For operator descriptions and examples, see Query_Operators_and_Examples.
- Now that you have chosen the columns you want to include in your query, specified the arrangement of the information, and applied conditions, you are ready to run your query. Go to Running_a_Query, which follows.
Running a Query
After you build a query, run it to retrieve results from your database. To run a query:
-
If you want to make sure that the query results show unique records only (no duplicates), select the Unique Records Only checkbox at the top of the Query Results panel.
-
To run the query, click  .
.
The results of your query are displayed in the Query Results panel. The top right portion of the panel shows the number of records found that match your query criteria.
-
To display results in full-screen view, click  . (This button is located at the top of the Query Results panel.)
This button is toggle. If you click it again, the results are re-displayed inside of the Query Results panel.
Modifying a Query
If the results are acceptable, you can skip this step and go to Saving_a_Query.
If you need to make changes to the query, consult these topics for information on how to make specific changes:
● How to Add, Remove, or Replace a Column
● How to Reorder the Columns in Your Query Results
● How to Rename a Column Heading in Your Query Results
● How to Sort a Column's Data
● How to Add, Edit, or Remove a Condition
Re-run the query to view the results of your changes.
Saving a Query
After you run the query, you can save it for future use. You keep the query private (for your eyes only) or you can share it with other users.
- To save your query, click
 .
.
The Save Query window opens:

- Complete the following:
- (Required) In the Name field, type a name for the query.
- To share the query with other users in your organization, select the Global checkbox. If you want the query to remain private, leave the box unchecked.
- To assign a tag to the query, select one from the Tags dropdown list.
The Tags list contains only the tags saved in your system. If you need to apply a tag not found in the list, you must create it first. For instructions, go to Creating_a_Tag. You can then edit the details of the query to apply the tag you created.
- In the Description field, type a description of the query.
It is a good idea to add a description that indicates the purpose of the query.
- Click
.png) .
.
The system saves the query and adds it to the My Queries and Recent Queries lists. You see this message next to the name of the query in the title bar:  Query Saved.
Related Topics
Understanding Query Conditions
How to Create and Manage Query Tags
Suggestions for Designing Queries
How to Add, Remove, or Replace a Column
How to Reorder the Columns in Your Query Results
How to Rename a Column Heading in Your Query Results
How to Sort a Column's Data
How to Add, Edit, or Remove a Condition
<Back to top>