How to Modify the Design of a Query
This topic shows you how to modify the design of a
query. You will learn how to add and remove columns of information, change
conditions, and sort results, to name a few.
Opening a Query
Modifying a Query
Adding,
Editing, and Renaming a Column
Adding,
Editing, and Removing an Aggregate Function on a Column's Data
Reordering
the Results Columns
Sorting
a Column's Data
Adding,
Editing, and Removing a Condition
Opening a Query
Your first step is to open the query whose design
you want to modify.
Do one of the following:
Click  to open the My
Queries window to view a list queries created by the logged-in user
and queries created by other users and designed as public (global).
to open the My
Queries window to view a list queries created by the logged-in user
and queries created by other users and designed as public (global).
Click  to open the Recent Queries window to view the last 12
queries created by the logged-in user.
to open the Recent Queries window to view the last 12
queries created by the logged-in user.
Select the query you want
to open, and then click  .
.
The query is presented in design view. The
following details are displayed:
Name of the query.
Columns selected
(visible in the Result Columns panel).
Sort options,
if any, applied to a column (visible in the Result
Columns panel).
Specified conditions,
if any. These are visible in the Query Conditions
panel.
For example:

From the design view, you can make
a variety of modifications to the query, including:
Modifying a
Query
The following section shows you how to modify elements
of a query.
Adding,
Editing, and Renaming a Column
The following sections show you how to add, remove, and rename a column.
Adding a Column
Adding a column is probably one of the most common
modifications you can make to a query. Sometimes, you need to add a column
because you want include additional information in your query results
or because you need to specify a condition to fine-tune your query so
that you can retrieve specific records.
In Lesson
One, we designed a simple one-column query to produce a simple list
of last names of Religious Education class leaders. Suppose that we now
want to know the first names of those leaders and view their assigned
roles. Because this information (first name and role) were included in
the original query, we need to update the query and add those columns.
The following procedure shows you how to add columns to an existing query.
Open the query you want to
modify by following the instructions presented earlier under Opening_a_Query.
For example, opening our one-column query
displays the following:
To add two more columns,
complete the following:
In the Result
Columns panel, click [Add new column],
and then select Religious Education > Class
Leader First Name.
In the Result Columns panel,
click [Add new column], and then select
Religious Education > Class Leader Role.
The Result Columns
panel now shows the three columns in our query: the Class
Leader Last Name column from our original query plus the two columns
we just added:

Click  to run the query.
The Query Results
panel displays the results. Our modified query now shows the first names
of our class leaders and their respective roles.

If desired, save the query
under a new name. To do this, click  , provide
the information for the modified query, and then click
, provide
the information for the modified query, and then click .png) .
.
Removing a Column
Sometimes, you want to remove unnecessary information
from a query. If a column of information is no longer required, you can
simply remove it. Removing unnecessary columns keeps the query from looking
cluttered and helps with the readability of your design.
To remove a column:
Open the query you want to
modify by following the instructions presented earlier under Opening_a_Query.
In the Result
Column panel click .png) to the far-right of
the column you want to remove.
to the far-right of
the column you want to remove.
The system removes the column.
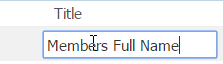
Renaming a Column
You can change the name of a column as it is displayed
in your query results. To do this, complete the following:
In the Results
Column panel, click the link in the Title
column for the column you want to rename.
A text field is displayed. For example:
Press the Back
key on your keyboard to remove the text from the field. Type a new
name for the column, and then press Enter.
The Title
field is updated with the change.
After you run the query, the new name appears
as the column heading in the Query Results
panel.
Any new reports (for example, Excel exports)
created from the query use the new name. You will also see the new name
listed as a merge field if you use the query results as a data source
for a mail merge.
Adding,
Editing, and Removing an Aggregate Function on a Column's Data
The following sections show you how to add, change,
and remove aggregate functions.
Adding an Aggregate Function
To add an aggregate function to a column's data, do
the following:
In the Results
Column, place your cursor over the
name of the column whose data you want to summarize.
Slide your cursor to the
right until you see this icon:  . Click it to display
the Functions menu:
. Click it to display
the Functions menu:
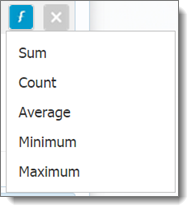
Select the function you want
to apply to the column's data.
The selected function is added to column
name to indicate it will be applied to your results. For example:

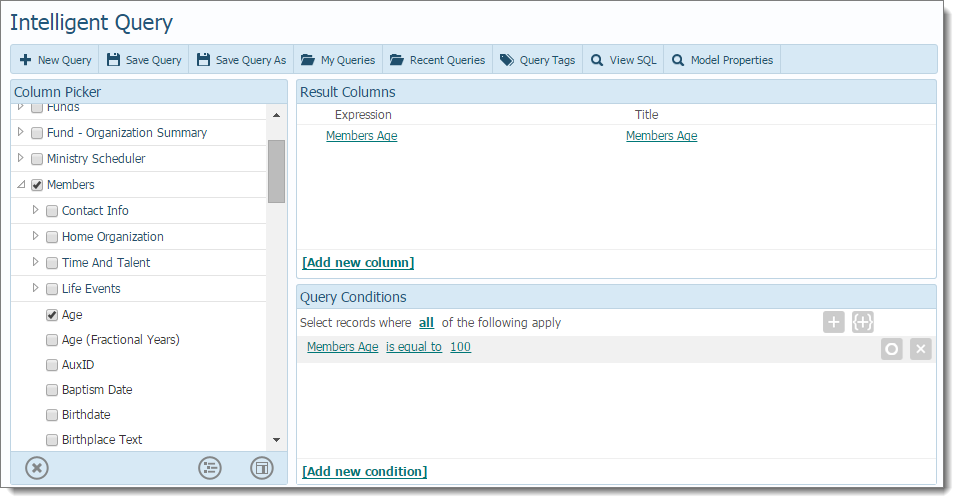
Example of Adding an Aggregate Function
Suppose you want to know how many members in your
organization are 100 years old.
Set up you query by doing
the following:
Select
the Members Age column.
Add
a condition to the Members Age
column to limit the results to members whose age is equal to 100.
The initial setup looks like this:
To answer the question "how
many", you need to apply the aggregate Count
function to the Members Age column.
To do this:
Position your cursor over
the Members Age column in the Result Columns panel. Then, slide the cursor
to the right until you see this icon: .
Click
to display the Functions menu. Select the Count
option.
The word "Count" is added to the
Members Age column to indicate it will
be applied to your results:
Click
to run the query.
The system displays the aggregate result
in the Query Results panel. For example:
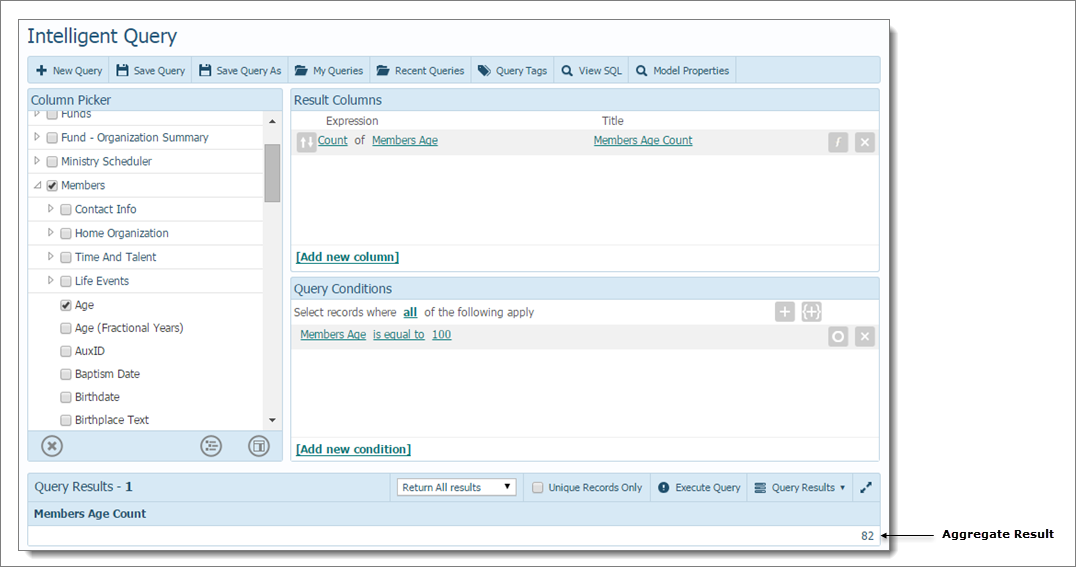
As the above illustration shows, we have
81 individuals who are 100 years old.
Editing an Aggregate Function
To edit an aggregate function:
- In the Results
Column panel, place your
cursor over the name of the column whose function you want to change.
- Slide your cursor to the right until you see this
icon: .
- Click to remove the currently
selected function from the column.
- Click again to display the
Functions menu. Then, select the desired aggregate function from the
menu.
The selected function is now applied to the
column. The name of the function is added to the column name
to indicate it will be applied to your results.
Removing an Aggregate Function from a Column.
To remove an aggregate function that is currently
applied to a column:
- In the Results
Column panel, place your
cursor over the name of the column whose function you want to remove.
- Slide your cursor to the right until you see this
icon: . Click the icon.
The aggregate function is removed from the
column.
Reordering
the Results Columns
If you need to reorder how the columns display in
your results, you need to modify the order in which they display in the
Result Columns panel. Here's how:
In the Results
Column panel, position your cursor on the name of column you
want to move. Slide your cursor to the left until you see this icon:
 . Click the icon.
The following menu is displayed. The sort
order options appear at the bottom:
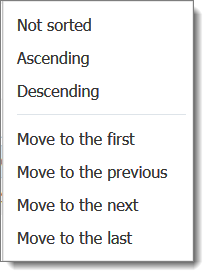
Select the desired sort
order option:
Move
to the first: moves the column to the top of the Result
Columns list. This column's results will display first in your
query results.
Move
to the previous: moves the column up one position in the list.
Move
to the next: moves the column down one position in the list.
Move
to the last: moves the column to the last position in the list.
This column's results will display last in your query results.
The Results Column
panel updates and the selected column is relocated in the list.
Now, when you run the query, the column order
in the Query Results panel will match the
order in which the columns are listed in the Results
Column panel.
Sorting
a Column's Data
If you want to add or change the sort on a column
of data, do the following:
In the Results
Column panel, position your cursor on the column whose results
you want to sort. Slide your cursor to the left until you see this
icon: .
For example:

Click .
The following menu is displayed:
At the top of the menu, select
one of these order options:
Not
sorted (the default): no sorting.
Ascending:
sorts results in A to Z order (for text data) or 0 to 9 order (for
numeric data, including dates).
Descending:
sorts results in Z to A order (for text data) or 9 to 0 order (for
numeric data, including dates).
Now, when you run the query, results for
the column display in the Query Results
panel in the order you specified.
Adding,
Editing, and Removing a Condition
The following sections show you how to add, change,
and remove conditions from a column.
Adding a Condition
To add a condition to a column in your query.
In the Query
Conditions panel , click  or select this
link: [Add new condition].
or select this
link: [Add new condition].
From the displayed menu,
select the column you want to apply the condition to.
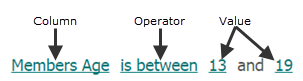
The condition expression is displayed in
the Query Conditions panel. An expression
contains three elements: the column name, an operator, and a value. For
example:
To add the condition, complete
the following:
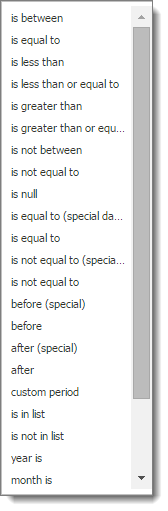
Click the Operator link and
select the desired operator from the menu.
 The operators listed
in the menu depend on the type of data contained in the column.
The operators listed
in the menu depend on the type of data contained in the column.
The operator is added to the condition.
Click the Value link and
type a value or values for the condition.
Editing a Condition
The condition expression is displayed in the Query Conditions panel. An expression contains
three elements: the column name, an operator, and a value. For example:
You can edit any of the three elements by clicking
the link and selecting a new value. For example, to change the operator,
click the Operator link to display a menu of available operators.
Select the desired operator.
Removing a Condition
- In the Query Conditions
panel, place your cursor over the name of the
column whose condition you want to remove.
- Slide your cursor to the right until u see this
icon: .
- Click to remove the currently
selected function from the column.
Related Topics
How
to Create a New Query
Understanding
Query Conditions
<Back
to top>