Click the My Ministry tab.
Click  to display the Minister Preferences page.
If you or a member of your family cannot serve at an event, you can indicate the dates and times when you are unavailable. This topic shows you how to add exception dates to your schedule. You will also learn how to view exception dates so that you can remove them if necessary.
Adding an Exception Date for a Family Member
Adding an Exception Date for Your Entire Family
Deleting an Exception Date for a Member
Deleting an Exception Date for Your Entire Family
Adding Snowbird Dates to the List of Exceptions
Click the My Ministry tab.
Click to display the Minister Preferences page.
Select the Member Preference tab. Then, select the Schedule Exceptions tab.
In the Member section, select the family member whose schedule exceptions you want to view.
For example:
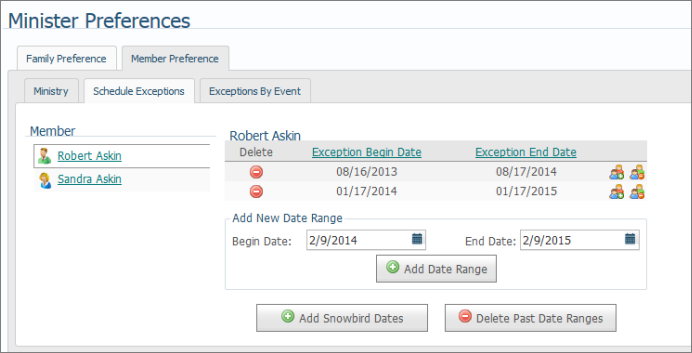
A list of the member's current schedule exception dates is located on the right.
Click the My Ministry tab.
Click to display the Minister Preferences page.
Select the Member Preference tab. Then, select the Schedule Exceptions tab.
In the Member section, select the family member whose schedule exceptions you want to view.
Under Add New Date Range, click inside the Begin Date and End Date fields and enter dates to create an exception date range.
![]() To add a single exception date, enter the same date in the Begin Date and End Date fields.
To add a single exception date, enter the same date in the Begin Date and End Date fields.
![]() For tips on using the calendar
For tips on using the calendar ![]() , see How to Use the Calendar to Set a Date.
, see How to Use the Calendar to Set a Date.
Click  .
.
The date or date range is added to the list of exception dates.
Click the My Ministry tab.
Click to display the Minister Preferences page.
Select the Member Preference tab. Then, select the Schedule Exceptions tab.
In the Member section, select the family member whose schedule exceptions you want to view.
Under Add New Date Range, click ![]() and enter the date range in the Begin Date and End Date fields.
and enter the date range in the Begin Date and End Date fields.
![]() To add a single exception date, enter the same date in the Begin Date and End Date fields.
To add a single exception date, enter the same date in the Begin Date and End Date fields.
Click .
The date or date range is added to the list of exception dates.
Click this icon to the right of the date or date range you added in Step 3: ![]() (the icon with the plus sign).
(the icon with the plus sign).
The exception date or date range now applies to the entire family.
Click the My Ministry tab.
Click to display the Minister Preferences page.
Select the Member Preference tab. Then, select the Schedule Exceptions tab.
In the Member section, select the family member whose schedule exceptions you want to view.
To the left of the exception date you want to delete, click ![]() .
.
You are prompted to confirm the deletion.
Click  to delete the exception date.
The exception date or date range is removed from the list of schedule exceptions.
If you are prompted to check a box to prevent additional dialogs, do not check the box. Click to remove it.
Click the My Ministry tab.
Click to display the Minister Preferences page.
Select the Member Preference tab. Then, select the Schedule Exceptions tab.
In the Member section, select the family member whose schedule exceptions you want to view.
Click this icon to the far right of the exception date or date range: ![]() (the icon with the minus sign).
(the icon with the minus sign).
A message is displayed to inform you that the date range was deleted for all family members.
Click to clear the message.
The date range is removed from the list of schedule exceptions.
If you specify a temporary address on the Other tab in your Family Directory record (Family Details) and provide a date range for when you reside at that address, you can easily add that date range to your list of exception dates.
To do this, click  .
.
The system displays a message to inform you that the Valid From dates on the Other tab in your Family Directory record were added to your list of exceptions.
![]() If you recently added a temporary ("Other") address to your record, the system may report that it cannot find your "snowbird" dates. All changes you make to your record are automatically assigned to a church administrator for review and approval. To find out the status of an address change, check your change request activity.
If you recently added a temporary ("Other") address to your record, the system may report that it cannot find your "snowbird" dates. All changes you make to your record are automatically assigned to a church administrator for review and approval. To find out the status of an address change, check your change request activity.
Click to clear the message.
Follow these steps to delete exceptions dates that occurred in the past from the list.
Click  .
.
A message is displayed to inform you that all past date ranges successfully deleted.
Click to clear the message.
Past exception dates are removed from the list of exceptions.
About the Minister Preferences Page