Click  to display the Scheduling page.
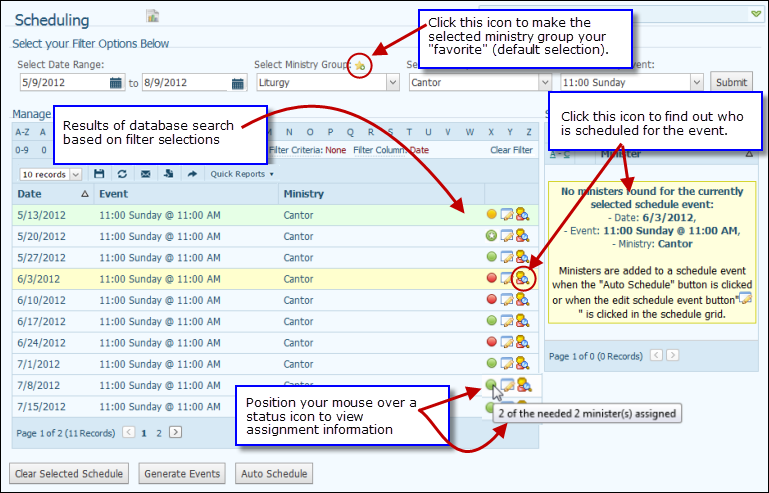
Select the desired filter options at the top of the page:
If you need to find out how many ministers are required to serve at an event or who is scheduled to serve or how many unfilled positions remain, use the following procedure.
Click
to display the Scheduling page.
Select the desired filter options at the top of the page:
The date range for the schedules you want to generate.
Ministry group, ministry, and ministry event.
As shown in the following illustration, we want to find out how many cantors in the Liturgy group are scheduled for all of the 11:00 Sunday events between 5/9/2012 and 8/9/2012.

![]() To clear filter options,
click
To clear filter options,
click ![]() . This button is located
at the bottom of the window.
. This button is located
at the bottom of the window.
![]() If you want to make the selected
ministry group your “favorite” (your personal default option), click this
icon:
If you want to make the selected
ministry group your “favorite” (your personal default option), click this
icon: ![]() . The selected group now
automatically appears in the Select Ministry Group
list so that you do not have to select it again the next time you run
the scheduler.
. The selected group now
automatically appears in the Select Ministry Group
list so that you do not have to select it again the next time you run
the scheduler.
 .
.The application processes your filter selections and searches the database to find ministers who match the criteria you specified. It also looks at the ministers-needed requirements specified for the selected event.
Results of the database search are displayed at the bottom of the Scheduling page. All of the 11AM Sunday events in the specified date range and reports the number of ministers needed for each event are displayed:
![]() The information you see may
differ from that shown in the illustration, which shows minister assignment
information. If you have not run the auto-scheduler or manually assigned
ministers, no minister assignment information can be displayed.
The information you see may
differ from that shown in the illustration, which shows minister assignment
information. If you have not run the auto-scheduler or manually assigned
ministers, no minister assignment information can be displayed.
![]() If desired, you can rearrange
the columns in the bottom pane and use the layout button to save
your new layout. See How
to Customize the Layout of a Page for details.
If desired, you can rearrange
the columns in the bottom pane and use the layout button to save
your new layout. See How
to Customize the Layout of a Page for details.
For each event, status icons provide at-a-glance information about the number of filled and unfilled ministry assignments. Position your mouse over an icon to view minister requirement details.
Status icons indicate the following:
![]() (Green): All of the
ministers required for the event have been assigned.
(Green): All of the
ministers required for the event have been assigned.
![]() (Green with an
asterisk): The event is overscheduled (has more ministers than needed).
(Green with an
asterisk): The event is overscheduled (has more ministers than needed).
![]() (Gray): No ministers
are assigned to this event because no minister requirement is specified
in the setup for the event. (To specify the number of ministers needed,
see How to Set Up the Scheduler.
)
(Gray): No ministers
are assigned to this event because no minister requirement is specified
in the setup for the event. (To specify the number of ministers needed,
see How to Set Up the Scheduler.
)
![]() (Yellow) The minister
requirement specified for this event has not been met. Some ministers
are scheduled, but the number needed has not been satisfied.
(Yellow) The minister
requirement specified for this event has not been met. Some ministers
are scheduled, but the number needed has not been satisfied.
![]() (Red) None of the needed ministers are currently assigned to this event.
(Red) None of the needed ministers are currently assigned to this event.
To the right, in the Schedule Event Ministers section, you see minister assignment information:
![]() Automatically
assigned by the auto-scheduler.
Automatically
assigned by the auto-scheduler.
![]() Manually
assigned by the administrator.
Manually
assigned by the administrator.
Manually assign ministers to events (for instructions, see Manually_Scheduling_Specific_Ministers_for_Events)
Automatically assign ministers by using the auto-scheduler (for instructions, see Using_the_Autoscheduler_to_Create_a_Schedule)
Use a combination of both methods. For example, you can make assignments using the auto-scheduler and then fill any unfilled assignments manually.
Manually_Scheduling_Specific_Ministers_for_Events
Using_the_Autoscheduler_to_Create_a_Schedule
How to Customize the Layout of a Page