 . Select Detailed
Posting to display the Detailed
Posting page.
. Select Detailed
Posting to display the Detailed
Posting page.
Setting up the filters on the Detailed Posting page is an easy way for you to manage the task of data entry for a session. We recommend that you organize your contributions and pledge payments into separate groups for data entry. Then, when you are ready to enter a group, simply set up the filters to match its features. After the filters are set up, you can skip right down to the Posting section and proceed to enter records into the system.
. Select Detailed
Posting to display the Detailed
Posting page.The following illustration shows you the filters you need to set up. See Contribution Posting Details for descriptions of the filters.
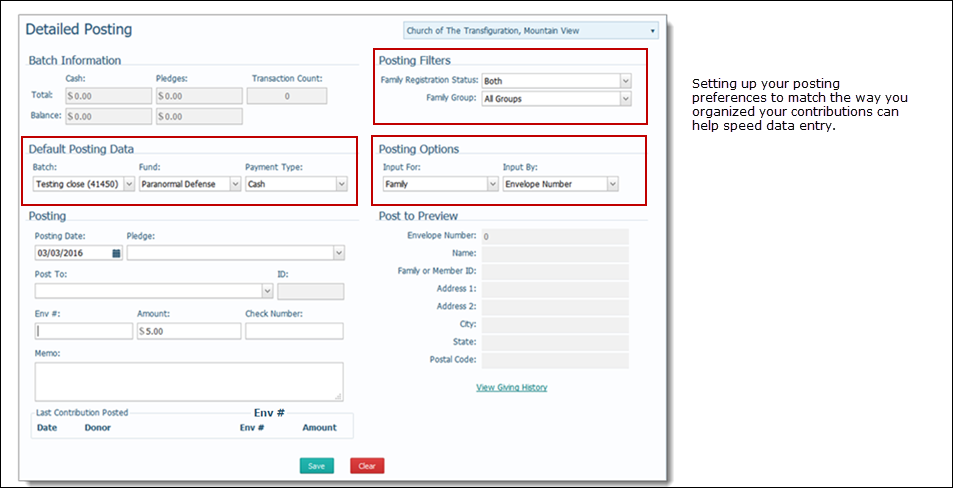
By default, the application assumes you are ready to post and that you are posting by envelope number. Therefore, the starting point for the cursor is in the Env # field (in the Posting section).
To set up the filters for the current posting session, complete the following:
Tab to the Posting Filters section. Select filters to that match your family status and group criteria:
![]() Selecting
posting filters can improve system performance. However, if you want to
make sure that you include everyone, we recommend that you set Family
Registration Status to Both
and Family Group to All.
Selecting
posting filters can improve system performance. However, if you want to
make sure that you include everyone, we recommend that you set Family
Registration Status to Both
and Family Group to All.
Family Registration Status: select the registration status of the records you want to work with.
Family Group: select the family group to use as a filter.
Tab to the Default Posting Data section, and select settings for the following:
These settings provide a quick way for you to set the defaults for data that you enter sequentially (into the same batch and fund and with the same payment type).
Batch: if you using a batch to post contributions, select the name of the batch from the list. If you are not using a batch, select None. Only open batches are shown in this list.
Fund: the contribution must be associated with a fund. Select the fund you are posting the contributions to.
Payment Type: select the payment method.
Tab to the Posting Options section, and select the method you will use to input the contributions:
Input For: select the setting that matches how your postings are sorted (for example, if organized by family, select Family).
Input By: select the field you want to use to identify contributors (for example, if you are entering contributions by the donor's last name, select Name).
Your filter settings remain in effect until you change them for the next group. You can now post contributions matching your filter selections into the system.
You can now enter records into the system. Do one of the following:
If you are using a batch to post contributions and need instructions, go to How to Post Contributions and Offerings by Batch.
If you are using a batch to post pledge payments and need instructions, go to How to Post Payments to a Pledge by Batch.
If you are posting contributions or pledge payments individually and need instructions, refer to the Help Table of Contents to locate specific instructions.
About the Contribution Posting Page
General Guidelines for Posting Contributions
How to Post Contributions and Offerings by Batch
How to Post Payments to a Pledge by Batch