Clear and consistent communication with donors is important for developing and maintaining a good relationship. This topic shows you how to create periodic pledge statements to keep your donors up to date on their progress toward fulfilling their pledge commitments. These statements show pledge amounts and detail the donor's giving for the period you specify (for example, July 2013) when setting up the pledge statement. A message template is also provided that enables you to create a customize a personal message to accompany the statement you send to your donors.
To create your pledge statements, complete each of the following steps in the order listed:
If desired, you can create a handwritten signature and convert it into an image that you can insert it into your pledge statements. A handwritten signature adds a personal touch and gives a custom look to your statements.
The following procedure shows you how to create a signature and save it to a file. Prior to printing your statements, you can insert the signature image into your statements.
![]() You
can create as many signature files as you need and save them to your local
hard drive. Be aware that the application allows you to fill the Signature dropdown list with five
files only.
You
can create as many signature files as you need and save them to your local
hard drive. Be aware that the application allows you to fill the Signature dropdown list with five
files only.
To create a signature image:
Have the signer write his or her signature on a piece of white paper. We suggest that the signer use a gel pen or a marker-type pen such as an Ultra Fine Sharpie for the best results.
For example:

Scan the signature into a file. For best results, select a high resolution setting (at least 300 dpi). Then, save the file on your computer.
Open the image file in an image editing application.
![]() There are a number of excellent
image-editing applications available online that you can download for
free. We recommend that you use an editor that allows you to make the
background transparent.
There are a number of excellent
image-editing applications available online that you can download for
free. We recommend that you use an editor that allows you to make the
background transparent.
Then, do the following:
Crop out everything except the signature.
Resize the file to these dimensions: 264 by 48 pixels.
For the best-looking image, make the background transparent.
![]() No paper is pure white
so when scanned, the background may show up as a shade of gray rather
than white. To avoid this problem, we recommend that you make the background
transparent. In addition, an image on a transparent background also looks
good on screen and on colored papers.
No paper is pure white
so when scanned, the background may show up as a shade of gray rather
than white. To avoid this problem, we recommend that you make the background
transparent. In addition, an image on a transparent background also looks
good on screen and on colored papers.
The white background is now removed, and a checked pattern appears in the transparent part of the image.
Re-save the file on your computer as a .png, .bmp, or .gif.
Record the exact location where you saved the file. You will need this information later when you ad the signature image to your printed statements.
If you manage several organizations, select the desired organization from the Organization list.
Click  .
Then, select Pledges > Statements
to display the Pledge Statements report setup.
.
Then, select Pledges > Statements
to display the Pledge Statements report setup.
For example:
The statement setup is presented in an easy-to-use, wizard-style interface that steps you through the process of setting up your pledge statements. To advance through the setup, you can either click the tabs at the top right or click Next in the lower right. At any time, you can click a tab or Previous to return to a tab to view or make changes to previously entered information.
The Statement Summary section in the lower left summarizes the selections you make on each of the tabs.
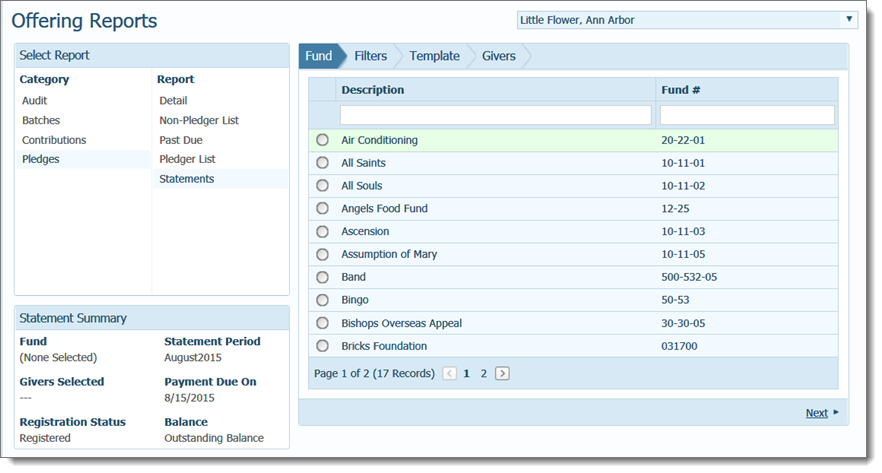
 tab, select
the fund for which you want to create pledge statements.
tab, select
the fund for which you want to create pledge statements. to advance to the Filters tab. Then, do the following:
 to advance to
the Template tab.
to advance to
the Template tab.On this tab, you can create a customized message to accompany your statements. You can also add a signature image to your statements. Both tasks are optional.
![]() Although a customized
message and signature typically go together, you can choose to include
one without choosing to include the other.
Although a customized
message and signature typically go together, you can choose to include
one without choosing to include the other.
![]() If you are adding a signature
image, you must have the file on your local hard drive that contains the
image of the signature you want to use. If you do not have a signature
file created, go to Step_1._Create_a_Signature_Image_to_Insert_into_Your_Statements
and follow the steps to create one. Then, return to this step to add it.
If you are adding a signature
image, you must have the file on your local hard drive that contains the
image of the signature you want to use. If you do not have a signature
file created, go to Step_1._Create_a_Signature_Image_to_Insert_into_Your_Statements
and follow the steps to create one. Then, return to this step to add it.
![]() Caution
Caution
To avoid losing your message text, save frequently. You must save the template before moving to the next tab or the text of your message will be lost.
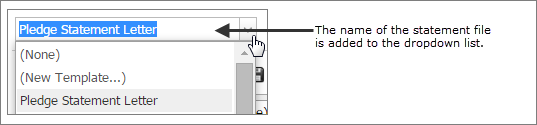
Be sure to type a name for the
message, and then click  to save it. The statement
is added to the dropdown list so it is available for future use.
to save it. The statement
is added to the dropdown list so it is available for future use.
 to search for the file, select it, and then click
  . The application uploads the image and displays it in
the Image Preview box. Finally, click inside the text field, type
a name for the file, and then click . The name
of the file is added to the dropdown list, as shown in the following
illustration.
. The application uploads the image and displays it in
the Image Preview box. Finally, click inside the text field, type
a name for the file, and then click . The name
of the file is added to the dropdown list, as shown in the following
illustration.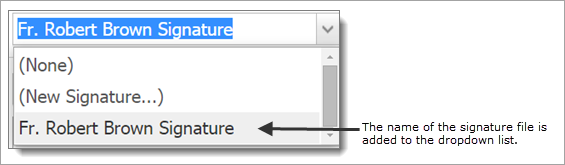
![]() You can upload
up to five signature image files. The required dimensions for the file
are 264 pixels by 48 pixels. Be sure that the image meets these requirements.
The image will appear distorted if the dimensions are incorrect.
You can upload
up to five signature image files. The required dimensions for the file
are 264 pixels by 48 pixels. Be sure that the image meets these requirements.
The image will appear distorted if the dimensions are incorrect.
![]() If you want
to save the file for future use, click . The system
adds the file to the Signature dropdown
list.
If you want
to save the file for future use, click . The system
adds the file to the Signature dropdown
list.
 to advance to the Givers tab. On this tab, select the names
of the donors who are receiving the pledge statement.
to advance to the Givers tab. On this tab, select the names
of the donors who are receiving the pledge statement.![]() Select the checkbox next
to the Family Name heading to select
the givers on the displayed page only. Select the Select
all records link to select all of your givers.
Select the checkbox next
to the Family Name heading to select
the givers on the displayed page only. Select the Select
all records link to select all of your givers.
 to open the Report Viewer.
![]() If the report does not display,
check your browser settings to make
sure that pop-up settings are enabled. Then, click again.
If the report does not display,
check your browser settings to make
sure that pop-up settings are enabled. Then, click again.
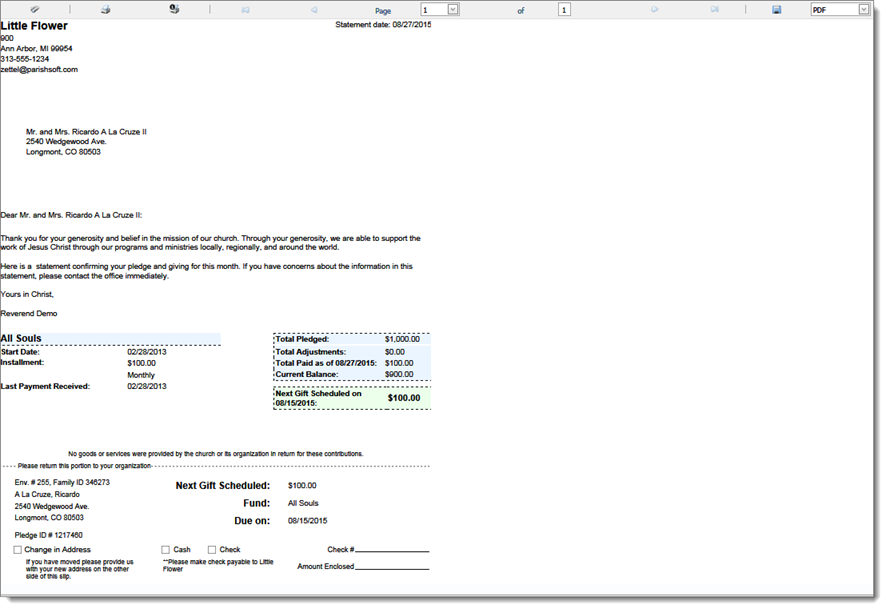
Each giver's pledge statement is displayed on a separate page in the viewer. The statements appear in A to Z order by giver's last name.
After you click , the statements
you created are shown in the Report Viewer. Use the toolbar controls at
the top of the Report Viewer to page through the report or to save, export,
or print it. For details on viewing, printing, and saving pledge statements,
go to About the Report Viewer.
Following is an example of a Pledge Statement that contains a personal message along with pledge details. The bottom of the statement contains a tear-off portion that the giver can return along with the pledge payment.
To print mailing labels:
Click
to display the Givers tab.
Individually select the givers you are mailing statements to. Alternatively, click the checkbox in the header (next to the Family Name header) to select all givers.
In the bottom-right, click
 .
.
The Report Viewer opens to let you preview the labels before printing the whole set. Labels are sorted and printed in A to Z order by last name.
To print, do one of the following:
Click ![]() to print all of
the mailing labels.
to print all of
the mailing labels.
Click ![]() to print the current
page of labels only.
to print the current
page of labels only.