The Invoices page lists all of your invoice records. This page is the central location for managing those records. Specifically, you can perform these tasks:
● Export invoices
● Add new invoices
● Delete invoices
● View details of a specific invoice
● Edit existing invoices
● Apply payments to invoices.
All of your invoice records are listed in the Invoices grid. The grid provides features that enable you to browse the list, search and find the desired invoice, and then take specific actions, such as editing or deleting an invoice. The grid also contains controls the let you sort, filter, and reorganize the records for easier viewing.
![]() Your ability to perform certain tasks is controlled by permissions assigned to your login credentials. For details, go to Permissions and Access Rights.
Your ability to perform certain tasks is controlled by permissions assigned to your login credentials. For details, go to Permissions and Access Rights.
The illustration below identifies the main areas on the Invoices page. Place your mouse pointer over a link (without clicking) to view a general description of an area. Click the link to jump to the section on this page that provides more detailed information.
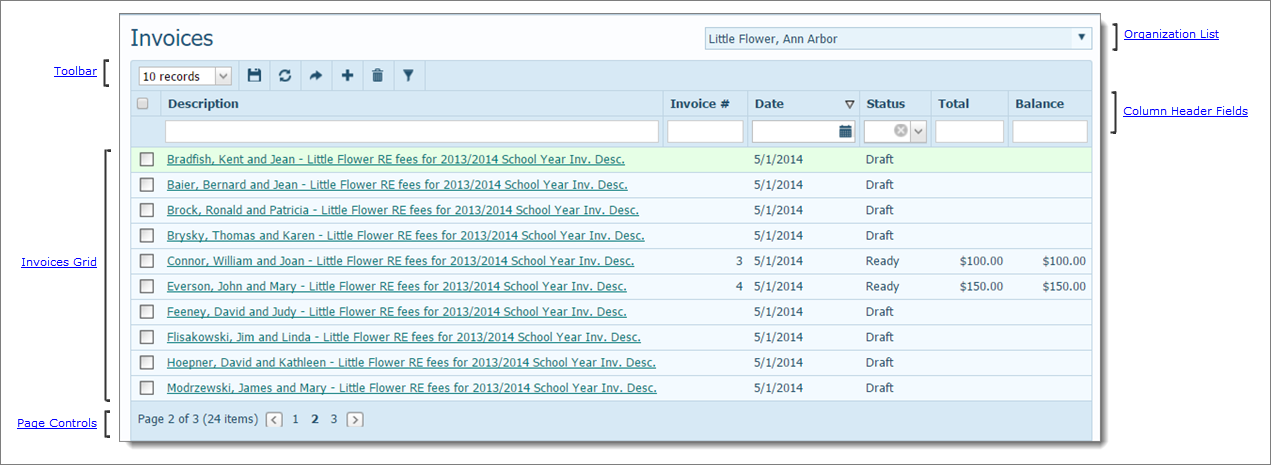
The organization associated with your ParishSOFT login credentials automatically appears in the Organization list, located in the upper-right corner of the Invoices page. If you manage several organizations, select the organization you want to work in from the list.
![]() Only the organizations for which you have View access rights are displayed in the Organization list.
Only the organizations for which you have View access rights are displayed in the Organization list.
The toolbar is located just above the list of invoices. The toolbar contains menus and buttons that enable you to control the list view and perform common invoice management functions.

● # Records menu lets you determine the number of records (default = 10) that are displayed in the Invoices grid. To do this, select the desired number of records from the # Records menu. The application saves this selection so that the next time you display the page, it automatically loads the number of records you selected.
![]() To speed up page loading, select a lower value.
To speed up page loading, select a lower value.
●  permanently saves changes you make to the layout of the grid.
●  resets the list layout to the default configuration.
●  exports the currently displayed list (filtered or unfiltered) of invoices to a .csv or Excel file.
●  adds a new invoice. This button is available only if you have View + Add/Edit permissions tied to your login credentials.
● ![]() deletes the selected invoices. This button is available only if you have View + Delete permissions tied to your login credentials.
deletes the selected invoices. This button is available only if you have View + Delete permissions tied to your login credentials.
●  displays Balance and Status filter options that you can select to filter the list to show invoices that match your selections.
The column header fields let you filter and sort the invoices in the Invoices grid. You can also change the order of the columns by clicking and dragging them to a new location.
The Invoices grid is a listing all of the customer invoices you created. The grid provides the following at-a-glance information for each invoice:
● Invoice description
● Number assigned to the invoice
● Date the invoice was created
● Status of the invoice (Draft, Ready, Partial, Paid)
● Total amount of invoice
● Balance owed as of today's date.

 Select All/Deselect All Checkbox
This checkbox control in the header enables you to select all or deselect all of the invoices on the page in the grid you are currently viewing. For example, the previous illustration shows page 2 of the Invoices grid. Selecting the header checkbox selects all invoices on Page 2 of the grid only. To deselect those invoices, select the checkbox again.
A checkbox is located to the left of each invoice listed in the grid. Selecting the checkbox activates the invoice record so that you can then perform a specific operation on it, such as a deletion or an export to a .csv file.
Each entry in the grid is active link to the invoice record. Clicking the link the invoice, enabling you to view its details, such as the specific line items charged on the invoice, any payments made by the customer, and the balance due. If the invoice is still in Draft status, you can edit the details. For those invoices whose status is Partial or Ready, you can apply payments, write-offs, and credits.
The number of pages in the Invoices grid is displayed at the bottom of each page. The number of records in the entire grid is displayed in parentheses. The page numbers are aligned across the bottom. Select a page to go directly to that page. Alternatively, click  to page back or click
  to page forward through the pages in the grid.

How to Customize the Layout of a Page
How to Export a List of Invoices to a .csv File