
Minister Directory serves as a master list of all the members in your Family Directory database who have expressed a desire to serve in a ministry. As you work through the application, you will need to view the information about your ministers that is contained in this directory.
Overview of Minister Directory
Minister Directory Command Buttons
Rolodex (Alphanumeric) Filters
The Minister Directory is a complete listing of all of the ministers in your organization.
The organization associated with your ParishSOFT login credentials automatically appears in the Organization list, which is located in the upper-right corner of the Minister Directory page.

If you manage multiple organizations, select the organization that you want to view from the list to display that organization's directory. If you are returning to this page, be sure to check which organization is currently shown in the list. The list defaults to the organization you selected when you last viewed this page.
●  adds a new minister to the directory.
●  adds groups of ministers to the directory.
●  edits multiple minister records.
●  changes an assignment's end date for a group of ministers. See How to Change an Assignment's End Date for a Group of Ministers.
As your list of ministers grows in size, you will find filtering and sorting very useful. The rolodex filters, located at the top of the directory, provide a way to help you manage list views and drill down to the exact records you want to see (for example, you can set up the filters to view only those ministers who volunteered for the Cantor ministry). For instructions on using the filters, see How to Filter Records.

You can also sort records on any column in the directory (for example, start dates in descending order) in a way that makes the information more easily accessible. For instructions column sorting, see Sorting the Display of Records.
The toolbar is located under the row of rolodex filters. The toolbar contains menus and buttons for performing common Minister Directory functions.

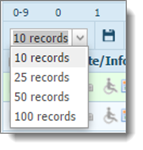
You can change the number records (default = 10) that are displayed on a page. To do this, select the desired option from the Records list:
![]() To speed up page loading, select a lower value.
To speed up page loading, select a lower value.
●  permanently saves changes to the layout.
●  resets the layout to the default configuration.
●  sends e-mail to selected people. For details, see How to Send an E-mail Message.
●  lets you create personalized hardcopy letters for mass mailings to families and members. For instructions, go to How to Perform a Mail Merge.
●  displays the Advanced Filter setup. For details, go to Advanced Filter.
● ![]() clears the Advanced Filter. This button is displayed only if the Advanced Filter is activated.
clears the Advanced Filter. This button is displayed only if the Advanced Filter is activated.
●  click this button to display records in the directory that are missing information. Click the button again to return to the main page.
●  click this button the Quick Reports menu where you quickly create the following: Minister Mailing labels and Family Group Mailing labels.
All of the ministers in the organization you select are listed in the grid. As you can see in the following illustration, the directory holds a lot of information about each minister. In a single glance, you can see the following information:
● Minister's name, address, and telephone number.
● Minister's ministry assignments (the groups and ministry events volunteered for) and assignment date ranges.
● Minister's status: active or inactive status and whether or not training requirements are fulfilled.
● Minister's special needs and required assistance.
● Total number of minister records.
![]() if a member is involved in more than one ministry, the directory contains a separate record for each ministry.
if a member is involved in more than one ministry, the directory contains a separate record for each ministry.
![]() Use the horizontal scroll bar to bring all of the information in the grid into the viewing area.
Use the horizontal scroll bar to bring all of the information in the grid into the viewing area.
Grid control functions help you view and manage your minister records.
●  enables you to select records in the grid. Selecting this checkbox in the header selects all records in the grid on the page you are viewing. This checkbox control also appears next to each records so you can select it to select a single record.
●  lets you view and edit the associated ministry record.
● ![]() lets you delete the associated ministry record.
lets you delete the associated ministry record.
●  lets you view details of the associated ministry record.
Special icons provide at-a-glance status information about your ministers.
● ![]() (wheelchair) indicates that a minister has a special need or requires assistance for a disability. Position your mouse pointer on the wheelchair icon to view an infotip that describes the nature of the disability (for example, “requires wheelchair access” or “hearing impaired”).
(wheelchair) indicates that a minister has a special need or requires assistance for a disability. Position your mouse pointer on the wheelchair icon to view an infotip that describes the nature of the disability (for example, “requires wheelchair access” or “hearing impaired”).
![]() The wheelchair icon is displayed if the Special Needs box is checked in the member’s census record in the Family Directory. The infotip description is extracted from the text field associated with the check box. If no information is entered in the text field, the infotip contains no specifics about the minister’s disability.
The wheelchair icon is displayed if the Special Needs box is checked in the member’s census record in the Family Directory. The infotip description is extracted from the text field associated with the check box. If no information is entered in the text field, the infotip contains no specifics about the minister’s disability.
● ![]() indicates that the minister is temporarily inactive.
indicates that the minister is temporarily inactive.
● ![]() indicates an inactive minister. An inactive minister is a minister whose assignment end date has passed. Position your mouse over the calendar icon to find out the exact date when the minister’s assignment expired or when the minister became inactive.
indicates an inactive minister. An inactive minister is a minister whose assignment end date has passed. Position your mouse over the calendar icon to find out the exact date when the minister’s assignment expired or when the minister became inactive.
● ![]() (yellow flag) indicates a special event.
(yellow flag) indicates a special event.
Three checkboxes in the grid are not for selection. They indicate a particular status.
If the Trained checkbox is selected (checked), the minister has received training for the ministry. For all ministries, the automated scheduler considers training as a requirement for scheduling. Therefore, this box must be checked for the minister to be considered for automatic and manual scheduling. If the box is not checked, the scheduler automatically removes the minister from the pool of ministers available for scheduling.
● Sub Only checkbox
If the Sub Only box is checked, the minister is serving as a substitute only in the ministry. Substitutes are not scheduled automatically by the automated scheduler. You can manually schedule a substitute.
● Temp Inactive checkbox
If the Temp Inactive box is checked, the minister is temporarily inactive. You cannot automatically or manually schedule inactive ministers.
Each minister record occupies a single line that extends beyond the width of the Minister Directory page. To bring information that extends beyond the borders of the page into view, click and drag the horizontal scroll bar left or right.

The page buttons are located at the bottom of the page. These buttons let you navigate quickly to specific pages in the directory. Simply click the desired page number button to display the records on that page. You can also click  to advance to the next page or click
  to go back to the previous page.

How to Add New Ministers to the Directory
How to Delete a Minister Record
How to Change an Assignment's End Date for a Group of Ministers
How to View and Update Incomplete Minister Directory Records
How to Customize the Layout of a Page