The scheduler is a powerful utility that is able to handle the varied and complex scheduling conditions imposed by your volunteers’ ministry choices, event times, preferred serving frequencies, and team and family associations. The scheduler uses the information you provide to ensure that all ministers’ needs are met and that every schedule provides the fairest possible distribution of service. However, to be absolutely certain that the results obtained are equitable and usable, you should take time to review your schedules before publishing them.
Following is a list of frequently asked or anticipated questions along with suggestions to help you troubleshoot issues you might experience during the scheduling process:
![]() Applying
the solutions proposed in this topic do not affect an already published
schedule. If you change a schedule, you will need to start over by clearing
the existing schedule, applying changes, and then generating and publishing
a new schedule.
Applying
the solutions proposed in this topic do not affect an already published
schedule. If you change a schedule, you will need to start over by clearing
the existing schedule, applying changes, and then generating and publishing
a new schedule.
● Why wasn’t a particular minister auto-scheduled or available for manual scheduling?
● Why are certain ministers are being scheduled more or less often than others?
● Why were no ministers scheduled?
● Why can't a minister log in to the website?
● Why can't I generate a schedule?
● Why are some ministers not getting scheduled at all?
Before contacting us, please check the list to determine if your question is asked and try the proposed solutions. If you need to contact us for help to resolve a problem, go to Contacting Us for contact information.
There are a number of reasons why a minister was not auto-scheduled. Following are some steps to take to help you figure out the answer to this question. We recommend that you follow the suggestions in the order given.
Run an Unscheduled Ministers report. Complete the following:
![]() This report provides names
of ministers who were not scheduled and offers reasons why.
This report provides names
of ministers who were not scheduled and offers reasons why.
 .
. .
.The report lists all available ministers that match your filter options.
 to display the Minister Directory page.
 to display
the individual minister’s record.
to display
the individual minister’s record.Check the individual’s minister preferences to determine if serving preferences or exception dates are interfering with his or her availability. To do this:
 to display the Minister Preferences page.
Check to see whether the Sunday Obligation Mass setting is checked for events that occur in the same weekend. To do this:
![]() If you are attempting to
schedule a minister for a Sunday obligation weekend event, and the minister
is already scheduled for another Sunday obligation event during that same
weekend, the auto-scheduler will only schedule the minister for one event
held during that weekend. You can override the auto-scheduler by manually
scheduling the minister (go to Manually_Scheduling_Specific_Ministers_for_Events
for details).
If you are attempting to
schedule a minister for a Sunday obligation weekend event, and the minister
is already scheduled for another Sunday obligation event during that same
weekend, the auto-scheduler will only schedule the minister for one event
held during that weekend. You can override the auto-scheduler by manually
scheduling the minister (go to Manually_Scheduling_Specific_Ministers_for_Events
for details).
Click  to display the Ministry Scheduler Configuration
page.
to display the Ministry Scheduler Configuration
page.
From the Groups list, select the desired ministry group. Then, from the Events list, select the desired event.
Click  to open the Edit Event window. For
example:
to open the Edit Event window. For
example:
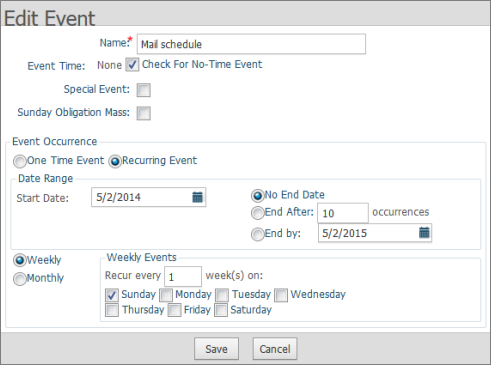
If the Sunday Obligation Mass setting is checked, the auto-scheduler will not schedule the minister for more than one Sunday Obligation Mass event that occurs in the same weekend.
If you observe that certain ministers are being scheduled more or less often than others, try the following troubleshooting suggestions. We recommend that you follow the suggestions in the order given. You can stop when a particular suggestion provides the results you are looking for.
Modify the Times Served Start Date settings. To do this:
Click  to display the Schedule Options page.
Select the General Options tab, if it is not selected.
On the far right, click Edit General Schedule Options to open the General Schedule Options window.
If you have a lot of new ministers, do one of the following to try to achieve a better balance:
Set the Time Frame option to 0 Months (Current Day).
Set the Specific Date option to the first schedule date in the period for which you are creating a schedule.
Click
 to save the new setting.
Generate a new schedule and determine if the results are more acceptable. If so, you can publish the schedule. If not, continue to Step 2.
To see what balance really looks like, run the Time Served Count report. In this report, you can check each minister's balance of time served during the schedule period.
To do run this report:
Click
to display the Ministry Scheduler Reports
page.
Select the Times Served Count report from the Select Report menu.
In the Select Filtering Options section, select the desired ministry group and ministry.
In the Select Date Range section, specify the date range.
Click
to generate the report.
The Times Served Count report lists the names of ministers that match your filter criteria and shows you the number of times each minister has served in the ministry during the specified time period.
If a particular minister is missing from this report, go to Step 3, which shows you how to run an Unscheduled Minister report. This report can help you figure out why a minister was not scheduled.
If a minister has a particularly high or low Times Served Count value, you need to look closely at the minister's data to figure out the cause of the imbalance. Skip to Step 4 to start looking at the data.
Run the Unscheduled Ministers report. This report lists the names of ministers who were not scheduled, and for each minister, provides a reason why. To run a report:
Click
to display the Ministry Scheduler Reports
page.
Select Unscheduled Ministers from the Select Report menu.
In the Select Filtering Options section, select the ministry group. Then, in the Select Date Range section, select the date range for the schedule you ran.
Click
to generate the report.
For each event listed, you can see the names of ministers who were not scheduled. The Reason column provides an explanation. Go to Common Reasons Why a Minister Cannot Be Scheduled for details.
Open the minister’s record to look at settings that can cause him or her to be under- or over-scheduled. To do this:
to display the Minister Directory page. to open the minister’s record.Review each under-scheduled minister's scheduling preferences and team affiliations. To do this:
to display the Minister Preferences page.Review your schedule setup and scheduling process:
Did you create schedules one at a time for each ministry and/or event?
To achieve better balance, it is best to schedule everybody at once instead of ministry group by ministry group.
How long is your schedule?
Schedules three months or longer tend to be more balanced.
Do you have a lot of teams?
Too many teams can affect the number of times each minister is scheduled and can affect scheduling balance.
Did you select a lot of filters to meet your requirements?
We recommend selecting the fewest possible filter options to meet your requirements. Filters impose specific criteria that the scheduler must adhere to. With each filter you add, the size of the selection pool of potential available ministers that meet your criteria is reduced so that the scheduler has fewer ministers to choose from when trying to fill slots in a schedule. You can end up with a schedule that does not equally distribute the service load among your ministers.
Review the guidelines under Guidelines for Obtaining Balanced and Fair Schedules to see if you can make adjustments to obtain a more balanced outcome.
There are a few reasons why you can end up with an empty schedule. Check the following:
Reason 1: The number of ministers needed for an event is not specified.
Make sure that when you set up the scheduler you remembered to configure the number of ministers needed for all of the events in question. For instructions, see How to Set Up the Scheduler.
Reason 2: The assignment end date expired.
Make sure that the assignment end date has not expired for your ministers. For each minister, check the assignment expiration date by doing the following:
Click
to display the Minister
Directory page.
Locate the minister's name in the list.
Check the information in the Edit/Delete/Info column.
If
the minister’s assignment end date has passed, this icon is displayed:
![]() . Position your mouse on top of the icon to see
the exact date of expiration.
. Position your mouse on top of the icon to see
the exact date of expiration.
The auto-schedule will not schedule a minister whose assignment end date has expired.
![]() If
you determine that this end date has expired for all of the ministers
in a group, you can update all of their assignment end dates at one time
by using the batch-change facility. For instructions, see How
to Change an Assignment's End Date for a Group of Ministers.
If
you determine that this end date has expired for all of the ministers
in a group, you can update all of their assignment end dates at one time
by using the batch-change facility. For instructions, see How
to Change an Assignment's End Date for a Group of Ministers.
Reason 3: You are looking at the wrong organization's schedule.
Make sure that you selected the right organization. Verify the name of the organization displayed in the Organization list at the top of the Scheduling page.
There are a couple of reasons why a minister can't log in. Check the following:
Reason 1: Incorrect passwords are the most common cause of the inability to log in.
A password is case sensitive. This means that the password entered must match the capitalization used when it was first created it; otherwise, the attempt to log in fails. If a login fails, check that the Caps Lock key is off.
Reason 2: The user's registration application was denied because the system could not find the user in the database.
The system automatically approves a user’s registration only if it can find a unique match in the ParishSOFT database for each of the following items of information for the user:
● First Name
● Last Name
● Postal Code
● E-mail Address
The most likely reason for a registration failure is that the system cannot find an e-mail address for the minister in question. If you suspect that your ParishSOFT database does not include e-mail addresses (or any of the other required information) for most of your ministers, you should collect this information and then update your database so that the system can automatically approve your ministers’ registration requests.
If a registration attempt fails, the application alerts the member and puts his or her registration on hold. You must take action to find out the source of the failure and resolve the problem by completing the following:
Select the Home tab.
Select the New Users in Suspense link.
![]() The number in parentheses
indicates the number of pending registration records.
The number in parentheses
indicates the number of pending registration records.
The User Registrations page is displayed. The page contains records for all of the members whose registrations are temporarily on hold.
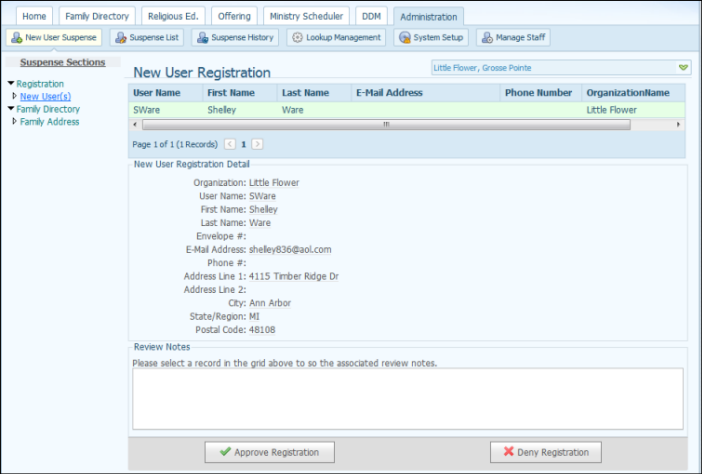
The New User Registration Detail in the bottom pane displays the information the member supplied during the attempted login. You can compare this information with that found in the Family Directory.
Open your organization’s Family Directory. Keep the New User Registration Detail information visible while you review the entries in the Family Directory.
If you find an entry
for the user, compare the information in the directory with the New User Registration Detail. If you accept
the new registration information, you can immediately update the Family
Directory record with the new registration details by clicking  .
.
The application changes the Family Directory record to match the details in the new registration. An automatic e-mail with a temporary password and login information is sent to the minister. The minister can then log in with the new credentials.
If you do not find an
entry for the user in the Family Directory, you can create a new entry
using the details from the new user registration. To do this, click
.
The application creates a new Family Directory record that matches the details in the new registration. An automatic e-mail with a temporary password and login information is sent to the minister. The minister can then log in with the new credentials.
If you do not approve
the registration, make a note detailing the reasons for the denial
in the Review Notes section. Then,
click  .
.
The information is recorded in the Suspense History log.
If additional requests are pending, review the next record. Repeat Step 3.
Following are three common reasons why the system cannot generate a schedule:
Reason 1: It is possible that no time was specified for the events you want to schedule.
For each event, verify that it has a time configured by doing the following:
Click
to display the Configuration page.
In the Groups panel, select the desired ministry group.
In the Events
panel, select the event. Then, click to open the
Edit Event window.
Make sure that an event time is specified.
Reason 2: It is possible that no ministers in the ministry are assigned to the events you want to schedule.
For each event, verify that it has ministers assigned to it by doing the following:
Click
to display the Minister Directory page.
Click  to
open the Advanced Filter window.
to
open the Advanced Filter window.
Do the following:
Select a ministry group from the Ministry Group list.
Select a ministry from the Ministry list.
Select an event from the Ministry Event list.
Click  to view a list of ministers assigned to the event.
Reason 3: It is possible that no ministers are specified as being needed for the event.
For each event, verify that a Ministers Needed value is specified by doing the following:
Click
to display the Scheduling Options page.
Select the Ministers Needed tab.
Do the following:
Select a ministry group from the Ministry Group list.
Select a ministry from the Ministry list.
Select an event from the Ministry Event list.
In the Ministers Needed column, check to see if the value is 0.
The scheduler uses ministers-needed information to assign ministers to events. If no ministers are specified, the scheduler cannot schedule ministers for the event.
If you observe that certain ministers are not being scheduled at all, run an Unscheduled Ministers report. This report provides names of ministers who were not scheduled and offers reasons why.
To do this:
..The report lists all available ministers that match your filter options.
Following are some of the more common reasons why a minister was not scheduled.
Reason 1: Expired Assignment Date
Make sure that the assignment end date has not expired for your ministers. For each minister, check the assignment expiration date by doing the following:
Click
to display the Minister
Directory page.
Locate the minister's name in the list.
Check the information in the Edit/Delete/Info column.
If
the minister’s assignment end date has passed, this icon is displayed:
![]() . Position your mouse on the icon to see the
exact date of expiration.
. Position your mouse on the icon to see the
exact date of expiration.
Reason 2: Not Trained
For a minister to be scheduled, he or she must be trained. To check training status, do the following:
Click
to display the Minister
Directory page.
Use the rolodex filters to locate the minister's name in the list.
Scroll to view the information in the Trained column.
If the Trained checkbox is not checked, the scheduler will not schedule the minister.
Reason 3: Substitute only
A minister who is a substitute cannot be automatically scheduled. To check whether or not a minister is a substitute only for a given ministry:
Click
to display the Minister Directory page.
Click to
open the Advanced Filter window.
Do the following:
Select All from the Ministry Group, Ministry, Ministry Role, Ministry Event, and Trained lists.
Select Substitute from the Sub Only list.
Click
to view a list of ministers who serve as substitutes only.
This list shows the names of ministers who cannot be automatically scheduled. Check this list to see if it includes the ministers who are not being scheduled.
![]() You
can manually schedule Sub Only ministers.
You
can manually schedule Sub Only ministers.
Reason 4: Temporarily inactive status
To check a minister's active status:
Click
to display the Minister Directory page.
If this filter icon is showing,
click it to clear the Advanced filter: ![]() .
.
Scroll to view the information in the Temp Inactive column. You may need to drag the horizontal scroll bar at the bottom of the page to bring this information into the viewing area.
Click the Temp Inactive column header. Then, click the header again to see which ministers have the Temp Inactive checkbox selected.
Any minister who has the Temp Inactive checkbox selected cannot be scheduled.
![]() To
make a minister available for scheduling, click
to open the minister's details and deselect the Temporarily
Inactivate checkbox.
To
make a minister available for scheduling, click
to open the minister's details and deselect the Temporarily
Inactivate checkbox.
Reason 5: Conflicting preference settings
A minister's preference settings can make him or her unavailable to serve. To check a minister's preference settings:
Click
to display the Minister
Preferences page.
Use the rolodex filters to locate the minister who is not being scheduled.
Click
![]() to display the minister's
preferences.
to display the minister's
preferences.
Select the Minister Profile tab, if it is not selected.
Under Ministries, check the following:
For Willingness to serve, verify the member's availability. For example, is the minister always available or only available at certain times?
For Temporarily Inactive, check whether the member's status is Yes, which indicates that he or she is temporarily inactive for the given ministry.
Select the Schedule Exceptions tab and check the minister's exception dates. These are dates when the minister is not available for scheduling.
Select the Exceptions By Event tab. If the Count column shows a 0, this means the minister has no event exceptions.
Common Reasons Why a Minister Cannot Be Scheduled
About the Scheduling Options Page
About the Minister Preferences Page
<Back to schedule creation diagram>