To produce fair and balanced schedules, the scheduling tool must take into account your ministers’ preferences (both individual and family group), which includes their availability to serve, preferred serving frequencies, and schedule exceptions (those time periods when a minister is unavailable for service). Therefore, before generating your schedules, you must make sure that all of this information is included in every minister’s record. The Minister Preferences page is where you configure individual minister and family group preferences.
Overview of the Minister Preferences Page
Filtering and Sorting Minister Records
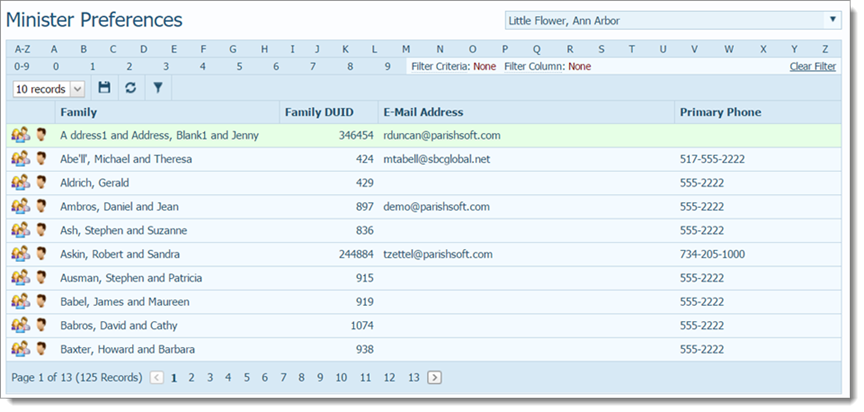
The Minister Preferences page contains a list of records of families in your Family Directory database that are involved in one or more ministries.
From this page, you access the family group preference configurations and the individual minister preference configurations. To get started, click the following icons:
● ![]() configures family preferences. For details, see How to View and Change a Family's Scheduling Preferences.
configures family preferences. For details, see How to View and Change a Family's Scheduling Preferences.
● ![]() configures individual member preferences. For details, see How to View and Change a Member's Ministry Preferences.
configures individual member preferences. For details, see How to View and Change a Member's Ministry Preferences.
The organization associated with your ParishSOFT login credentials automatically appears in the Organization list, which is located in the upper-right corner of the Minister Preferences page.

If you manage multiple organizations, select the organization that you want to view from the list to access that organization's list of minister records and to view and minister preferences. If you are returning to this page, be sure to check which organization is currently shown in this list. The list defaults to the organization you selected when you last viewed this page.
As the list of minister records grows in size, you will find filtering and sorting very useful. The alphanumeric filters, located at the top of the directory, provide a way to help you manage list views and drill down to the exact records you want to see (for example, you can view only those families whose last name starts with "T" by selecting the T filter). For instructions on using the filters, see How to Filter Records.

You can also sort on any column in the list (for example, Family DUID) in a way that makes the information more easily accessible. For instructions column sorting, see Sorting the Display of Records.
●  permanently saves changes to the layout. See How to Customize a Page's Layout.
●  resets the layout to the default configuration.
●  displays the Advanced Filter setup. See Advanced Filters.
● ![]() displays the Family Preferences tab where you can configure new family preferences and editing existing ones. For instructions, see How to Configure a Family's Scheduling Preferences
displays the Family Preferences tab where you can configure new family preferences and editing existing ones. For instructions, see How to Configure a Family's Scheduling Preferences
● ![]() displays the Member Preferences tab where you can do the following:
displays the Member Preferences tab where you can do the following:
§ Specify a minister's availability.
§ Specify exceptions to a minister's schedule.
§ Specify new member preferences and edit existing ones.

The page buttons are located at the bottom of the page. These buttons let you navigate quickly to specific pages in the Minister Preferences list. Simply click the desired page number button to display the records on that page. You can also click  to advance to the next page or click
  to go back to the previous page.

Each family record occupies a single line that extends beyond the width of the Minister Preferences page. To bring information that extends beyond the borders of the page into view, click and drag the horizontal scroll bar left or right.
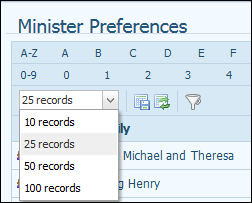
You can change the number of family records (default = 10) that are displayed on a page. To do this, select the desired option from the Records list:
![]() To speed up page loading, select a lower value.
To speed up page loading, select a lower value.
How to View and Set a Member's Ministry Preferences
How to View and Set a Family's Scheduling Preferences
How to Customize the Layout of a Page