Overview of the Templates Page
The Templates page lists all of the invoice templates you created. This page is the central location for managing your templates. Specifically, you can perform these tasks:
● Add new templates
● Delete existing templates
● View details for a specific template
● Edit a template.
The grid provides features that enable you to browse the list, quickly find the right template, and then take specific actions, such as editing and deleting. The grid also contains controls the let you sort the list for easier viewing.
![]() Your ability to perform certain tasks is controlled by permissions assigned to your login credentials. For details, go to Permissions and Access Rights.
Your ability to perform certain tasks is controlled by permissions assigned to your login credentials. For details, go to Permissions and Access Rights.
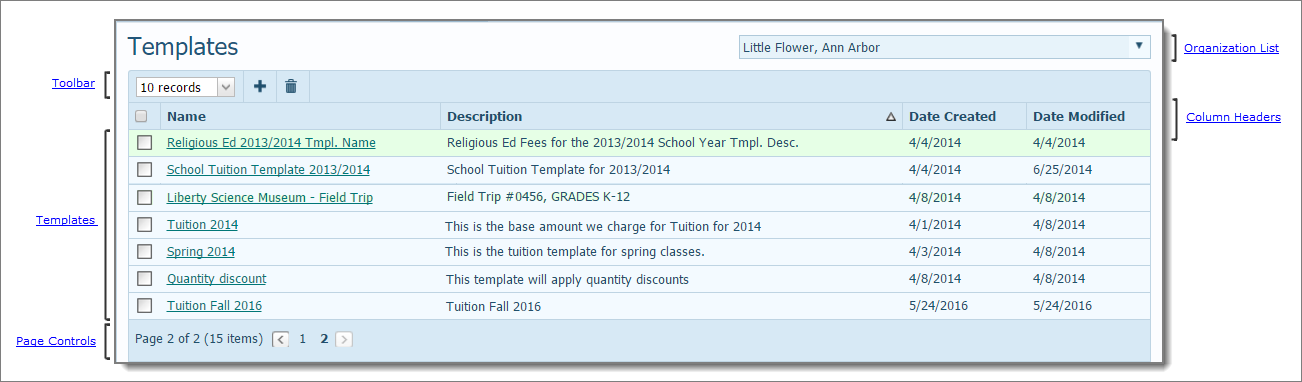
The illustration below identifies the main areas on this page. Place your mouse pointer over a link (without clicking) to view a general description of an area. Click the link to jump to the section on this page that provides more detailed information.
The organization associated with your ParishSOFT login credentials automatically appears in the Organization list, which is located in the upper-right corner of the Invoices page. If you manage several organizations, select the organization whose invoices you want to work on from the list. The page reloads, and the Invoices list shows you the invoices created in the organization you selected.
![]() Only the organizations for which you have View access rights are displayed in the Organization list.
Only the organizations for which you have View access rights are displayed in the Organization list.
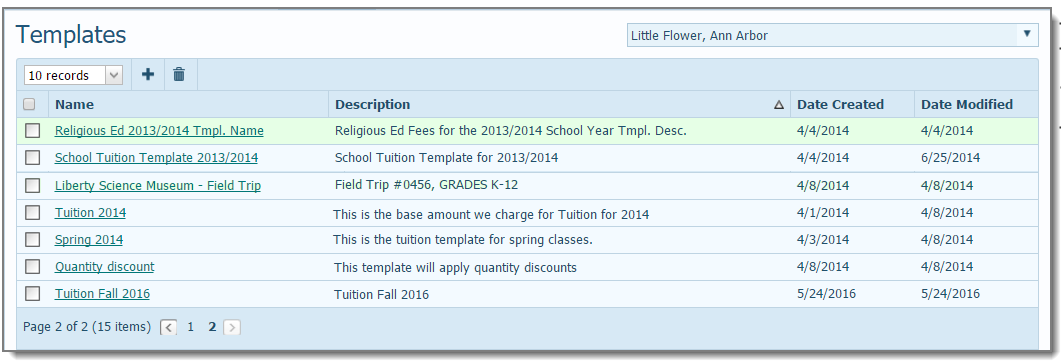
The toolbar is located just above the list of invoices. The toolbar a menu that lets you control the list view and buttons that enable you to add and delete templates from the Templates grid.

● # Records menu lets you determine the number of records (default = 10) that are displayed in the Templates grid. To do this, select the desired number of records from the # Records menu. The application saves this selection so that the next time you display the page, it automatically loads the number of records you selected.
![]() To speed up page loading, select a lower value.
To speed up page loading, select a lower value.
●  opens the Create New Invoice Template window where you can create and save a new invoice template. This button is available only if you are a user with View + Add/Edit permissions.
● ![]() deletes the selected invoice templates. This button is available only if you are a user with View + Delete permissions.
deletes the selected invoice templates. This button is available only if you are a user with View + Delete permissions.
The column header fields let you sort the records in the templates grid. For example, to sort the entire grid by date created by clicking the Date Created column heading. When you click a column heading, a sort icon appears to the right of the column name to indicate the column you are sorting on and the direction of the sort:
![]() sorts in ascending order such that successively higher values (numeric or alphabetic) are displayed as you proceed down the page. For alphabetic sorts, ascending order is from A to Z. For numeric sorts, ascending order is from 0 to 9.
sorts in ascending order such that successively higher values (numeric or alphabetic) are displayed as you proceed down the page. For alphabetic sorts, ascending order is from A to Z. For numeric sorts, ascending order is from 0 to 9.
![]() sorts in descending order such that successively lower values (numeric or alphabetic) are displayed as you proceed down the list. For alphabetic sorts, descending order is from Z to A. For numeric sorts, descending order is from 9 to 0.
sorts in descending order such that successively lower values (numeric or alphabetic) are displayed as you proceed down the list. For alphabetic sorts, descending order is from Z to A. For numeric sorts, descending order is from 9 to 0.
The Templates grid is a listing all of your invoice templates. The grid provides at-a-glance information for each template, specifically:
● Name: name of template.
● Description: description of the template.
● Date Created: the date the template was saved.
● Date Modified: the date the template was last changed.
 Select All/Deselect All Checkbox
This checkbox control in the header enables you to simultaneously select all or deselect all of the templates on the page you are viewing.
A checkbox is located to the left of each template in the list. The checkbox enables you to select one or more templates individually so that you can then perform a specific operation, such as a deletion.
Each template record is active link. Clicking the link opens a window where you can view template details, such as a description of the template and the line items it contains. You can also edit the template from within this window.
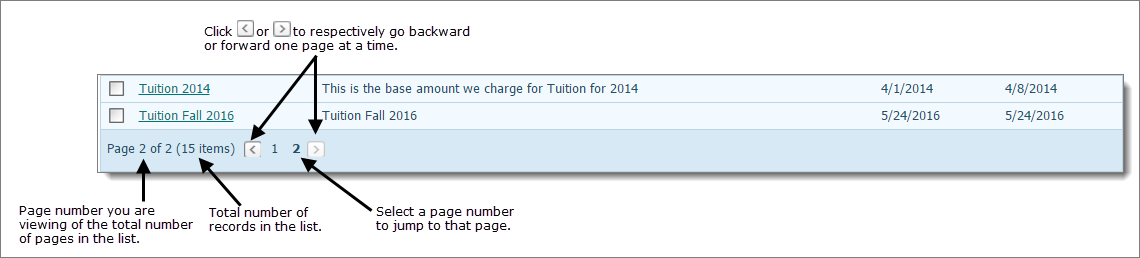
The number of pages in the Templates grid is displayed at the bottom of each page. The number of records in the entire grid is displayed in parentheses. The page numbers are aligned across the bottom. Select a page to go directly to that page. Alternatively, click  to page back or click
  to page forward through the pages in the grid.
How to Customize the Layout of a Page
How to Create a New Invoice Template
How to Delete an Invoice Template
How to View a Template's Details