A parish directory is a listing of the families and members in your organization. You can configure the report to include one family type, such as active families only, or a combination of family types, such as active alumni families.
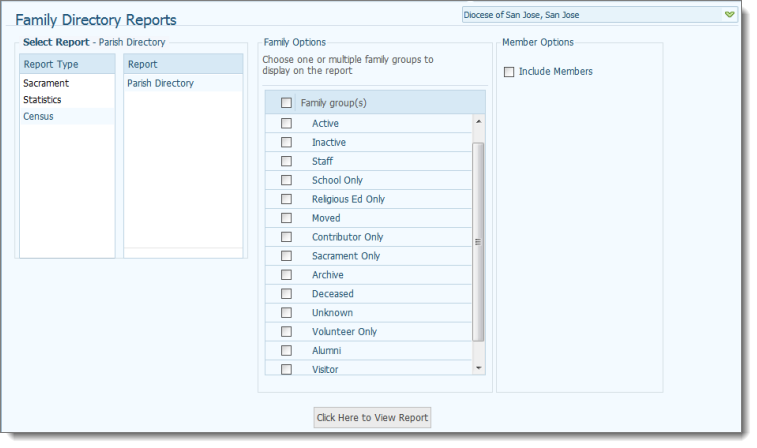
From the Report Type menu, select Census. Then, from the Report menu, select Parish Directory to display the directory setup:
![]() Your Parish Directory setup may differ from the one shown in the following illustration. The Family group(s) options available for selection vary by organization and are determined by your organization administrator.
Your Parish Directory setup may differ from the one shown in the following illustration. The Family group(s) options available for selection vary by organization and are determined by your organization administrator.
 .
.
The Family Options menu enables you to select the types of families you want to include in the directory. The Member Options menu enables you to select whether or not to include the names of individual family members in your directory.
![]() You can select one or more groups. To include all of the groups listed, select the Family groups(s) option at the top of the menu. To deselect all groups, select the Family groups(s) option again. To deselect a single group, select it to remove the check mark. The No Family Group option lets you include families in the report that have no affiliation with a family group.
You can select one or more groups. To include all of the groups listed, select the Family groups(s) option at the top of the menu. To deselect all groups, select the Family groups(s) option again. To deselect a single group, select it to remove the check mark. The No Family Group option lets you include families in the report that have no affiliation with a family group.
 .
.The report is displayed in the Report Viewer.
Following is an example of a directory listing. In the report setup, the Include Members option was selected so that the names of individual members are included in the each family group's listing.
![]() A given family's email address is included in the report (see highlighted address in the illustration below) only if the Publish Email checkbox in the family record is selected.
A given family's email address is included in the report (see highlighted address in the illustration below) only if the Publish Email checkbox in the family record is selected.

To print and save the report, see How to Print, View, and Save Reports.
About the Family Directory Reports Page
Field Descriptions for the Family Details Tab
How to Print, View, and Save Reports