After you set up a batch entry form for a quick entry batch, you can enter contributions or pledge payments into the batch. This topic shows you how.
Things to Keep in Mind While Entering Contributions
Here are a few things to keep in mind while entering contributions into a batch.
● For any line item, you can change the default values for posting data. To do this, click ![]() to open the Default Posting Data for Line Item window. Select the desired values from the dropdown lists. Save your changes to apply them to that line item only.
to open the Default Posting Data for Line Item window. Select the desired values from the dropdown lists. Save your changes to apply them to that line item only.
● To delete a line item from the batch entry form, click ![]() .
.
● To advance to the next field or to next line item in the batch entry form, you can either press the Tab key or the Enter key.
● If you set up the form to include both the Env # and Last Name as lookup fields, during data entry the system automatically skips the second lookup field and places the cursor in the Amount field if you enter a value in the first lookup field. To force the system not to skip the second lookup field, on your keyboard press Shift + Tab.
● The system automatically saves your work after you enter a line item. You can always see when the system last saved your work by looking at the timestamp in the top-right corner of the batch entry form.
● You can exit the form at any time. To do this, click X in the top-right corner or click  at the bottom. The system saves your work before closing. You can return to the batch later to continue working.
![]() The following instructions assume that the quick-entry batch is created and set up. If you need to create a quick-entry batch, go to How to Create a Quick-Entry Batch. If you need to set up the batch, go to How to Set Up a Batch for Quick Entry Posting.
The following instructions assume that the quick-entry batch is created and set up. If you need to create a quick-entry batch, go to How to Create a Quick-Entry Batch. If you need to set up the batch, go to How to Set Up a Batch for Quick Entry Posting.
 . From the dropdown menu, select the Quick Entry Posting option to display the Quick Entry Posting page.
![]() The Posting dropdown menu is available only if you have Add/Edit permissions in the Offering module. Contact your administrator for assistance.
The Posting dropdown menu is available only if you have Add/Edit permissions in the Offering module. Contact your administrator for assistance.
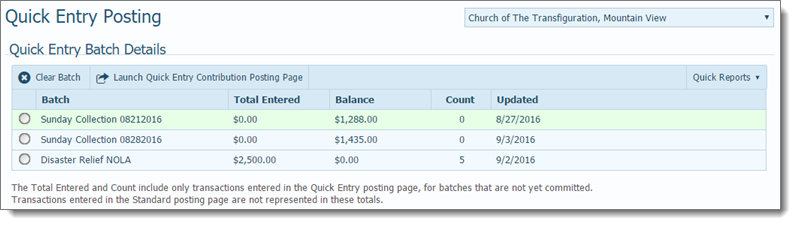
The Quick Entry Posting page is displayed. The grid shows open quick-entry batches only. For example:
 .
.The system does the following:
![]() CAUTION
CAUTION
The quick entry posting process allows multiple users to work simultaneously in a batch. Be aware that users do not see one another’s changes to a batch that affect such elements as the transaction count and the batch balance.
to exit the informational message.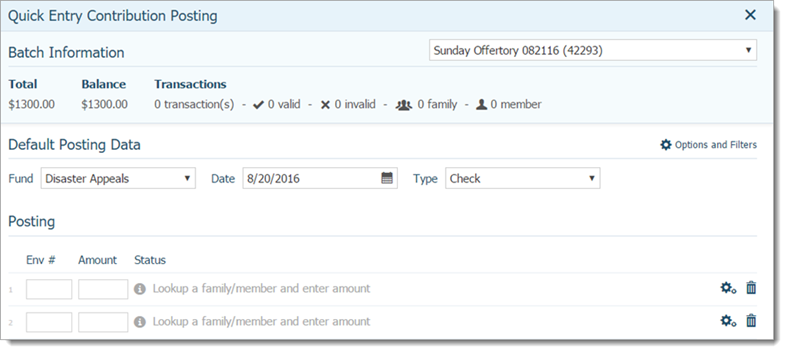
For example, if in the setup you selected the envelope number as the lookup field, type the family or member’s envelope number in the Env # field.
The system validates the information you entered.
 .
.The system saves the contribution you just entered and does the following:
![]() The system validates the value in the lookup field. If no matching giver is found, an error message is displayed. You can correct the mistake immediately or wait until you finish entering all contributions into the batch.
The system validates the value in the lookup field. If no matching giver is found, an error message is displayed. You can correct the mistake immediately or wait until you finish entering all contributions into the batch.
![]() The name link shows the giver’s name and street name and number only. To view city and state details, position your mouse (without clicking) on top of the link. Complete address details appear in a small pop-up window.
The name link shows the giver’s name and street name and number only. To view city and state details, position your mouse (without clicking) on top of the link. Complete address details appear in a small pop-up window.

Then, do one of the following:
If you want the contribution applied to the displayed pledge, press the Tab key to advance to the next line item. Then, go to Step 6.
![]() If the fund receiving the contribution is set up to require pledges, the system will post the contribution and automatically adjust the pledge balance if the contribution results in an overpayment.
If the fund receiving the contribution is set up to require pledges, the system will post the contribution and automatically adjust the pledge balance if the contribution results in an overpayment.
 . Press the Tab key to advance to the next line item. Then, go to Step 6.
![]() If the fund receiving the contribution is set up to require pledges, the system will post the contribution and automatically adjust the pledge balance if the contribution results in an overpayment.
If the fund receiving the contribution is set up to require pledges, the system will post the contribution and automatically adjust the pledge balance if the contribution results in an overpayment.
At the bottom of the batch entry form, the system displays one of the following messages:
![]() You have errors you must correct before you can Commit.
You have errors you must correct before you can Commit.
![]() You have completed the batch. Click here to Commit.
You have completed the batch. Click here to Commit.
How to Fix Errors in a Quick Entry Batch
How to Commit a Quick Entry Batch
How to Create a Quick Entry Batch Report