How to Create Contribution Statements
On a quarterly or yearly basis, it is common practice
for churches to provide donors with contribution statements that record
their charitable contributions. This topic shows you how create a contribution
statement that donors can use to substantiate their contributions, especially
during tax time. These statements show contribution amounts and detail
the donor's giving for the period you specify (for example, end of year
2013) when setting up the contribution statement. A letter template is
also provided that enables you to customize a personal message to accompany
the statement you send to your donors.
Setting
Up Contribution Statements
Printing,
Viewing, and Saving Contribution Statements
Printing Mailing Labels for Contributions
Setting
Up Contribution Statements
If you manage several organizations,
from the Organization
list select the organization whose contributions you want to review.
Click  to display the Offering Reports page.
From the Category
menu, select Contributions. Then, select
Statements from the Report
menu.
The setup for the Contribution Statements
report is displayed. For example:

The statement setup is presented in an easy-to-use,
wizard-style interface that steps you through the process of creating
your contribution statements. To advance through the setup, you can either
click the tabs on the top right or click Next
in the lower right. At any time, you can click a tab or Previous
(lower right) to go back to view or make changes to previously entered
information.
The Statement Summary
section in the lower left presents summary of the selections you make
on each of the tabs.
- Starting on the
 tab, do
one of the following:
tab, do
one of the following:
- If you want to include specific funds in
the report, select the checkbox next to each fund you want to include.
 If the fund list
is long, try using the column
header filters to narrow down the list of funds to show only the fund
or funds you want to work with.
If the fund list
is long, try using the column
header filters to narrow down the list of funds to show only the fund
or funds you want to work with.
- If you want to include all funds in the report,
select the All Funds checkbox in the header (the checkbox to the left
of the Description heading).
Be aware that selecting the
All Funds checkbox selects only the funds on the page you are viewing.
If you want to include all funds in the report, you must first select
the checkbox (you can select it on any setup page), and then select the
Select all records link that appears
above the list of funds. The link shows the number of funds that will
be included in the report.
- Click
 to advance to the Options tab. Use this tab to select the desired
content and format for the report. Do the following:
to advance to the Options tab. Use this tab to select the desired
content and format for the report. Do the following:
 For
descriptions of the setup options on the Options
tab, go to Setup
Options for the Contribution Statements Report.
For
descriptions of the setup options on the Options
tab, go to Setup
Options for the Contribution Statements Report.
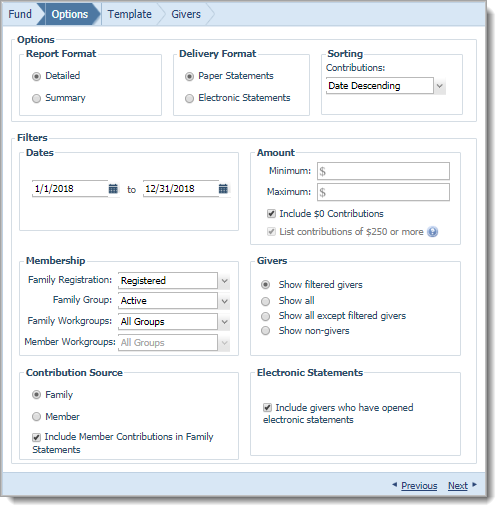
- In the Options
group, select the report format, delivery format, and
sort options (if applicable).
- In the Filters
group:
- Select the date range for the contributions
you want to include in the report.
- Specify the minimum and maximum amounts
in the contribution range.
- If you want to include zero-dollar contributions,
select the Include $0 Contributions
checkbox.
- If you want to list individual contributions
of $250.00 or more, select the List contributions
of $250 or more checkbox (applies to paper statements only).
- In the Membership
group, select the desired filters to search your database for givers
that meet specific membership criteria.
- In the Givers group,
select which givers to include in the statements.
- In the Contribution Source
group, specify whether to include family or member contributions in
the statements.
- In
the Electronic Statements section,
this checkbox control is selected by default: Include
Givers who have opened electronic statements.
- If you created
electronic versions of your contribution statements and want to
generate paper statements for givers have opened their electronic
versions (in My Own Church), leave the checkbox selected.
- If you do not want to include givers who
have opened their statements, de-select this checkbox.
- Click
 to advance to the Template tab. On this tab, you can create
a common, customized message to include with your contribution statements.
Do the following:
to advance to the Template tab. On this tab, you can create
a common, customized message to include with your contribution statements.
Do the following:
- In the Statement Dates
section, select the statement date. This is the date when the statement
will be generated or the date when the statement will be received
in the mail.
- In the Body of Statement
section, select one of the following options from the drop down list:
- None:
if you do not want to include a message to accompany the statement.
- New
Template: if you want to create a customized message
to accompany the statement. In the Statement
area below, type the text of the message. Apply whatever paragraph
and character styles you want to format the text. Be sure to type
a name for the letter, and then click
 to save the
template. The statement is identified by the name you gave it and
is now available for future use.
to save the
template. The statement is identified by the name you gave it and
is now available for future use.
 Caution
To avoid losing your message text, save frequently.
You must save the template before moving to the next tab or the text of
your message will be lost.
- An existing template: if you
previously created and saved a customized message, the name of the
template appears in the list.
- In the Signature
section, select one of the following options from the drop down list:
- None:
select this option if you do have a signature image to upload.
- New
Signature: select this option if you have a signature image
file on your computer that you want to upload. The system will insert
the image at the end of the message accompanying your contribution
statements. Click
 to search for the file, select it, and then click
  to upload it.
You can upload
up to five signature image files. The required dimensions for the file
are 264 pixels by 48 pixels. Be sure that the image meets these requirements.
The image will appear distorted if the dimensions are incorrect.
If you want
to save the file for future use, click  . The system
adds the file to the Signature dropdown
list.
. The system
adds the file to the Signature dropdown
list.
- An existing signature: if you
previously saved a signature image, it appears in the list. Select
it to include with the statement.
- Click
 to advance to the Givers tab.
This tab shows you list of givers matching
your fund selections and all of the filter criteria you previously selected.
- On the Givers tab,
do the following:
- Individually select the names of the givers receiving
the contribution statement.
Select the checkbox next
to the Family Name heading to select
the givers on the displayed page only. Select the Select
all records link to select all givers.
- To view the statements, click
 .
.
Your browser opens a separate tab to display
the statements included in the report..
If the report is not
displayed, check your browser settings to make
sure that pop-up settings are enabled. Then, click again.
The system can only generate
one report at a time. While a report is being generated, the View Statements
button is temporarily disabled (dimmed). After the system finishes generating
the report, the button is activated again to allow you to generate another
report.
Each giver's contribution statement is displayed
on a separate page. The statements appear in A to Z order by giver's last
name. Following is an example of a Contribution Statement that contains
a personal message (created on the Template
tab) along with the family contribution details:
If you chose (in Step 7c)
not to include a personal message to accompany the statement, the system
automatically removes the salutation ("Dear...") and moves the
detail portion of the statement up so that it immediately starts on the
first page.

Printing,
Viewing, and Saving Contribution Statements
After you click , your browser
opens a separate tab where you can save and print them.
Printing
Mailing Labels for Contribution Statements
To print mailing labels for contribution statements:
Click to
display the Givers tab.
Individually select the
givers you are mailing statements to. Alternatively, click the checkbox
in the header (next to the Family Name)
to select all givers.
In the bottom-right, click
 .
.
The Report Viewer opens to let you preview
the labels before printing the whole set. Labels are sorted and printed
in A to Z order by last name.
Do one of the following:
Click  to print all of the mailing labels.
Click  to print the current page of labels only.
Click
to save the labels.
Related Topics
About
the Reports Page
About
the Report Viewer
<Back
to top>