On a quarterly or yearly basis, it is common practice for churches to provide donors with contribution statements that record their charitable contributions. This topic shows you how create how to create electronic versions of contribution statements that can use to substantiate their contributions, especially during tax time. These statements show contribution amounts and detail the donor's giving for the period you specify when setting up the contribution statement. A letter template is also provided that enables you to customize a personal message to accompany the statement you send to your donors. After you prepare the statements, they are individually delivered to givers who can log in and download their statement from within their secure My Own Church portal.
![]() If
you prefer, you can create paper statements that you can print and mail
to givers. For instructions on creating paper versions, go to How
to Create Contribution Statements (Paper Versions).
If
you prefer, you can create paper statements that you can print and mail
to givers. For instructions on creating paper versions, go to How
to Create Contribution Statements (Paper Versions).
![]() Alternatively,
you can choose to use both electronic statements and paper statements.
For details, go to Combining_Delivery_Methods:_Sending_Electronic_Statements_and_Paper_Statements.
Alternatively,
you can choose to use both electronic statements and paper statements.
For details, go to Combining_Delivery_Methods:_Sending_Electronic_Statements_and_Paper_Statements.
Frequently Asked Questions and Answers
What is an Electronic Contribution Statement (E-Statement)?
What are the Benefits of E-Statements?
What Does an E-Statement Look Like?
How Does a Giver Receive an E-Statement?
How Long Are E-Statements Available to Givers?
How Do Givers Know When the E-Statement Is Available?
What If Some Givers Want to Receive E-Statements but Others Do Not?
Why Can't I Generate E-Statements for Members?
Step 1: Audit Family Names and Email Addresses
Step 2: Review Fund Names and Settings for Accuracy
Step 4: Create a Signature Image to Insert into Your E-Statements
Setting Up and Generating E-Statements
Information Displayed in the Electronic Statements Status Panel
Combining Delivery Methods: Sending Electronic Statements and Paper Statements
Announcing the Availability of E-Statements to Givers
Following are some frequently asked questions and answers about E-Statements.
An E-statement is simply a copy of a contribution statement that is produced and delivered electronically to givers. Instead of sending a paper statement to givers in the mail, organization staff can generate a PDF version of the statement and make it available to givers through their secure My Own Church portal. After a giver logs in, he or she can download the PDF to a computer to view or print a copy, if necessary.
Note that creating E-statements is an option, which means your organization can choose to create and deliver them electronically or you can continue to create paper versions that staff can print and send by mail to givers who do not want to receive them electronically. Your organization can also use both methods to deliver statements.
E-Statements offers significant benefits both to your organization and givers.
● For your organization and staff, E-Statements:
Save money: no printing and mailing costs are incurred.
Save time: staff no longer need to spend time printing contribution statements and mailing labels, stuffing and sealing envelopes, and then taking letters to the post office.
Save resources: uses no paper and less energy than paper statements so they are more environmentally friendly.
● For givers, E-Statements:
Fight clutter around the home: givers can save a copy of the statement to a computer. If they need a physical copy for any reason, they can print it.
Provide greater security: statements are separately delivered to each giver's secure My Own Church portal—instead of to a mailbox. Electronic delivery reduces the chance that a statement can be lost or stolen. In addition, the statements are private because they are viewed by the recipient only.
Provide immediate availability: givers do not need to wait for a contribution statement to arrive in the mail. They have 24/7 access to a statement from any computer or smart device as long as they have an Internet connection.
An E-Statement is simply a PDF version of a paper statement. The content of an E-Statement is the same as a paper statement.
After you generate E-Statements, the system automatically delivers the electronic version to each giver's My Own Church personal portal. A giver retrieves the statement by logging in to My Own Church to download the PDF to a computer. From there, the giver can view and print it, if necessary.
There is no time limit on how long the statements are available. Givers can download statements to their computers and store them for future reference. Therefore, a statement can be kept for as long as the giver desires.
After you generate E-Statements, you should notify givers that they are available. For more information, go to Announcing_the_Availability_of_E-Statements_to_Givers.
If some givers want to receive E-Statements but others do not, you can use both electronic delivery and traditional mail delivery.
After you generate E-Statements, the system keeps track of which givers downloaded their E-Statements from My Own Church. You can use that information to generate paper statements for givers who have not downloaded their E-Statements, and then mail the statements to those givers only. You can save postage by mailing statements only to givers who did not receive them. For instructions on how to use both methods, go to Combining_Delivery_Methods:_Sending_Electronic_Statements_and_Paper_Statements.
E-statements for members are currently not available. During the setup, if you select Electronic Statements as the delivery method, the Member option (for Contribution Source) is disabled (grayed out). If you select the Member option (for the Contribution Source), the Electronic Statements option is disabled (grayed out). This is by design based on the current state of the software. We will add the ability to generate E-statements for members in a future release.
Before generating your E-statements, it is important to do some advanced preparation to ensure that they are accurate and to help the process run more smoothly. Follow these steps in the order given:
Step 1: Audit Family Names and Email Addresses
Step 2: Review Fund Names and Settings for Accuracy
Step 4: Create a Signature Image to Insert into Your E-Statements
Contributions statements provide relevant transaction details and summaries that you can send to donors. It is important that you properly maintain your records to ensure that donors' names are accurate and that, at a minimum, the Formal Mailing Name and Email Address fields in your family records contain data.
Open the Family Directory module.
If you manage several organizations, select the desired organization from the Organization list.
Click  to display the Family List page.
![]() To clear
filtered search results click the Clear Search
Results link. To disable the filters, click
To clear
filtered search results click the Clear Search
Results link. To disable the filters, click ![]() .
.
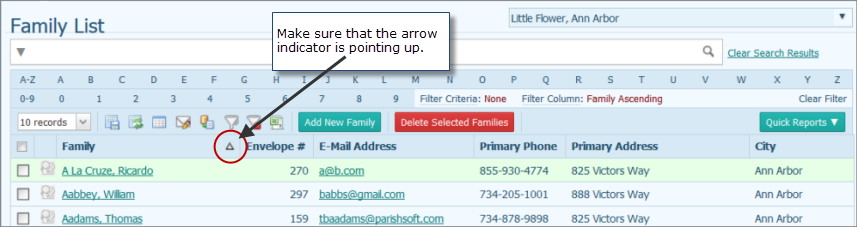
Locate families with no family name. To do this:
Click the Family
column header. As shown in the illustration below, make sure that
the column arrow is pointing up (![]() ).
).
The Up arrow indicates that the list is sorted in alphabetic order from A to Z. Any families with no last name appear at the top of the list.
Open each record. Edit the record to supply a formal mailing name.
![]() If
you need help editing family records, click the HELP
link. Then, select Family Directory Help.
In the Contents pane, open the Managing Families book. Select this
topic: How to View or Update a Family's
Record.
If
you need help editing family records, click the HELP
link. Then, select Family Directory Help.
In the Contents pane, open the Managing Families book. Select this
topic: How to View or Update a Family's
Record.
Locate any families with no email. To do this:
Click the Email Address
column header, making sure that the column arrow is pointing up (![]() ).
).
Edit the family records of those families that have no email address in their record.
Your fund names must be accurate and all funds must be accurately identified as tax-deductible or not tax-deductible. To review your funds:
Open the Offering module.
Click  to display the Fund
Management page.
to display the Fund
Management page.
If you manage several organizations, select the desired organization from the Organization list.
Review each fund for accuracy. If you need to change the information for a fund, including its tax-deductible status, do the following:
Click  .
.
Make the necessary changes,
and then click  to save.
![]() If you need help editing
a fund, go to How
to Edit a Fund's Details.
If you need help editing
a fund, go to How
to Edit a Fund's Details.
If you are creating end-of-year statements, make sure that any tax-deductible contributions received as of the last day of the year (for example, as of 12/31/2016) have a posting date for the calendar year in which they were received.
![]() This
is an important step. Sometimes a contribution received on the last day
of the calendar year cannot be posted until a few days later in January
of the following year. It is an easy mistake to post to the wrong calendar
year so be sure to use the correct calendar year in the posting date.
If a mistake happens, a donor's contribution statement will miss some
contributions for the previous calendar year.
This
is an important step. Sometimes a contribution received on the last day
of the calendar year cannot be posted until a few days later in January
of the following year. It is an easy mistake to post to the wrong calendar
year so be sure to use the correct calendar year in the posting date.
If a mistake happens, a donor's contribution statement will miss some
contributions for the previous calendar year.
To post a contribution:
Open the Offering module.
Click  .
Then, select the Detailed Posting option
to display the Detailed Contribution
Posting page.
.
Then, select the Detailed Posting option
to display the Detailed Contribution
Posting page.
If you manage several organizations, select the desired organization from the Organization list.
Complete the fields in the
posting form. In the Posting Date field,
click  , and then select the
date the contribution was received. Make sure that the date you select
is for the calendar year in which the contribution was received.
, and then select the
date the contribution was received. Make sure that the date you select
is for the calendar year in which the contribution was received.
![]() If you need more information
about contribution posting, click the HELP
link. Then, select Offering Help. In the
Contents pane, open the Contribution
Posting book. This book contains a number of topics that explain
how to post various types of contributions.
If you need more information
about contribution posting, click the HELP
link. Then, select Offering Help. In the
Contents pane, open the Contribution
Posting book. This book contains a number of topics that explain
how to post various types of contributions.
If desired, you can create a handwritten signature and convert it into an image that you can insert it into your E-statements. A handwritten signature adds a personal touch and gives a custom look to your statements.
The following procedure shows you how to create a signature and save it to a file. When you generate your E-statements (in the next section), you can select this file to insert into the statement.
![]() You
can create as many signature files as you need and save them to your local
hard drive. Be aware that the application allows you to fill the Signature dropdown list with five
files only.
You
can create as many signature files as you need and save them to your local
hard drive. Be aware that the application allows you to fill the Signature dropdown list with five
files only.
To create a signature image:
Have the signer write his or her signature on a piece of white paper. We suggest that the signer use a gel pen or a marker-type pen, such as an Ultra Fine Sharpie for the best results.
For example:

Scan the signature into a file. For best results, select a high resolution setting (at least 300 dpi). Then, save the file on your computer.
Open the image file in an image editing application.
![]() There are a number of excellent
image-editing applications available online that you can download for
free. We recommend that you use an editor that allows you to make the
background transparent.
There are a number of excellent
image-editing applications available online that you can download for
free. We recommend that you use an editor that allows you to make the
background transparent.
Then, do the following:
Crop out everything except the signature.
Resize the file to these dimensions: 264 by 48 pixels.
For the best-looking image, make the background transparent.
![]() No paper is pure white
so when scanned, the background may show up as a shade of gray rather
than white. To avoid this problem, we recommend that you make the background
transparent. In addition, an image on a transparent background also looks
good on screen and on colored papers.
No paper is pure white
so when scanned, the background may show up as a shade of gray rather
than white. To avoid this problem, we recommend that you make the background
transparent. In addition, an image on a transparent background also looks
good on screen and on colored papers.
The white background is now removed, and a checked pattern appears in the transparent part of the image.
Re-save the file on your computer as a .png, .bmp, or .gif.
Record the exact location where you saved the file. You will need this information later when you add the signature image to your printed statements.
To create your E-Statements, follow these steps:
Click  to display the Offering Reports page.
If you manage several organizations, select the desired organization from the Organization list.
Under Select Report, select Contributions from the Category list. Then, select Statements from the Report list.
The setup for the Contribution Statements report is displayed.
The statement setup is presented in an easy-to-use, wizard-style interface that steps you through the process of creating your contribution statements. To advance through the setup, you can either click the tabs at the top right or click Next in the lower right. At any time, you can click a tab or Previous to return to a tab to view or make changes to previously entered information.
The Family Statement Summary section in the lower left summarizes the selections you make on each of the setup tabs.
The Electronic Statements Status panel updates you on the most recent electronic contribution statements job.
![]() The status panel is visible
only to users with View access permissions to the Offering module.
The status panel is visible
only to users with View access permissions to the Offering module.
When you generate electronic statements, the system performs the job as a background task, which frees you up to do other work in the application instead of having to wait for the job to finish. The status panel enables you to monitor the status of a running job. You will find the information on the panel especially useful when you are generating a large volume of electronic statements. At a glance, the status of the job is displayed so you can see how it is progressing and when it is done.
Starting on the  tab, do one of
the following:
tab, do one of
the following:
Select one or more funds individually by selecting the checkbox next to each fund you want to include in the report.
![]() If the fund list is long,
try using the column
header filters to locate the fund or funds you want to work with.
If the fund list is long,
try using the column
header filters to locate the fund or funds you want to work with.
Select all funds by selecting the All Funds checkbox in the header (the checkbox to the left of the Description heading).
![]() Be aware that selecting the
All Funds checkbox includes only those
funds on the page you are viewing. If you want to include all of your
organization’s funds in the report, you must first select the checkbox
(you can select it on any setup page). Then, select the Select
all records link that appears above the list of funds.
Be aware that selecting the
All Funds checkbox includes only those
funds on the page you are viewing. If you want to include all of your
organization’s funds in the report, you must first select the checkbox
(you can select it on any setup page). Then, select the Select
all records link that appears above the list of funds.
Click  to advance to the Options tab and complete
the following:
to advance to the Options tab and complete
the following:
![]() For descriptions of the setup
options on the Options tab, go to Setup
Options for the Contribution Statements Report.
For descriptions of the setup
options on the Options tab, go to Setup
Options for the Contribution Statements Report.
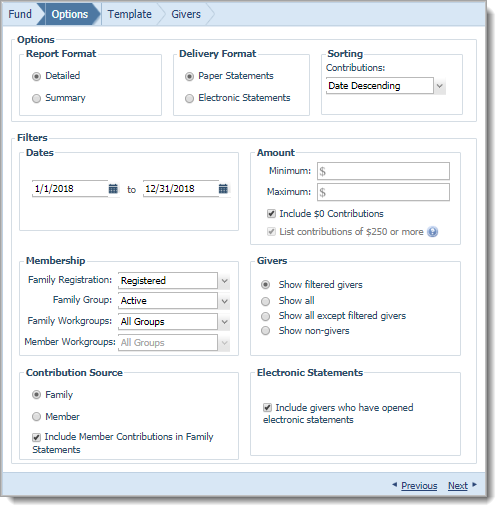
In the Options group, do the following:
Select Detailed or Summary for the report format.
Select Electronic Statements for the delivery format.
![]() Selecting Electronic
Statements disables the Member
option (in the Contribution Source
group). The ability to generate electronic statements for members is currently
not available but will be implemented in a future release.
Selecting Electronic
Statements disables the Member
option (in the Contribution Source
group). The ability to generate electronic statements for members is currently
not available but will be implemented in a future release.
In the Filters group, do the following:
Select the date range for the contributions you want to include in the report.
Specify the minimum and maximum amounts in the contribution range.
If you want to include zero-dollar contributions, select the Include $0 Contributions checkbox.
In the Membership group, select the desired filters to search your database for givers that meet specific membership criteria.
In the Givers group, use the filter options to select the givers to include in the statements.
In the Contribution Source group, select the Include Member Contributions in Family Statements if you want the family statement to include individual family member's contributions.
![]() Family
is the only available option. The ability to generate electronic statements
for members is currently not available but will be implemented in a future
release.
Family
is the only available option. The ability to generate electronic statements
for members is currently not available but will be implemented in a future
release.
Click  to
advance to the Template tab. On this
tab, you can create a common, customized message to include with your
contribution statements. Do the following:
to
advance to the Template tab. On this
tab, you can create a common, customized message to include with your
contribution statements. Do the following:
![]() For descriptions of the setup
options on the Template
tab, go to Template
Tab Options for the Contribution Statements Report.
For descriptions of the setup
options on the Template
tab, go to Template
Tab Options for the Contribution Statements Report.
In the Statement Dates section, select the statement date.
In the Body of Statement section, select one of the Body of Statement options:
None: no customized message is included with your statements.
New
Template: if you want to
create a new message, click  and select (New Template...). In the text field, type
the text of your message and apply the desired formatting (for example,
select a font and font size). When done, click inside the text field
to the left of the Save button (
and select (New Template...). In the text field, type
the text of your message and apply the desired formatting (for example,
select a font and font size). When done, click inside the text field
to the left of the Save button (![]() ), type a name
for the file, and then click
), type a name
for the file, and then click ![]() to save it. The
name of the statement file is added to the dropdown list.
to save it. The
name of the statement file is added to the dropdown list.
![]() Caution
Caution
To avoid losing your message text, save frequently. You must save the template before moving to the next tab or the text of your message will be lost.
Saved
message: if you want to use a previously saved message, click
. From the dropdown list, select the file name.
The text of the message appears in the text field. If desired, you
can edit the message text and formatting (for example, change the
font and font size). You can re-save it under the same or a different
name or you can remove it from the dropdown list by clicking ![]() .
.
![]() To remove
a previously saved body of statement from the dropdown list, click
To remove
a previously saved body of statement from the dropdown list, click ![]() .
.
In the Signature section, select one of the following options from the drop down list:
![]() You can add a signature
image only if you already created and saved a signature image file on
your computer. For instructions on creating the file, go to Creating_a_Signature_Image_to_Insert_into_Your_E-Statements.
You can add a signature
image only if you already created and saved a signature image file on
your computer. For instructions on creating the file, go to Creating_a_Signature_Image_to_Insert_into_Your_E-Statements.
![]() You can upload up to
five signature image files. The required dimensions for the file are 264
pixels by 48 pixels. Be sure that the image meets these requirements.
The image will appear distorted if the dimensions are incorrect.
You can upload up to
five signature image files. The required dimensions for the file are 264
pixels by 48 pixels. Be sure that the image meets these requirements.
The image will appear distorted if the dimensions are incorrect.
None: no signature image is included with your statements.
New
Signature: if you want to upload a new signature image file,
select this option. Click  to search for the file,
select it, and then click
to search for the file,
select it, and then click  to upload it. The system
will insert the image at the end of the message accompanying your
contribution statements. If you want to save the file for future use,
type a name for the file. Click
to upload it. The system
will insert the image at the end of the message accompanying your
contribution statements. If you want to save the file for future use,
type a name for the file. Click ![]() , and then click
, and then click
 . The system adds the file name to the Signature dropdown list.
![]() Each time
you save a signature file, the application adds the file name to the Signature dropdown list. You can add
up to five file names to the list.
Each time
you save a signature file, the application adds the file name to the Signature dropdown list. You can add
up to five file names to the list.
Previously saved signature image: the name of any previously saved signature file appears in the list. Select the file name. The system inserts the image preview field.
![]() To remove a previously
saved signature image file from the dropdown list, click
To remove a previously
saved signature image file from the dropdown list, click ![]() .
.
In the Printed Name section, you can specify whether or not you want a printed name to appear below the body of statement and signature image. Select one of these options from the drop down list:
None: if you do not want to add a printed name to the statement.
New
Template: if you want to add a printed name, type the name
in the field. Apply whatever paragraph and character styles you want
to format the text. If you want to save the name for future use, type
a name for the file. Click ![]() , and then click . The system adds the name to the Printed
Name dropdown list and will add the name after the body of
statement and signature.
, and then click . The system adds the name to the Printed
Name dropdown list and will add the name after the body of
statement and signature.
Saved printed name: if you previously created and saved a printed name, the name appears in the list. Select it. The system displays the name in the image preview field. This name will be inserted below the body of statement and signature.
![]() To remove a printed
name from the dropdown list, click
To remove a printed
name from the dropdown list, click ![]() .
.
Click  to advance to the Givers tab.
The Givers grid shows the names of families that gave to the funds selected on Funds tab and that also match the filter criteria specified on the Options tab.
Select the names of givers for whom you want to generate E-statements. You can use any of the following methods:
Select individual records. To do this, select checkbox next to each family's name.
Select only the records listed the page of the grid you are viewing. To do this, select the Select All checkbox in the header.
Select all records. To do this, select the Select All checkbox in the header. Then, select the Select all records link that appears at the top of the grid.
![]() If you want to generate reports
for most givers, you can select the Select All checkbox or the Select
All records link, and then deselect specific givers you want to
exclude.
If you want to generate reports
for most givers, you can select the Select All checkbox or the Select
All records link, and then deselect specific givers you want to
exclude.
Do one or both of the following:
To see what the E-Statements
look like before you generate them, click  .
.
The statements open in the Report Viewer. If desired, you can print them.
![]() If your statements
do not display in the viewer, check your browser settings to make
sure that pop-up settings are enabled. Then, click again.
If your statements
do not display in the viewer, check your browser settings to make
sure that pop-up settings are enabled. Then, click again.
![]() The details in the
actual statements for givers may differ from what you are permitted to
see in preview mode. To see all statement details in the preview, you
must be granted fund permissions to all tax-deductible funds for the year
selected in the setup..
The details in the
actual statements for givers may differ from what you are permitted to
see in preview mode. To see all statement details in the preview, you
must be granted fund permissions to all tax-deductible funds for the year
selected in the setup..
To generate your E-statements,
click  .
.
![]() The system displays
a message advising you to check back for status in a few hours. If your
E-statements job is a small one, the system does not take long to process
it. Try checking back in a few minutes.
The system displays
a message advising you to check back for status in a few hours. If your
E-statements job is a small one, the system does not take long to process
it. Try checking back in a few minutes.
![]() From time to
time, the system may not be able to process a job because it cannot connect
to the PDF service. In this case, the system will display a message to
alert you to the problem and let you know what actions to take.
From time to
time, the system may not be able to process a job because it cannot connect
to the PDF service. In this case, the system will display a message to
alert you to the problem and let you know what actions to take.
The system generates the E-Statements based on the criteria you specified. The Electronic Statement Status section in the lower left shows the status of the current job. For descriptions of the fields in the status section, go to Information_Displayed_in_the_Electronic_Statements_Status_Area.
After the system generates the statements, they are posted individually to each giver's My Own Church account. Givers can now log in to My Own Church to retrieve their statements.
The Electronic Statements Status panel is located in the bottom-left corner of the report setup.

The panel provides important information about the status of the E-statement jobs you run. The table below describes the information that appears in the fields on this panel.
Field |
Description |
Job Date |
Displays the date and time the previous E-statements job was run. If no job was run previously, the field shows the following: n/a.
|
Status |
Displays the status of the E-statement job as one of the following:
|
Period |
Shows the date range specified in the setup (in the Dates group on the Options tab) for the previously run E-statements job. For example, 1/1/2016 - 12/31/2016 indicates that the statements in the previously run job included contributions made between January 1, 2016 and December 31, 2016. |
Funds |
E-statements include contributions made to tax-deductible funds only. The number shown indicates the number of funds selected in the report setup (on the Funds tab) for the previously run job. Click the link to view the names of the selected funds. |
Groups |
Shows the family group selected in the report setup (from the Family Group dropdown list in the Membership group on the Options tab) for the previously run E-statements job. |
Registration |
Shows family registration status selected in the report setup (from the Family Registration dropdown list in the Membership group on the Options tab) for the previously run E-statements job. |
![]() The
trick to using the combined delivery approach successfully is that you
need to allow enough time (several days) between when you create your
E-Statements and when you generate paper statements. The system keeps
track of which givers downloaded their statements. So, when you create
paper statements, you can exclude those who have already retrieved them.
The
trick to using the combined delivery approach successfully is that you
need to allow enough time (several days) between when you create your
E-Statements and when you generate paper statements. The system keeps
track of which givers downloaded their statements. So, when you create
paper statements, you can exclude those who have already retrieved them.
The following instructions show you how to create E-Statements and paper statements. First, you will create your E-Statements. Be aware that system will automatically generate statements for all givers and post them individually to each giver's My Own Church account. Next, you will generate paper statements, but you will generate statements only for givers who have not downloaded their E-Statements from their My Own Church accounts.
Create electronic versions of your contribution statements by completing the steps under Setting_Up_and_Generating_E-Statements.
The system creates E-Statements and individually delivers them to your givers' My Own Church accounts. Givers can view their statements by logging in to My Own Church and downloading them to their computers. The system keeps track of which givers downloaded their E-Statements from My Own Church.
Notify all givers that their E-Statements are available. For instructions on emailing givers, go to Announcing_the_Availability_of_E-Statements_to_Givers.
Allow your givers sufficient time to pick up their E-Statements. You may want to send out a reminder email.
Create paper versions of your contribution statements for givers who have not picked up their E-Statements. To do this, complete the following:
Go to Step_5:_Set_Up_Your_Statements and complete Steps 1 - 6a. Then, return to this procedure and continue at Step 4b.
As shown in the following illustration, de-select this checkbox on the Filters tab: Include givers who have opened electronic statements.
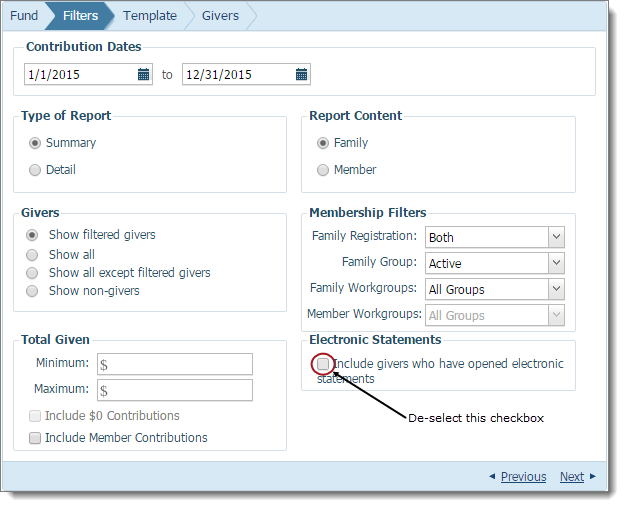
Givers who have not opened their E-Statements will now be included in your statement output.
Go back to Step_5:_Set_Up_Your_Statements. Complete Steps 6c - 7.
The system generates paper versions for all givers except those who already viewed their statements in My Own Church. You can now print and mail the paper statements to those givers.
After you generate your E-statements, any giver with a user account can log in to My Own Church and view and print his or her own statement. When the E-statements are ready, you should send givers an email letting them know that the statements are available.
The following instructions show you how to export givers' email addresses in your database to a .csv file. You can then import the addresses into an email program.
Click
to display the Offering Reports page.
If you manage several organizations, select the desired organization from the Organization list.
Under Select Report, select Contributions from the Category list. Then, select Statements from the Report list.
At the bottom of the right
panel, click  to export the email addresses
of givers to a .csv file.
to export the email addresses
of givers to a .csv file.
Navigate to the location
on your computer where you want to save the file. Click .
Use one of the following methods to notify givers that E-Statements are available:
Import the names and email addresses in the .csv file into the email client of your choice. Create your announcement email and send it to the recipients in the address list.
Link the exported .csv file to mail merge document you create in Word. Then, use Outlook to send the email to recipients listed in the file. For step-by-step instructions, go to How to Use Mail Merge to Send an Email Message to Givers (Outlook Only).
How to Create Contribution Statements (Paper Versions)
Setup Options for the Contribution Statements Report
Template Tab Options for the Contribution Statements Report
How to View Electronic Contribution Statements
How to Use Mail Merge to Send an Email Message to Givers (Outlook Only)