The Fund Management page is used by the organization administrator to manage funds in the organization's Chart of Accounts. The organization administrator is the principal owner of all funds and, as such, has fund permissions and all rights of access to all of the organization's funds, which are listed on this page.
Access to this page is restricted to organization administrators. Therefore, the Fund Management button is visible only to those users who have organization administrator privileges tied to their login credentials.
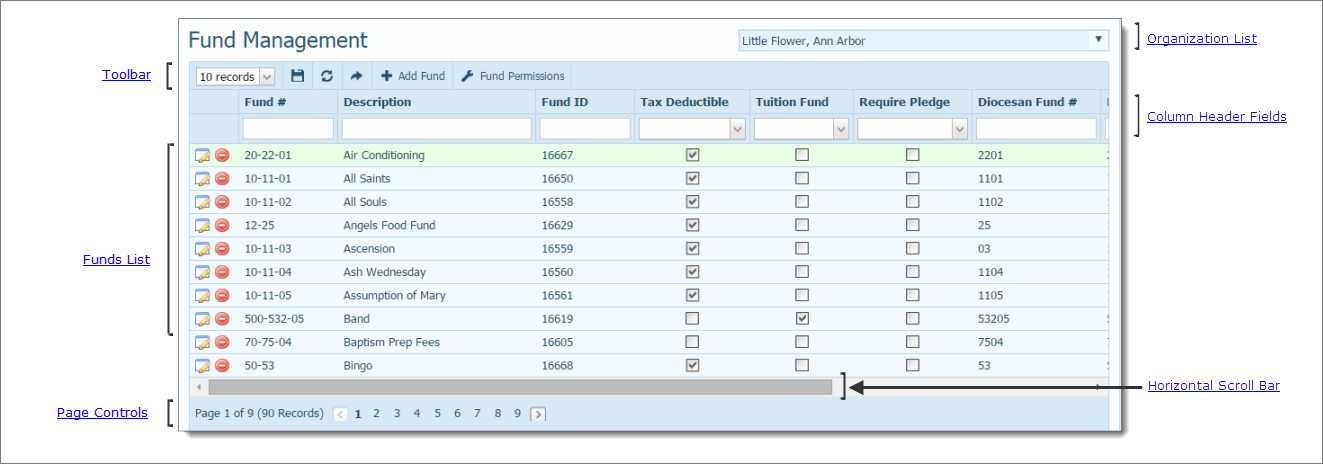
Overview of the Fund Management Page
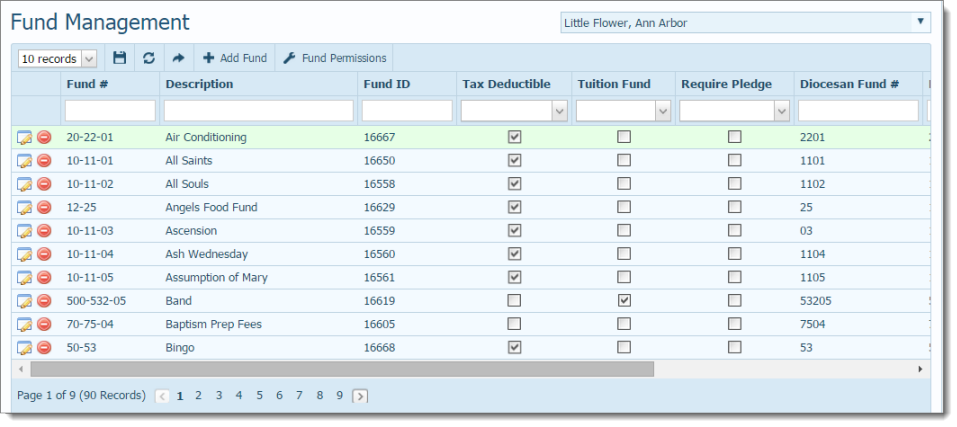
The Fund Management page is a list of all of the funds owned by the organization currently selected from the Organization list. From this page, the organization administrator can perform the following fund-management tasks:
View the details of an existing fund.
Edit the details of an existing fund.
Delete funds that are no longer in use.
View, set, and change access permissions for a fund.
The illustration below identifies the main elements on the Fund Management page. Place your mouse pointer over a hyperlink (without clicking) to view a general description of the element. Click the link to jump to the section on this page that provides more detailed information.
The organization associated with your ParishSOFT login credentials automatically appears in the Organization list, which is located in the upper-right corner of the Fund Management page. If you manage several organizations, select the organization whose funds you want to view from the list. The page reloads, and the Funds list shows you the funds for the organization you selected.
![]() Only the organizations you have View access rights are displayed in the Organization list.
Only the organizations you have View access rights are displayed in the Organization list.
The toolbar is located just above the list of funds. The toolbar contains menus and buttons that enable you to control the list view and perform common fund management functions.

● # Records menu lets you determine the number of records (default = 10) that are displayed on the Fund Management page. To do this, select the desired number of records from the # Records menu. The application saves this selection so that the next time you display the page, it automatically loads the number of records you selected.
![]() To speed up page loading, select a lower value.
To speed up page loading, select a lower value.
●  permanently saves changes you make to the layout.
●  resets the layout to the default configuration.
●  adds a new fund. This button is available only if you a user with administrator privileges.
●  lets you manage (assign and remove) fund permissions for staff members. This button is available only if you have organization administrator privileges.
The column header fields let you filter and sort the funds in the Funds list. You can also click and drag the columns to a new location and resize them to give you better views of your Fund data.

The column headers contain built-in filters that allow you to search for specific funds in your list. Filtering is especially useful when you want to quickly view a select group of funds. When you filter the list, you temporarily hide certain funds so that you can view only those that meet your criteria. You can filter the list on one criterion (one column) or further refine your list by filtering on several criteria (several columns) of data. You can filter on any column in the Funds list:
![]() Column filters are additive, which means that each time you add a filter, the search results are further narrowed down to display only the items that meet all filter criteria.
Column filters are additive, which means that each time you add a filter, the search results are further narrowed down to display only the items that meet all filter criteria.
● Fund #: fund account number in your chart of accounts.
● Description: fund name or description.
● Tax Deductible (Yes/No): indicates whether or not the fund is tax exempt. If the fund is tax deductible, contributions to it appear on end-of-year contribution statements and can be deducted from the giver's taxes.
● Tuition Fund (Yes/No): indicates whether or not the fund can be used in the tuition application.
● Require Pledge (Yes/No): indicates whether or not the fund accepts pledges only.
● Diocesan Fund #: fund account number in your diocesan accounting system
● External Fund #: fund account number in an external accounting system (for example, QuickBooks).
● Start Date: click  to set a minimum start date.
● End Date: click to set a maximum end date.
When you are working with your Funds list, you may find it easier to view your records if they are organized in a certain order. The column headers give you the ability to do the following:
● Sort the list on a single column in ascending or descending order.
● Move a column of data to a new location in the grid.
● Change the size of a column to make the column's content more readable.
After you make these changes, you can permanently save your layout version so that it is in effect every time you are on the Fund Management page.
The Funds list allows the administrator to see, at-a-glance, information for each fund. The list is presented in table-style format, with each fund record occupying a row and each column displaying a specific fund detail. To view details, see Fund Details.
The Funds list includes two button controls that help the administrator manage funds:
 edits the details of an existing fund.
 deletes funds that are no longer in use.
Each fund occupies a single line in the list. To bring the information that extends beyond the borders of the page into view, click and drag the horizontal scroll bar left or right.

The number of pages in the Funds list is displayed in parentheses at the bottom of the page. Select a page to go directly to that page in the list. Alternatively, click  to page back or click
  to page forward through the list.

How to Assign Fund Permissions to Your Staff
How to Apply Column Filters to a List
About Fund Permissions and Access Rights
