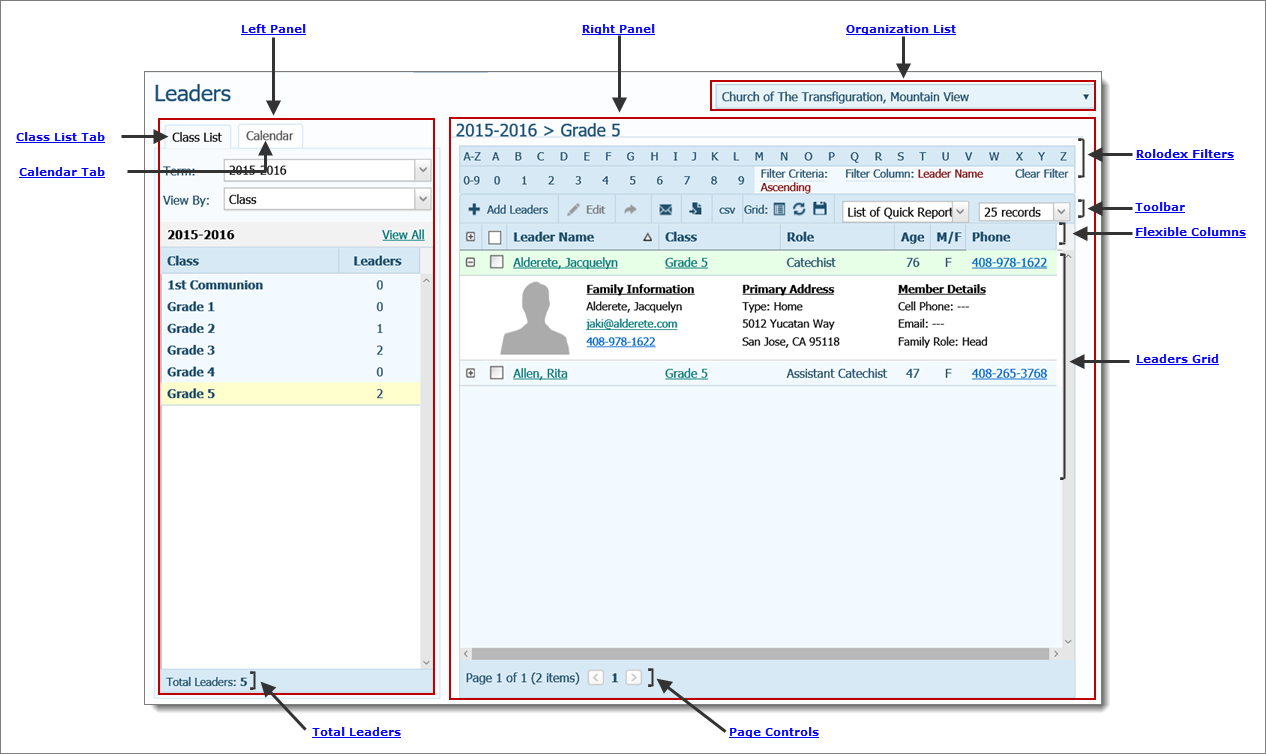
The Leaders page serves as a leader directory. The directory includes the names of all individuals serving in leader roles in your program for the selected term. Filter options let you view leaders by class, grade, session, and day of the week.
The illustration below identifies the main features of the Leaders page. Place your mouse pointer over a hyperlink (without clicking) to view a general description of an item. Click the hyperlink to jump to the section on this page that gives you more detailed information.
The organization associated with your ParishSOFT login credentials automatically appears in the Organization list, which is located in the upper-right corner of the Leaders page:

If you manage multiple organizations, click  , and then select the organization whose leader records you want to work with from the list:

The left panel has two tabs: Class List and Calendar.
The Class List tab shows all of the classes in the selected term. Filter controls at the top of the tab enable you to select the term you want to work with and select how you want to view classes in the list.
Contains a list of terms created for your program. By default, the last term you selected is displayed on this page and on all other pages that contain a Term list (for example, on the Student Directory and Classes pages). To display a different term's data, select the term from the list. The selected term becomes the new default selection.

The View By list contains options that let you change the way in which you view the list of classes on the Class List tab.
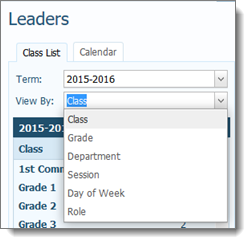
You can select one of six viewing options:
● Class: displays a list of classes along with the leaders assigned to each.
● Grade: displays a list of the grades in your Religious Education program. Click  next to a grade level to open the group and view the classes within the group along with the number of students enrolled in each class. Select a class to view a list of leaders assigned to the class.
● Department: displays a list of the departments (for example, Adult Education) in your Religious Education program. Click next to a department name to open the group and view the classes within that department along with the number of students enrolled in each class. Select a class to view a list of leaders assigned to the class.
● Session: displays a list of the sessions in the selected term. Click next to a session to open the group and view the classes held during that session along with the number of students enrolled in each class. Select a class to view a list of leaders assigned to the class.
As shown in the following illustration, selecting View By > Session changes the view to enable you to see a list of sessions in the selected term. Note how clicking next to a session name expands the group to show a list of classes held in the session along with the number of leaders assigned to each class. Clicking  closes the group.

● Day of Week: displays a list of days of the week on which classes are held. Click next to a day of the week to open the group and view the classes held on that day. Select a class to view a list of leaders assigned to the class.
● Role: displays a list of roles assigned to leaders in your program (for example, Catechist) and the number of leaders assigned to that role. Selecting a role from the list updates the grid on the right to let you see the names of leaders assigned to the role.
When you first display the Leader page, by default. the system displays the names of all leaders assigned to classes held in the selected term. When you select a specific class from the list, the Leaders grid updates to display a list of leaders assigned to the selected class.
● View All: clicking this link returns the Leaders grid to the default state. The Leaders grid shows the names of all leaders assigned to classes in the selected term.
● Deselect All: clicking this link deselects all leaders. The Leaders gird shows the names of leaders assigned to the first class listed on the Class List tab.
The Calendar tab lets you select a date on a calendar and view the classes and events scheduled on that date. Navigation controls at the top of the calendar let you navigate to any date in any year. Filter controls under the calendar let you change the way you view information.
The Calendar tab displays a calendar for the current month and year (the default). Use the controls at the top of the calendar![]()
![]() to change the month and year.
to change the month and year.
Select a date on the calendar to find out whether any classes are scheduled on that date. The classes are listed at the bottom of the Calendar tab. For the classes listed, these additional controls are available:
● Sort By filter: enables you to view the list of classes by class name or date and time.
● Class name link: clicking the class name hyperlink displays the names of leaders assigned to the class.
● Room link: clicking the room hyperlink opens the room calendar where you can see the dates and times (in calendar format) that the class is scheduled.

Holidays and special events are built into the calendar. The name of the holiday is displayed if it falls on a date you select:

Shows the total number of leaders assigned to all classes in the selected term.
The right panel shows your leader records and contains a number of features and functions to help you view and manage those records.
The rolodex filters are located in two rows at the top of the right panel. These filters allow you to view content that matches specific criteria and hide content that does not. For example, you can use the rolodex filters to a list of only those leaders whose last name starts with "Z". For details on using the filters, go to How to Filter Records.
The toolbar is located directly under the row of rolodex filters. The toolbar contains menus and buttons used to perform common functions associated with the Leaders list.

 adds leaders to classes in your program.
 opens the Edit Leaders window where you can edit the leader role.
![]() opens the Transfer Leader window where you can transfer a leader from one class to another.
opens the Transfer Leader window where you can transfer a leader from one class to another.
![]() (Email): sends email to selected leaders in the Leader list. For instructions how to send email, go to How to Send an Email Message.
(Email): sends email to selected leaders in the Leader list. For instructions how to send email, go to How to Send an Email Message.
![]() (Mail Merge): opens the Mail Merge utility where you can create personalized hardcopy letters for mass mailings to all leaders or to a select group of leaders. For instructions on using Mail Merge, go to How to Perform a Mail Merge.
(Mail Merge): opens the Mail Merge utility where you can create personalized hardcopy letters for mass mailings to all leaders or to a select group of leaders. For instructions on using Mail Merge, go to How to Perform a Mail Merge.
 (Export to CSV): exports the Leaders list to a spreadsheet or .csv (comma-separated) file. For instructions on how to export a list to a spreadsheet, go to How to Export a List to a Spreadsheet or .csv File.
 (Grid): use these buttons to modify the content and layout of the grid. For descriptions, go to Grid_Buttons.
The List of Quick Reports contains pre-defined reports that you can quickly generate. Click  to open the menu and select the desired report:

The report opens in the Report Viewer where you can save, print, or export it.
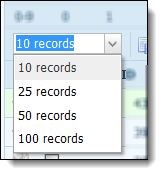
#Records Menu
By default, ten records per page are displayed in the Leaders grid. To change the number of records that you can view on each page, select the desired option from the menu:
![]() To speed up page loading, select a lower value.
To speed up page loading, select a lower value.
The Leaders grid lists all of the individuals in your program who are assigned the role of leader. When you select a class in the Class List in the left panel, the names of leaders assigned to the class are displayed in the grid. The grid shows the following information for each leader:
● Full name
● Assigned class
● Role (for example, catechist)
● Age
● Gender
● Phone Number
The grid has these additional features:
● Name link: click the link under the leader's name to open the individual's Member Details record.
● : click this button to the left of a leader's name to view personal information, including the individual's email address and phone number, home address, and emergency contact number.
● : click this button to hide the leader's personal information.
● Leader Notes: if notes are made in the Leader Notes section of the individual's Member Details record, the note appears in the leader's grid entry.
The grid has flexible and responsive columns that you can change as needed to suit your preference for viewing information. The columns have these features:
● Sortable: click a column header to sort entries based on the information in the column. For details, go to Sorting_the_Display_of_Records.
● Resizable: grab the border between columns to increase or decrease the width of one of them. For details, go to Changing_Column_Widths.
● Moveable: drag and drop columns in the grid to suit your preference for working with the information. For details, go to Changing_Column_Widths and Rearranging_the_Columns.
If desired, click ![]() to permanently save your layout changes or click
to permanently save your layout changes or click  to reset the grid back to the default layout.
 lets you choose which columns of information to include in the grid. For details, go to Selecting_Columns_to_Include_in_a_Grid.
resets the grid back to the default settings. For details, go to Resetting_the_Layout_to_the_Default_Configuration.
![]() permanently saves your changes to the layout of the grid. For details, go to Saving_Changes_to_the_Layout.
permanently saves your changes to the layout of the grid. For details, go to Saving_Changes_to_the_Layout.
The number of pages in the Leaders list is displayed at the bottom of the page.

Select a page to go directly to that page in the list. Alternatively, click  to page back or click
  to page forward through the list.
How to Print, View, and Save Reports
How to Customize a Grid Layout
How to Export a List to a Spreadsheet or .csv File