
The Scheduling page lists all of your events. On this page, you can view events to determine if you have enough ministers available to serve. You also can view the names of specific ministers who are scheduled to serve. You can manage your schedules by adding ministers to and removing ministers from events.
Examples of the Scheduling Page
The following illustrations show you examples of the Scheduling page.
The illustration below shows you the Scheduling page with no scheduling data. This is what the page looks like before you generate a list of events, before you run the autoscheduler, or after you clear a selected schedule.
The following illustration shows you the Scheduling page after you have applied the filters and either generated events or run the autoscheduler:
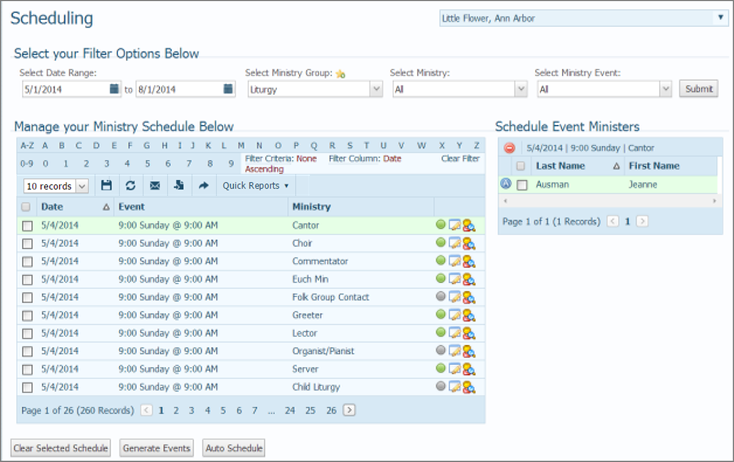
The organization associated with your ParishSOFT login credentials automatically appears in the Organization list, which is located in the upper-right corner of the Scheduling page. If you manage multiple organizations, be sure to check to see which organization is currently shown in this list. The list defaults to the organization you selected when you last viewed this page.
You can select one or more of the following filter options to apply to your schedule data:
● Date Range: click the calendar icons ![]() to set the start and end dates in the range. For tips on using the calendar
to set the start and end dates in the range. For tips on using the calendar ![]() , see How to Use the Calendar to Set a Date.
, see How to Use the Calendar to Set a Date.
● Ministry Group: select the desired ministry group from the dropdown list. To make the selected ministry group your “favorite” (your personal default option), click ![]() .
.
● Ministry: select the desired ministry from the dropdown list.
● Ministry Event: select the desired event from the dropdown list.
To apply your filter selections, click  .
.
● If you have no schedule data, the filters are applied when you generate events or run the auto-scheduler.
● If you already have schedule data showing at the bottom of the page, the filters will be applied to that data.
A subset of events that match the filter criteria you specify is displayed.
As your list of events grows in size, you will find filtering and sorting very useful. The alphanumeric filters, located under the filters, provide a way to help you manage list views and drill down to the exact records you want to see (for example, you can set up the filters to view only those ministers who volunteered for the Cantor ministry). For instructions on using the filters, see How to Filter Records.

You can also sort records on any column in the directory (for example, start dates in descending order) in a way that makes the information more easily accessible. For instructions column sorting, see Sorting the Display of Records.
![]() Descriptions of the status icons are given in the following list. Hover your mouse over a status icon to view specific minister assignment information for an event.
Descriptions of the status icons are given in the following list. Hover your mouse over a status icon to view specific minister assignment information for an event.
● ![]() (Green): All of the ministers required for the event have been assigned.
(Green): All of the ministers required for the event have been assigned.
● ![]() (Green with an asterisk): The event is overscheduled (has more ministers than needed).
(Green with an asterisk): The event is overscheduled (has more ministers than needed).
● ![]() (Gray): No ministers are assigned to this event because no minister requirement is specified in the setup for the event. (To specify the number of ministers needed, see How to Set Up the Scheduler. )
(Gray): No ministers are assigned to this event because no minister requirement is specified in the setup for the event. (To specify the number of ministers needed, see How to Set Up the Scheduler. )
● ![]() (Yellow) The minister requirement specified for this event has not been met. Some ministers are scheduled, but the number needed has not been satisfied.
(Yellow) The minister requirement specified for this event has not been met. Some ministers are scheduled, but the number needed has not been satisfied.
● ![]() (Red) None of the needed ministers are currently assigned to this event.
(Red) None of the needed ministers are currently assigned to this event.
● click to apply your filter selections to your schedule data.
●  permanently saves changes to the layout.
●  resets the layout to the default configuration.
●  sends e-mail to selected people.
●  lets you create personalized hardcopy letters for mass mailings to families and members. For instructions, go to How to Perform a Mail Merge.
●  exports a schedule to a spreadsheet or a .csv file.
●  click to add ministers to or remove ministers from an event. For instructions, go to How to Add and Remove Ministers from a Schedule.
● ![]() click to view names of ministers who are currently scheduled for an event. For details, go to How to View the Status of Minister Assignments for an Event
click to view names of ministers who are currently scheduled for an event. For details, go to How to View the Status of Minister Assignments for an Event
● ![]() clears all events and scheduled ministers for the currently selected filter options.
clears all events and scheduled ministers for the currently selected filter options.
●  generates a list of events for the filter options selected.
●  generates a list of events and automatically schedules.
●  displays the Quick Reports menu where you can create schedule-related reports directly from the Scheduling page.
How to Customize the Layout of a Page
How to Add Ministers and Remove Ministers from a Schedule
How to View the Status of Minister Assignments for an Event
Current Known Scheduling and Proposed Workarounds