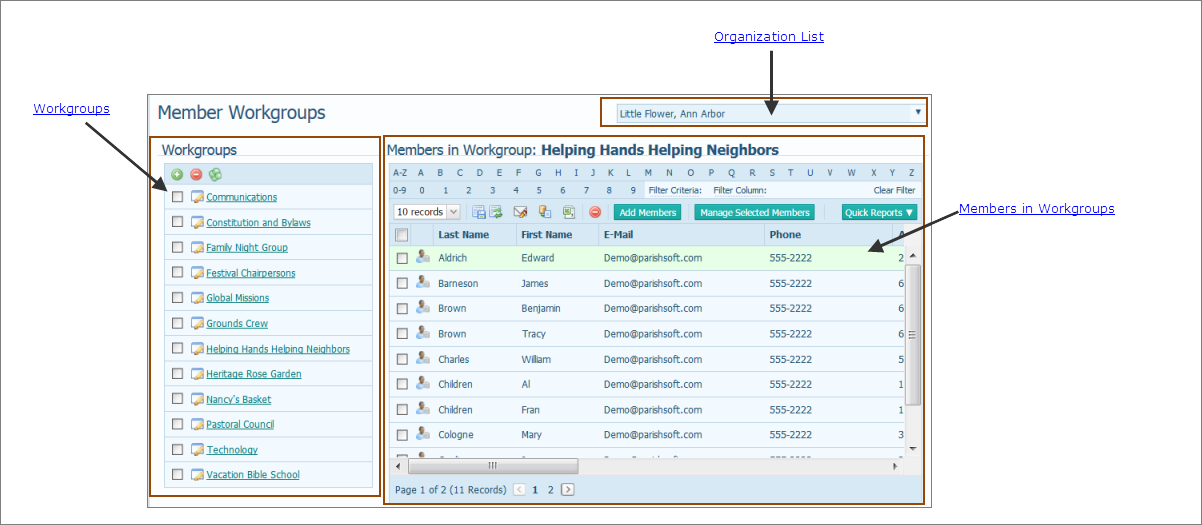
Overview of the Member Workgroups Page
The Member Workgroups page is a list of all of your organization's workgroups and workgroup members. As shown in the illustration below, the page is divided into three main sections:
● Organization List
● Workgroups
● Members in Workgroup
The illustration below identifies the main areas on this page. Place your mouse pointer over a link (without clicking) to view a general description of an area. Click the link to jump to the section on this page that provides more detailed information.
The organization associated with your ParishSOFT login credentials automatically appears in the Organization list, which is located in the upper-right corner of the Member Workgroups page.
● If you manage multiple organizations, select the organization whose records you want to access from the list.
● If you want to view records for all of the organizations you manage, select All Organizations.
Only the organizations for which you have access rights and permissions to view are displayed in the list.
![]() If you are returning to the Member Workgroups page from another page in the application, be sure to check which organization is shown in this menu. The list of groups defaults to the organization you selected when you last viewed the page.
If you are returning to the Member Workgroups page from another page in the application, be sure to check which organization is shown in this menu. The list of groups defaults to the organization you selected when you last viewed the page.

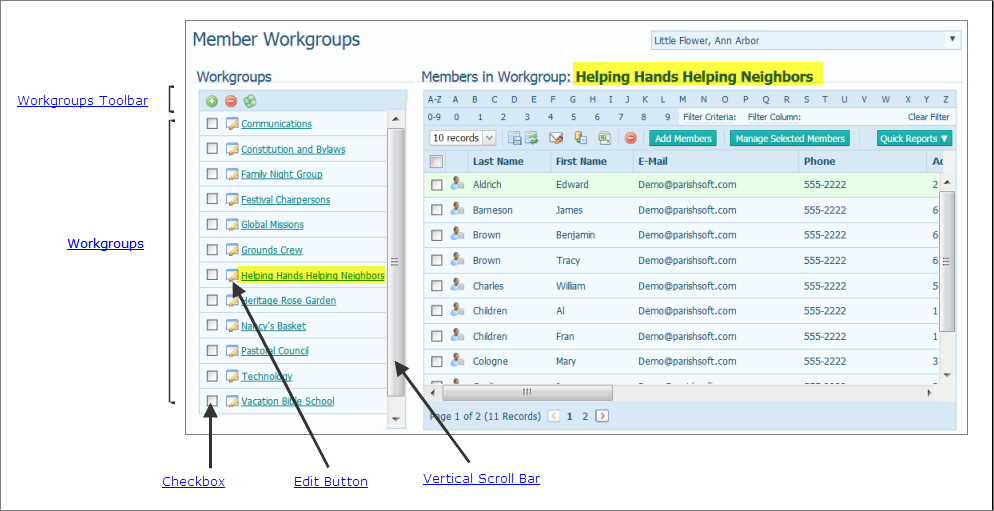
The Workgroups section lists each of the workgroups you create. Toolbar buttons at the top of this section enable you to manage your workgroups. You can add new workgroups and remove workgroups that are no longer active. You can also combine individual workgroups to form a single workgroup.
The following illustration identifies the main elements in the Workgroups section. Place your mouse pointer over a link (without clicking) to view a description of the element. Click the link to jump to detailed information for the element on this page.
Toolbar buttons let you manage your member workgroups:
●  adds a new member workgroup.
●  deletes the selected member workgroup.
●  combines individual workgroups into a single workgroup.
Each workgroup listed in the Workgroups panel has a link. Selecting the link lets you see the names of members who belong to the workgroup. The names are displayed in the Members in Workgroup panel on the right:
 Checkbox
Check inside the box to select the specific workgroup that you want to work with. A checkmark  appears inside the box to indicate the workgroup is selected. To deselect a workgroup, check the box again. The checkmark disappears.
 Edit Button
The Edit button appears to the left of the name of each workgroup. Click this button to open a window where you can change the workgroup name and/or description.
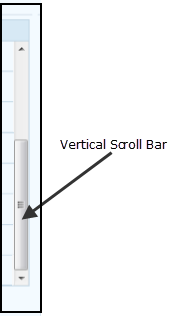
If the Workgroups list is so long that it extends beyond the viewing area, click and drag the vertical scroll bar up or down to quickly scroll through the list.
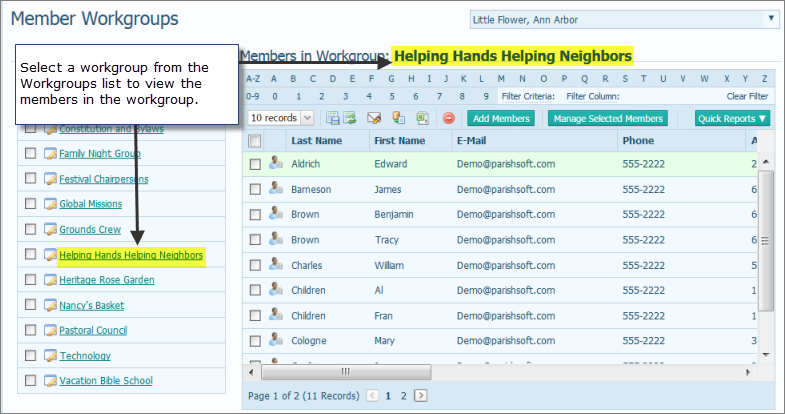
The Members in Workgroup section on the right lists the names of members who belong to the workgroup that is currently selected in the Workgroups section. As shown in the following illustration, the Helping Hands workgroup is selected in the Workgroups section, and the members of this group are shown in the Members in Workgroup section. The following illustration identifies the main elements in the Members in Workgroup section. Place your mouse pointer over a link (without clicking ) to view a description. Click the link to jump to detailed information for the element on this page.
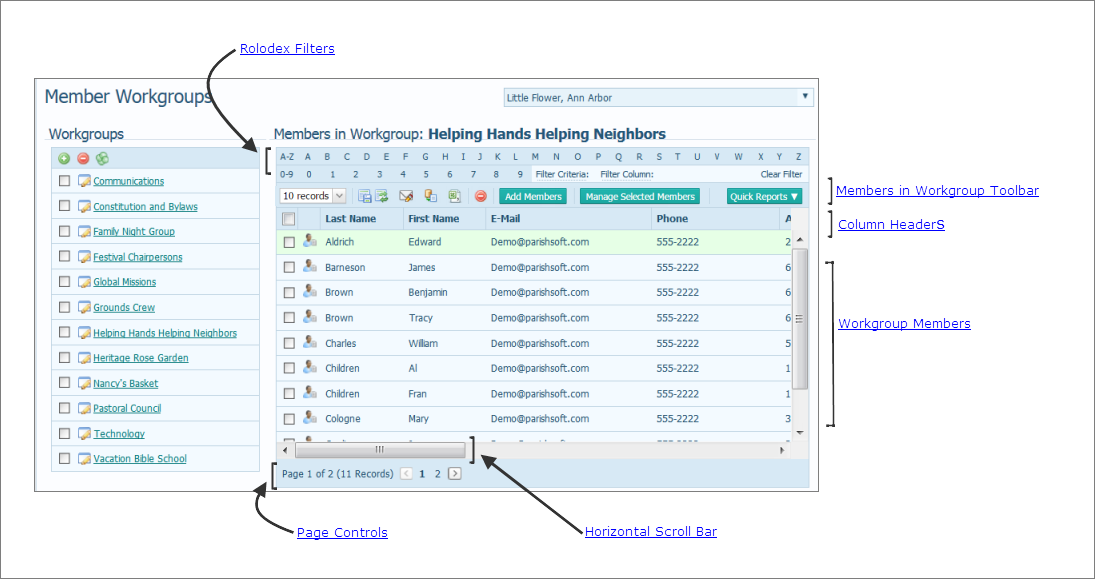
As your list of members within a workgroup grows in size, you will find filtering and sorting helpful for focusing on particular information in the list. The Rolodex filters are a set of alphanumeric filters that are located above the list of members in a selected workgroup. These filters provide a way for you to selectively manage views of members in a workgroup.
When used together with the column sort function, the filters let you drill down and see only those records you want to work with. For example, you can set up the filter to view only those members in the selected workgroup whose last name begins with C, as shown in the following illustration:

For instructions on using the filters, see How to Filter Family List and Member List Records.
You can also sort records on any column in the list (for example, Last Name in ascending order) in a way that makes the information more easily accessible. For instructions column sorting, see Sorting the Display of Records.
The toolbar is located under the row of Rolodex filters. The toolbar contains buttons and menus for performing common tasks associated with Members in Workgroups list functions.

You can change the number records (default = 10) that are displayed on a page. To do this, select the desired option from the # Records menu:
![]() To speed up page loading, select a lower value.
To speed up page loading, select a lower value.

●  permanently saves changes you make to the layout. See How to Customize the Layout of the Family List and Member List Pages.
●  resets the layout to the default configuration.
●  sends email to selected members. See How to Send an Email Message.
●  lets you create personalized hardcopy letters for mass mailings to families and members. See How to Perform a Mail Merge.
● ![]() lets you export the Members in Workgroups list to a spreadsheet or .csv file. For details, go to How to Export a List to a Spreadsheet or .csv File.
lets you export the Members in Workgroups list to a spreadsheet or .csv file. For details, go to How to Export a List to a Spreadsheet or .csv File.
● deletes a selected member from the workgroup.
●  adds a new member to the selected workgroup.
You can quickly create mailing labels and build mailing lists composed of members in your workgroups by selecting the desired option from the Quick Reports menu:

For details, see How to Create Member Workgroup Mailing Labels and How to Create a Member Workgroup Mailing List.
You can customize the layout of the Members in Workgroup list to meet your needs. You can rearrange columns, resize columns, and change the number of records to display per page.
This is a list of all of the members in the selected workgroup. The list shows each member's first and last name, contact information, group membership, and member and organization identification numbers.
You can select one or more members from the list and use the toolbar buttons to perform specific actions. For example, you can select a member and then click to delete him or her from the workgroup.
● To individually select one or more members, check the box to the left of the member's name, as shown in this illustration:

● To select members on all pages in the grid, click (in the header to the left of the Last Name column). A checkmark appears next to all members.
![]() After selecting all members, you can deselect individual members by checking the box next to an individual's name.
After selecting all members, you can deselect individual members by checking the box next to an individual's name.
● To deselect members on all pages in the grid, click (in the header to the left of Last Name column). The checkmark next to each member is removed.
 displays the member record. To view or update the record, see How to View or Update a Member's Record.

Each record occupies a single line in the list. To bring the information that extends beyond the borders of the page into view, click and drag the horizontal scroll bar left or right.
The number of pages in the Members in Workgroup list is displayed in parentheses at the bottom of the page. Select a page to go directly to that page in the list. Alternatively, click  to page back or click
  to page forward.

How to Add and Delete Member Workgroups
How to Add and Delete Members from a Workgroup
How to Edit a Member Workgroup
How to Combine Member Workgroups to Create a Single Workgroup
How to View or Update a Member's Record
How to Create Member Workgroup Mailing Labels
 lets
lets