Lookup Permissions Configuration
Select All and Clear All Buttons
The Lookup Management page provides a central location for organization administrators to manage options that appear in drop-down lists that are used for data entry and reporting in the ParishSOFT Family Directory and Religious Education modules.
The illustration below identifies the main areas on this page. Place your mouse pointer over a link (without clicking) to view a general description of an area. Click the link to jump to the section in this Help topic that provides more detailed information.
![]() The Merge and Configuration sections are visible to diocesan administrators only.
The Merge and Configuration sections are visible to diocesan administrators only.

![]() If you select an organization for which you do not have viewing rights, the command buttons on the page are disabled. See your Organization Administrator for assistance.
If you select an organization for which you do not have viewing rights, the command buttons on the page are disabled. See your Organization Administrator for assistance.
![]() The All Organizations option is visible only to users who have an active assignment to the diocese, access to multiple organizations, and the Diocesan Admin access right enabled in their staff record.
The All Organizations option is visible only to users who have an active assignment to the diocese, access to multiple organizations, and the Diocesan Admin access right enabled in their staff record.
The organization associated with your ParishSOFT login credentials automatically appears in the Organization list, as shown in the upper-right corner.
● If you manage multiple organizations, select the name of the organization whose lookup tables you want to view or update.
● Select the All Organizations option to view values in lookup tables for all organizations you have an active assignment in.
The Tables panel lists all of the lookup tables for which you can create lookup records. The tables are grouped into two categories: Family Directory and in Religious Education. The tables serve as a data source for drop-down lists by the same name in the Family Directory or Religious Education modules. For example, the Education lookup table in the Family Directory group has a corresponding Education drop-down list in the application (in Member Details).
When you select a lookup table from the Tables list, the lookup records currently defined for it are displayed in the grid in the Records Management panel on the right. Each record that you see in the grid represents an option that appears in the same-named dropdown list in the associated application. Users can select the options when doing data entry. For a more in-depth look at the relationship between lookup table records and dropdown list options, go to About_Drop-down_Lists.
The table below lists and describes the lookup tables in the Family Directory group.
|
Table Name |
Description |
|
Career Types |
Jobs, careers, and occupations held by members. Assigned in Member Details. Examples: accountant, teacher, photographer. |
|
Celebrants |
Specific names of individuals who officiate at a religious ceremony, such as a wedding or baptism. Assigned in Member Details. Examples: Deacon Lawrence Adams and Reverend Father Buckley. |
|
Ethnic Background |
Race, nationality, and ethnic group affiliations. Assigned in Member Details. Examples: American Indian, African American, Cambodian. |
|
Faith of Baptism |
Religious denominations in which members are baptized. Used in the baptismal record. Examples: Catholic, Lutheran, Orthodox Christian. |
|
Family Group |
Family-based memberships and affiliations. Assigned in Family Details. Examples: Catechist, Finance, Military, Visitor. |
|
Language |
Native languages. Assigned in Member Details. Examples: Spanish, Korean, Hungarian. |
|
Member Education Level |
Education levels of school attained and degrees completed. Assigned in Member Details. Examples: Grade 1, high school, Bachelors. |
|
Member Strengths |
Special skills, strengths, and talents members possess. Assigned in Member Details. Examples: Analytical, Communication, Leader. |
|
Religion |
Religious denominations. Assigned in Member Details. Examples: Buddhist, Catholic, Orthodox Christian. |
|
School |
Names of schools members attend or graduate from. Assigned in Member Details. Examples: Cardinal Stritch, University of Michigan, Hiawatha. |
|
Solicitation Group |
Categories of giving levels and fundraising channels used in the appeal planning process. Assigned in Family Details. Examples: $100, $1000, $5000, Direct Mail. |
|
Suffix |
Group of letters placed after a member's full name to provide additional information, such as the person's position, education, or generation. Assigned in Member Details. Examples: Jr., M.D., Ph.D. |
|
Title |
Prefix placed before a member's name that is used to formally address the person. Assigned in Member Details. Examples: Judge, Mr., Dr., Professor. |
The table below lists and describes the lookup tables in the Religious Education group.
|
Table Name |
Description |
|
Buildings |
Names of buildings and facilities where classes are held. Examples: Chapel, Church Center, Education Wing. |
|
Rooms |
Names of rooms where classes are held. Examples: 102, Legion Room, Parish Hall. |
|
Departments |
Divisions in the religious education program that provide instruction or spiritual formation to a particular group. Examples: Adult Education, Family Education, Student Education. |
|
Grades |
Grade levels. Examples: Grade 11, 1st Grade, High School, Adult. |
|
Leader Roles |
Leadership positions. Examples: Catechist, Room Parent, Attendance Keeper. |
|
School Type |
Categories into which grade levels are organized. Examples: Elementary, Middle School, High School. |
The Records Management panel appears on the right. The name of the lookup table selected in the Tables panel appears at the top of the panel along with a description of the purpose of the table and the name of the module in which it is used. The grid below shows the lookup records currently defined for the selected table. A number of tools are available to let you manage and organize the records in the grid.
![]() The Merge section is visible to diocesan administrators only.
The Merge section is visible to diocesan administrators only.
This section contains fields used to merge two distinct values in a Family Directory lookup table into one value.
● Permanent Lookup ID field: this field holds the lookup ID of the value to be kept.
● Duplicate Lookup ID field: this field holds the lookup ID value of the value to be merged.
.png) : merges the lookup values entered into the Permanent and Duplicate Lookup ID fields. After the merge, the system updates all related records in the application accordingly.
: merges the lookup values entered into the Permanent and Duplicate Lookup ID fields. After the merge, the system updates all related records in the application accordingly.
For instructions on merging lookup values, go to How to Merge Values In Family Directory Lookup Tables.
![]() The Configuration section is visible to diocesan administrators only.
The Configuration section is visible to diocesan administrators only.
This section contains two features used to configure permissions to organizations to modify values in Family Directory lookup tables:
● Bulk Manage Lookup Permissions link: enables the diocesan administrator to enable/disable permission in bulk to multiple Family Directory tables.
● Allow all Parishes to Add, Edit, or Merge checkbox: allows the diocesan administrator to enable/disable permissions on a table by table basis. This checkbox appears above each table's grid.
By default, all organizations in the diocese are allowed to modify values in each Family Directory lookup table. The change the default for one or more tables, go to How to Change Default Lookup Table Permissions.
The toolbar is located at the top of the Records Management panel. As shown in the illustration below, the toolbar contains menus and buttons you can use to manage records in the grid.

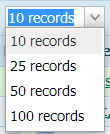
This menu lets you specify the number of records (default = 10) that are displayed per page in the grid. You can change this number by selecting a records option from the menu:
![]() To speed page loading, select a lower value.
To speed page loading, select a lower value.
 Move Records Buttons
 Use the Move buttons to change the order in which the lookup records are listed in the grid. To reorder the records, first select (check the box) the record or records you want to move. Then, click one of these buttons:
 Moves selected records to top of the list (to the first position).
 Moves the selected records up the list one row at a time.
 Moves the selected records down the list one row at a time.
 Moves selected records to the bottom of the list (to the last position).
After you reorganize the list, you can permanently save the new order by clicking  .
.
 Add New Lookup Record Button
![]() Your ability to add new lookup values to a Family Directory lookup table is controlled by the diocese. If a table is locked, a message is displayed to inform you that the table cannot be modified. In the table, you can see lookup values owned by your organization and the diocese, but the Add button is not available.
Your ability to add new lookup values to a Family Directory lookup table is controlled by the diocese. If a table is locked, a message is displayed to inform you that the table cannot be modified. In the table, you can see lookup values owned by your organization and the diocese, but the Add button is not available.
Lets you add a new record to the table selected in the Tables panel. After you save the record, the grid updates to show the newly added record. The corresponding dropdown list (in the application) is also updated to include the newly added record as a selectable option. For instructions on adding new records, go to Adding_a_New_Record_to_a_Family_Directory_Lookup_Table.
Use the Sort buttons to put the records in logical order:
 Sorts records in alphabetic order on the text in the Description column. Click once to sort in one direction (for example, from A to Z). Click again to sort in the reverse order (for example, from Z to A).
 Sorts records in numeric order on values in the Lookup ID column. Click once to sort in one direction (for example, from highest to lowest). Click again to sort in the reverse order (for example, from lowest to highest).
To permanently save the order, click  . For details, go to Save_List_Order_Button.
Save List Order Button![]() This button displays in the toolbar only after you change the order of records in the grid. See Sort buttons for ways to sort the grid.
This button displays in the toolbar only after you change the order of records in the grid. See Sort buttons for ways to sort the grid.
After you rearrange records in the grid (by using the Sort or Move buttons), you can save the new order by clicking . The order remains the same until you change and re-save it.
If you work with one item more than others, clicking puts that item at the top of the list not only in the Lookup Management list but also in all of the lookup lists throughout the application that contain that item.
A situation in which you might use this feature is when you are scheduling of classes in a particular building. You could use the Move buttons move the building record to the top of the Buildings list and then save the list order. All of the Buildings dropdown lists in the application will now show the building you moved to the top of the list as the default choice. To make a different record the default choice, simply move it to the top of the list and re-save your list order.
 Export Button
![]() This toolbar button is available to diocesan administrators only.
This toolbar button is available to diocesan administrators only.
Click to export lookup records from a table's grid to a CSV file. For instructions, go to How to Export Family Directory Lookup Records to a CSV File.
 selects all records in the grid, placing a check mark next to each record to indicate that it is selected. Use this button when you want to apply the same change to multiple records.
If you want to work with most records but not all, one method you can use is to click  to select all records, and then individually uncheck ( deselect) those you do not want to apply the change to.
![]() deselects all selected records in the list. The system removes the check mark from each box indicate that it is no longer selected.
deselects all selected records in the list. The system removes the check mark from each box indicate that it is no longer selected.
The column headers identify the following information for each record in the grid:
● # in use: number of times the lookup value is used in your records. Click # to see the actual count for a given lookup value.
● Creator Organization: name of the organization that created and, therefore, owns the lookup value.
● Organization ID: ID of the organization that created the lookup value.
● Lookup ID: unique number assigned by the system that identifies the lookup value. This ID is used when merging looking values (for details, go to How to Merge Values In Family Directory Lookup Tables).
If a table has a lot of records, you can use any of the column search fields (see illustration below) to locate the record you are looking for.
In the Search field, type one or more of the beginning letters in the record's name. The grid updates automatically and displays records matching your search criteria. For example:
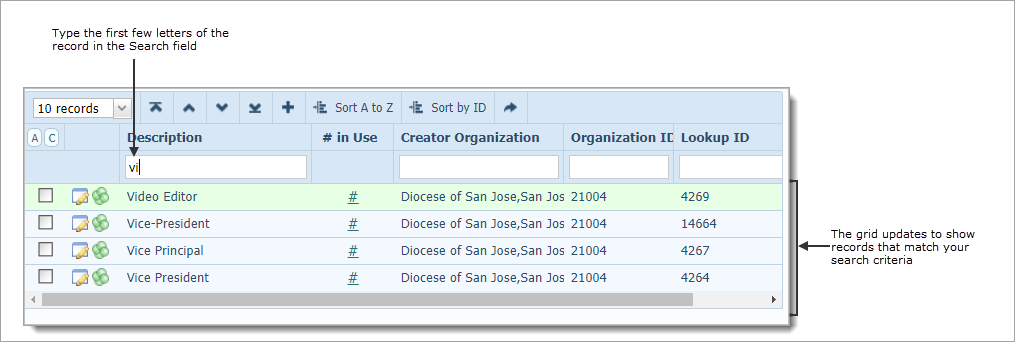
To re-display the entire list of records, clear the filter by first selecting your filter criteria and then pressing the Delete key. You can then press Enter or wait a moment until the list updates and re-displays all of the records in the selected table.
The records grid shows you all of the records currently defined for the lookup table selected in the Tables panel. Use the command buttons to manage the records in this grid.
 : the checkbox controls enables you to select the record you want to work with. For example, if you want to move a record to a different location in the grid, select the checkbox first and then use the desired Move button.
These command buttons let you perform operations on records in the grid:
![]() Your ability to edit and merge lookup records in a Family Directory lookup table is controlled by the diocese. If a table is locked, a message is displayed to inform you that changes and additions to the table cannot be made. If a table is not locked, you can edit and merge records owned by your organization, but you cannot edit and merge records owned by the diocese.
Your ability to edit and merge lookup records in a Family Directory lookup table is controlled by the diocese. If a table is locked, a message is displayed to inform you that changes and additions to the table cannot be made. If a table is not locked, you can edit and merge records owned by your organization, but you cannot edit and merge records owned by the diocese.
![]() (Edit): if activated, lets you change the description (name) of the record.
(Edit): if activated, lets you change the description (name) of the record.
 (Merge): if activated, lets you merge two records. The record you select to "merge with" remains in the grid. For details, go to How to Merge Values In Family Directory Lookup Tables.
Each record in the grid occupies a single line. To bring the information that extends beyond the borders of the grid into view, click and drag the horizontal scroll bar at the bottom of the list left or right.

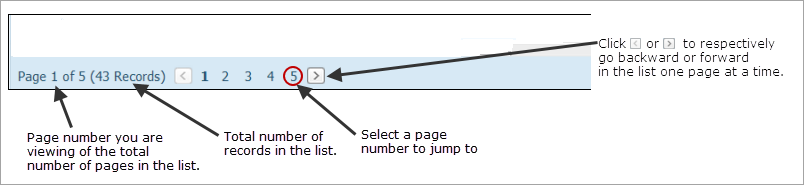
The number of pages in the list is displayed at the bottom of the page. Select a page to go directly to that page in the list. Alternatively, click  to page back or click
  to page forward through the list.
Understanding Lookup Management
How to Manage Records in Family Directory Lookup Tables
How to Merge Values In Family Directory Lookup Tables
How to Export Family Directory Lookup Records to a CSV File
How to Change Default Lookup Table Permissions
Understanding Lookup Management
How to Manage Records in the Buildings Lookup Table
How to Manage Records in the Rooms Lookup Table
How to Manage Records in the Departments Lookup Table
How to Manage Records in the Grades Lookup Table
How to Manage Records in the Leader Roles Lookup Table
How to Manage Records in the School Types Lookup Table