The Classes pages provides a central location for you manage the classes in your program. On this page, you can perform a variety of management tasks, including:
● Adding a new class to a term.
● Editing the details for a class.
● Removing a class from a term.
● Adding students and adding leaders to a class.
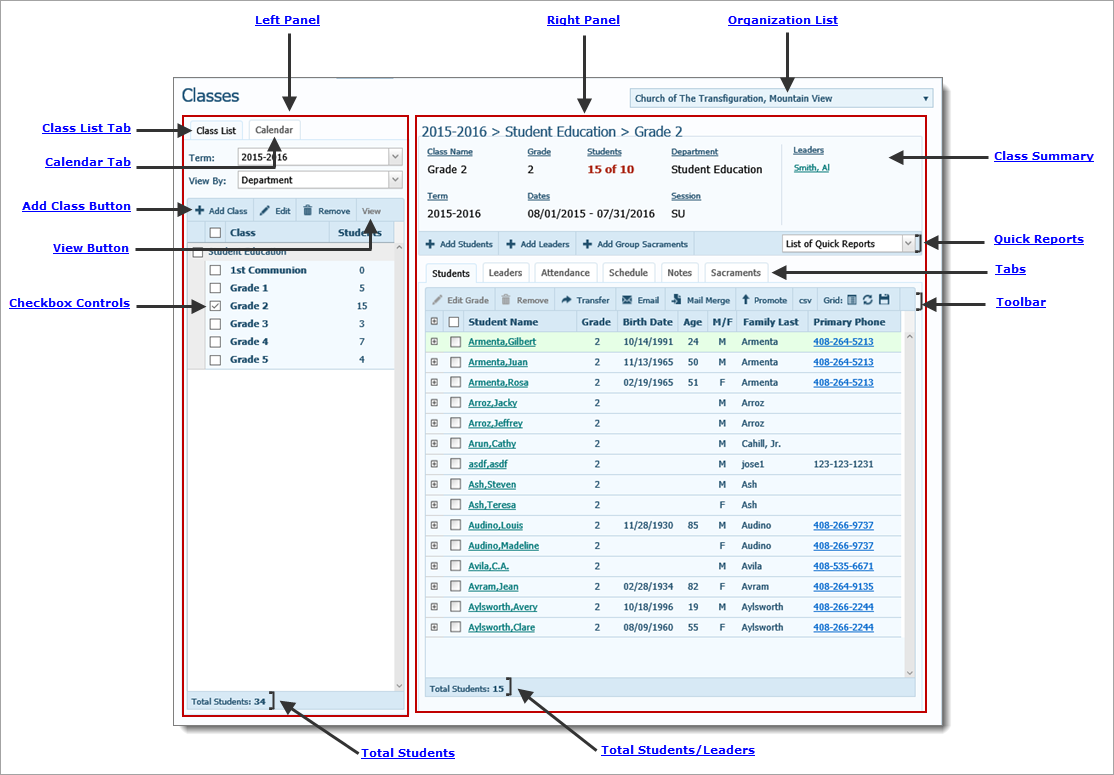
The illustration below identifies the main features of the Classes page. Place your mouse pointer over a hyperlink (without clicking) to view a general description of an item. Click the hyperlink to jump to the section on this page that gives you more detailed information.

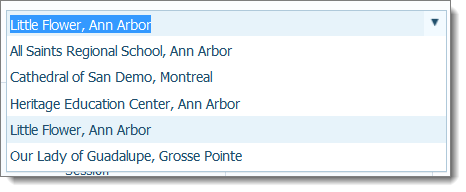
The organization associated with your ParishSOFT login credentials appears by default in the Organization list, which is located in the upper-right corner of the page.

If you manage multiple organizations, select the organization whose records you want to work with from the list. Or, select All Organizations to view records for all of the organizations you manage.
![]() If you return to the Classes page from another page in the application, be sure to check which organization is showing in the list. The organization defaults to the one you selected when you last displayed the Classes page.
If you return to the Classes page from another page in the application, be sure to check which organization is showing in the list. The organization defaults to the one you selected when you last displayed the Classes page.
The left panel lets you view and manage classes in the selected term. This panel has two tabs: Class List and Calendar.
The Class List tab shows all of the classes in the selected term. Filter controls at the top of the tab enable you to select the term you want to work with and select how you want to view classes in the list. Button controls allow you to add, edit, and remove classes.
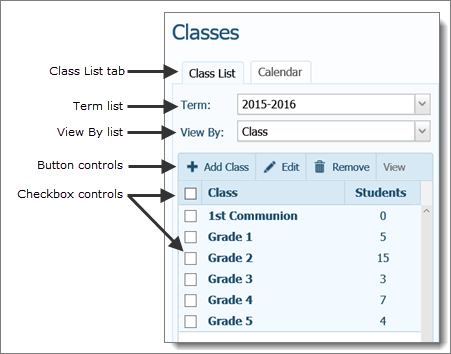
Contains a list of terms created for your program. By default, the last term you selected is displayed on this page and on all other pages that contain a Term list (for example, on the Student Directory and Leaders pages). To display a different term's data, select the term from the list. The selected term becomes the new default selection.

The View By list contains options that let you change the way in which you view the list of classes on the Class List tab.

You can select one of five viewing options:
● Class: displays a list of classes along with the number of students currently enrolled in each.
● Grade: displays a list of the grades in your Religious Education program. Click  next to a grade level to open the group and view the classes within the group along with the number of students enrolled in each class. Select a class to view a list of students enrolled in the class.
● Department: displays a list of the departments in your Religious Education program. Click  next to a department name to open the group and view the classes within that department along with the number of students enrolled in each class. Select a class to view a list of students enrolled in the class.
● Session: displays a list of the sessions in the selected term. Click  next to a session to open the group and view the classes held during that session along with the number of students enrolled in each class. Select a class to view a list of students enrolled in the class.
The following illustration shows you an example of the results displayed when you select the View By > Session option. Note how clicking  next to the name of a session expands the list to show the classes held in the session. Clicking
  closes the group.

● Day of Week: displays a list of days of the week on which classes are held. Click  next to a day of the week to open the group and view the classes held on that day. Select a class to view a list of students enrolled in the class.
 : click to add a class to the selected term.
 : click to edit details for the class selected on the Class List tab.
 : click to remove the class selected from the term.
 : you must click this button if you select multiple classes from the list. For instructions on creating a combined student list, go to How to View a List of Enrolled Students. For instructions on creating a combined leader list, go to How to View a List of Leaders Assigned to a Class.
A checkbox control appears to the left of the Class header. Select this checkbox to select all of the classes in the list. A checkbox control also appears to the left of each class. Use this checkbox to select an individual class. You can select a single or multiple classes in the list.
● If you select a single class, an alphabetical listing of students in the selected class is displayed in the grid on the Students tab in the right panel. An alphabetical listing of leaders for the selected class is also displayed in the grid on the Leaders tab.
● If you select multiple classes, you must click  . A combined list of students in the selected classes in the grid is then displayed on the Students tab, and a combined list of leaders is displayed in the grid on the Leaders tab. A combined list serves as a data source for operations associated with any of the grid’s active buttons. For example, clicking
  exports a combined list to .csv file. Clicking
  generates a list of email recipients.
Shows the total number of students enrolled in all classes in the selected term.
The Calendar tab provides a calendar that enables you to quickly view dates and events. You can use the calendar when planning and scheduling classes in a term.
![]() When you click the Calendar tab, the displayed calendar defaults to the current month and year. The highlighted date is today's date.
When you click the Calendar tab, the displayed calendar defaults to the current month and year. The highlighted date is today's date.
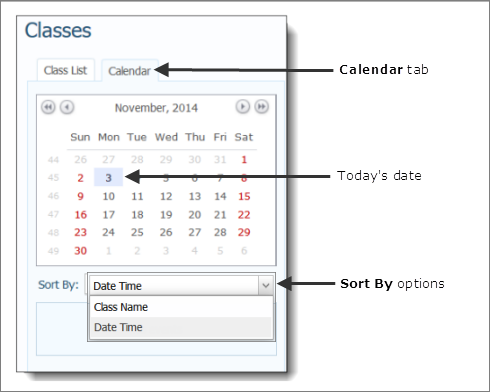
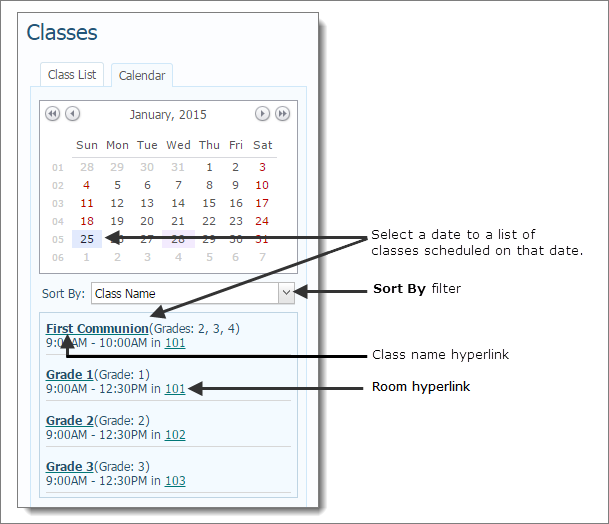
Selecting a date on a calendar enables you to view the classes scheduled that date. Navigation controls at the top of the calendar let you navigate to any date in any year. Filter controls under the calendar let you change the way you view information.
The Calendar tab lets you select a date on a calendar and view the classes or events scheduled on that date. Navigation controls at the top of the calendar let you navigate to any date in any year.
 Go back a year at a time.
 Go back a month at a time.
 Go forward a month at a time.
 Go forward a year at a time.
Clicking a date on the calendar lets you see whether any classes are scheduled on that date. The classes are listed at the bottom of the Calendar tab. For the classes listed, these additional controls are available:
● Sort By filter: enables you to view the list of classes by class name or date and time.
● Class name link: clicking the class name hyperlink lets you see the names of students enrolled in the class.
● Room link: clicking the room hyperlink opens the room calendar where you can see the dates and times (in calendar format) that the class is scheduled in the building and room.
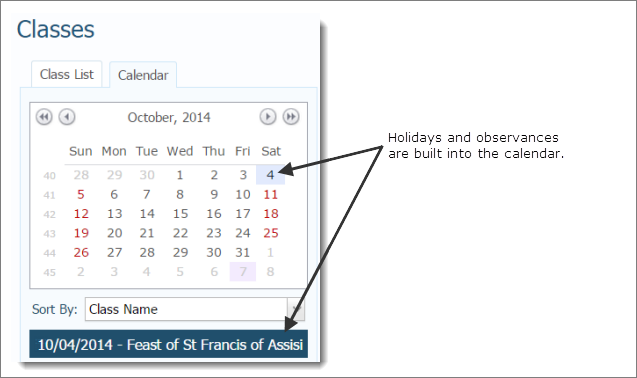
Holidays and special events are built into the calendar. If you select a date that a holiday falls on, the name of the holiday is displayed at the bottom of the tab:
The right panel provides information about the class selected from the list in the left panel.
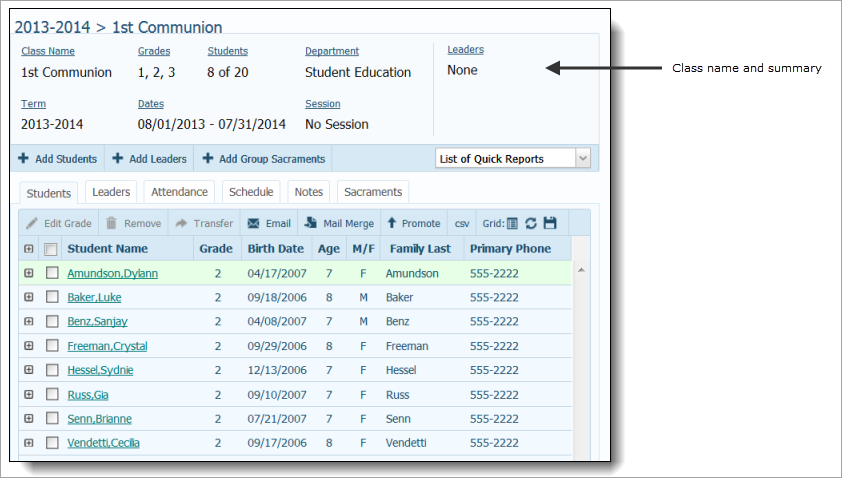
Selecting a class from the list in the left panel displays a summary in the top portion of the right panel. The summary includes census data for the class so you can obtain at-a-glance information on the number of currently enrolled students, the names of individuals assigned as leaders, term dates, and the name of the session the class is in.
 lets you add students to a class.
 lets you add leaders to a class.
 opens the Group Sacrament Entry page in Family Directory where you can add sacrament records for a group of students that share the same sacrament information.
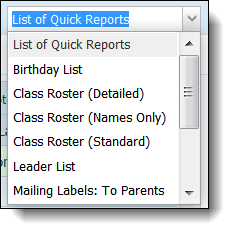
The List of Quick Reports contains pre-defined reports that you can quickly generate for the class you are currently viewing. Click  to open the list and select the desired report:
![]() Your diocese has the ability to hide and show sacrament data. If you diocese chooses to hide all sacrament data, the Sacraments List report is not available for you to select. If your diocese chooses to hide a specific sacrament's data, that sacrament's data does not appear in the report.
Your diocese has the ability to hide and show sacrament data. If you diocese chooses to hide all sacrament data, the Sacraments List report is not available for you to select. If your diocese chooses to hide a specific sacrament's data, that sacrament's data does not appear in the report.
A toolbar appears at the top of the Students and Leaders tabs. The features and functions on the toolbar vary depending on the tab you are viewing.
Five main tabs are aligned across the lower portion of the right panel. Each tab represents a specific type of class-related information that you can quickly access by clicking the tab.
The grid on the Students tab shows the names of students currently enrolled in the class that is selected in the left panel.
● Name link: click the link under the student's name to open the student's Member Details record.
●  (More): click this button to the left of a student's name to expand the entry and view personal information, including the student's email address and phone number, home address, and emergency contact number.
●  (Less): click this button to the left of a student's name to close the entry and hide the student's personal information.

The Students toolbar contains these buttons:
 changes the selected student's grade level.
 removes students from the selected class.
 transfers the selected student to a different class.
 sends email to selected students. For instructions, go to How to Send an Email Message.
 lets you send personalized hardcopy letters for mass mailings to all students or to a select group of students. For instructions, go to How to Perform a Mail Merge.
 promotes selected students to the next class level.
 exports the student list to a spreadsheet or csv (comma-separated values) file. For instructions, go to How to Export a List to a Spreadsheet or .csv File.
The grid on the Students tab has flexible and responsive columns that you can change as needed to suit your preference for viewing information. The columns have these features:
● Sortable: click a column header to sort entries in the grid based on the information in the column. For details, go to Sorting_the_Display_of_Records.
● Resizable: grab the border between two columns to increase or decrease the width of one of them. For details, see Changing_Column_Widths.
● Moveable: drag and drop columns in the grid to suit your preference for viewing information. For details, see Changing_Column_Widths and Rearranging_the_Columns.
If desired, click ![]() to permanently save your layout changes or
to permanently save your layout changes or  to reset the grid back to the defaults.
 lets you choose which columns of information to display in the grid.
 resets grid layout back to the default settings.
![]() permanently saves your changes to the layout of the grid.
permanently saves your changes to the layout of the grid.
The Leaders tab shows you the names of leaders currently assigned to class selected in the left panel.
● Name link: click the link under the leader's name to open the leader's Member Details record.
●  (More): click this button to the left of a leader's name to expand the entry and view personal information, including the leader's email address and phone number, home address, and emergency contact number.
●  (Less): click this button to the left of a leader's name to close the entry and hide the leader's personal information.

The Leaders toolbar contains these buttons:
 edits the selected leader's role.
 removes a leader from the selected class.
 transfers a leader from the selected class.
 sends email to selected leaders. For instructions, go to How to Send an Email Message.
 lets you send personalized hardcopy letters for mass mailings to leaders. For instructions, go to How to Perform a Mail Merge.
 exports the currently displayed leader list to a spreadsheet or csv (comma-separated values) file. For instructions, go to How to Export a List to a Spreadsheet or .csv File.
The grid on the Leaders tab has flexible and responsive columns that you can change as needed to suit your preference for viewing information. The columns have these features:
● Sortable: click a column header to sort entries in the grid based on the information in the column. For details, go to Sorting_the_Display_of_Records.
● Resizable: grab the border between two columns to increase or decrease the width of one of them. For details, see Changing_Column_Widths.
● Moveable: drag and drop columns in the grid to suit your preference for viewing information. For details, see Changing_Column_Widths and Rearranging_the_Columns.
If desired, click ![]() to permanently save your layout changes or
to permanently save your layout changes or  to reset the grid back to the defaults.
 lets you choose which columns of information to display in the grid.
 resets grid layout back to the default settings.
![]() permanently saves your changes to the layout of the grid.
permanently saves your changes to the layout of the grid.
Shows the total number of leaders assigned to the selected class.
The Attendance tab has two sub-tabs: Records and View by Student.
● On the Records tab, you can view overall attendance statistics for the class by date and you can record attendance for the selected class.
![]() You must have a schedule created for the class to keep attendance records.
You must have a schedule created for the class to keep attendance records.
If a class note was created for the class, this icon appears in the Notes column: ![]() . Click
. Click ![]() to view the text of the note.
to view the text of the note.
![]() For instructions on creating a class note, go to How to Make and Save Notes About a Class.
For instructions on creating a class note, go to How to Make and Save Notes About a Class.
● On the View by Student tab, you can select a student in the class to view the student's complete attendance record.
This tab lets you add a schedule for a class or manage the schedule for an existing class. If a schedule exists for the class, it is appears at the bottom of the tab.
This tab provides an area where you can add, save, and print class-related notes. If a class note is create for the class, this icon appears in the Notes column on the Records subtab: ![]() . Click
. Click ![]() to view the text of the note.
to view the text of the note.
This tab lets you view sacraments information for students in the selected class.
How to View Names of Students Enrolled in a Class
How to Remove a Student from a Class
How to Add Students to a Class
How to Promote a Student to the Next Class (from the Classes Page)
How to Customize a Grid Layout
How to Export a List to a Spreadsheet or .csv File
How to View a Student's Sacrament Information
How to View Attendance Records
How to Make and Save Notes About a Class